
Finding the right umbrella lighting kit can significantly elevate the quality of my photography. With the right lighting, I can achieve the soft, diffused look that enhances portraits and product shots alike. As I searched for options, I considered factors like versatility, ease of transport, and overall quality, which are essential for both amateur and professional photographers.
In this guide, I’ll explore some of the top umbrella lighting kits available. From all-in-one solutions that include backdrops to kits designed for portability, I’ll help you find the best option to suit your needs, ensuring you can create stunning visuals in any setting.
Top Picks


Key Takeaways
Here are the main points to consider when selecting an umbrella lighting kit:
- Versatility is key; look for kits that include different lighting options.
- Consider the portability of the kit, especially if I travel frequently for shoots.
- Energy-efficient bulbs can save on electricity costs while providing bright lighting.
- Adjustable stands and backdrops enhance my shooting options.
- A durable carrying case or storage solution makes transport easier.
How to Choose Best umbrella lighting kit
When selecting an umbrella lighting kit, there are numerous factors to consider to ensure I get the best fit for my photography needs. The following sections outline essential criteria to keep in mind.
9 Best umbrella lighting kit
LINCO Lincostore Photo Video Studio Kit
Pros
Cons
Overview
The LINCO Lincostore Photo Video Studio Light Kit is a versatile solution for photographers.
It includes softboxes, umbrellas, and three backdrops, providing everything I need for professional-quality lighting in my projects.
Key Features of the LINCO Light Kit
Practical considerations
While this kit is comprehensive, it’s important to consider your space and the time needed for setup.
The adjustable backdrop stands require careful assembly, and the lighting may need fine-tuning based on your shooting environment.
Real-world insight
In my experience, having a variety of backdrops really enhances my creative options.
The flexibility to switch between different setups has allowed me to produce more engaging content for my photography and video projects.
Professional Photography Lighting Kit with Backdrops
Pros
Cons
Overview
This NEEWER Photography Lighting Kit is perfect for anyone looking to enhance their photo and video shoots.
It includes durable light stands, softboxes, and backdrops to provide versatile lighting solutions.
Key Features of the NEEWER Photography Lighting Kit
Practical considerations
While this kit is excellent for professional photography, it may not be suitable for those with limited space or who prefer a more portable solution.
The setup process can be a bit intricate, requiring some patience to master.
Real-world insight
From my experience, having a kit like this has greatly improved the quality of my photos and videos.
The ability to customize lighting effectively can make a significant difference, especially in achieving that perfect shot.
Kshioe Portable Photo Lighting Kit
Pros
Cons
Overview
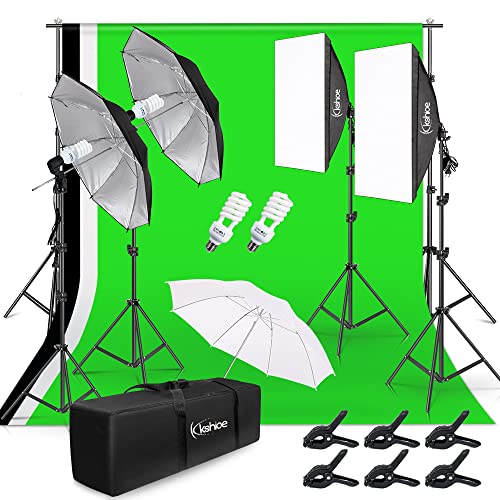
The Kshioe Photo Lighting Kit is an ideal solution for photographers seeking versatility and ease of use.
With its portable softbox and adjustable backdrop stand, I can achieve professional-looking results effortlessly.
Key Features of the Kshioe Photo Lighting Kit
Practical considerations
While the Kshioe kit is fantastic for smaller studio setups, those with larger space requirements may find the backdrop sizes limiting.
It’s essential to consider your shooting environment before purchasing.
Real-world insight
In my experience, having a versatile and portable lighting kit like this one has significantly improved my photography.
It allows me to adapt quickly to different shooting scenarios, which is invaluable when I’m on the move.
Complete Umbrella Photography Lighting Kit
Pros
Cons
Overview
The EMART Umbrella Photography Lighting Kit includes energy-saving bulbs and durable light holders, perfect for achieving soft, continuous lighting in portrait photography or video recordings.
It’s an all-in-one solution for my studio needs.
Key Features of the EMART Umbrella Lighting Kit
Practical considerations
While this lighting kit is excellent for indoor studio use, I should consider my space limitations and ensure I have enough room to set up the lights effectively.
It’s perfect for those looking to improve their photography or video quality without breaking the bank.
Real-world insight
In my experience, having soft lighting can significantly enhance the quality of my photos and videos.
This kit provides the tools I need to create a professional look, making it a valuable addition to my equipment collection.
Professional Photography Backdrop Support System
Pros
Cons
Overview
The EMART 8.5 x 10 ft Backdrop Support System is perfect for both home and professional use.
This comprehensive photography lighting kit includes a powerful 50W LED bulb, reflective materials, and a versatile backdrop set for various shooting needs.
Key Features of the EMART Backdrop Support System
Practical considerations
While this kit is versatile, it may be best suited for those with some experience in photography, as setting up the backdrop and lighting effectively can take time and practice.
Real-world insight
In my experience, having a comprehensive kit like this has greatly simplified my shoots, allowing me to focus on creativity rather than logistics.
The adjustable height and quality lighting make a noticeable difference in the final product.
EMART Professional Photography Lighting Kit
Pros
Cons
Overview
The EMART Photography Umbrella Lighting Kit includes everything I need for professional-quality lighting.
With energy-saving bulbs and adjustable stands, it’s perfect for both amateur and experienced photographers alike.
Key Features of the EMART Photography Umbrella Lighting Kit
Practical considerations
While this kit is excellent for smaller studios and home setups, those with larger spaces might require additional lighting to achieve the desired effect.
It’s essential to consider your specific needs before purchasing.
Real-world insight
In my experience, this lighting kit offers a great balance between quality and affordability.
It’s perfect for quick setups and provides enough versatility to accommodate different shooting scenarios.
EMART 2Pack 135W Dimmable Photography Bulbs
Pros
Cons
Overview
The EMART 2Pack 135W Photography Light Bulb offers impressive brightness and versatility with adjustable color temperatures from 3000K to 6500K.
Its remote control feature enhances convenience, making it perfect for both professional and amateur photographers.
Key Features of the EMART 135W Photography Light Bulb
Practical considerations
While the EMART bulbs are powerful and versatile, they may be more suited for dedicated photography studios rather than casual setups due to their brightness capabilities and professional features.
Real-world insight
In my experience, the remote control feature is a game-changer when I’m shooting alone.
It allows me to tweak the light settings without having to run back and forth, saving time and making the process much smoother.
Complete Photography Lighting Kit for Studios
Pros
Cons
Overview
The RALENO Photography Lighting Kit includes everything I need for professional-quality photos.
With adjustable stands and durable, energy-efficient LED bulbs, this kit is perfect for any photography project.
Key Features of the RALENO Photography Lighting Kit
Practical considerations
While this kit is perfect for most photography needs, those with larger studio spaces might find it necessary to supplement the lighting or backdrop options for expansive shoots.
Real-world insight
In my experience, having a reliable lighting kit like the RALENO not only enhances the quality of my photos but also boosts my confidence during shoots, knowing I have the right tools to achieve professional results.
SLOW DOLPHIN Photography Background Stand Kit
Pros
Cons
Overview
The SLOW DOLPHIN Photography Lighting Kit is a comprehensive solution for studio lighting.
With adjustable stands, a durable muslin backdrop, and powerful LED bulbs, it’s perfect for capturing stunning portraits and videos.
Key Features of the SLOW DOLPHIN Lighting Kit
Practical considerations
This kit is ideal for photographers seeking a comprehensive lighting solution, but those new to studio setups may need some practice to efficiently assemble and adjust the equipment.
Real-world insight
As I explored using this kit in various settings, I found that the lightweight design made it easy to transport to different locations, allowing for spontaneous outdoor shoots without compromising on lighting quality.
Key Features to Look For
To ensure I choose the right umbrella lighting kit, here are key features to look for:
Light Type
Choose between LED and traditional bulbs based on my lighting needs.
- LED for energy efficiency.
- Incandescent for warmth.
Stand Stability
Look for sturdy stands that can support the weight of the lights without tipping.
- Wide base for stability.
- Adjustable height for versatility.
Portability Features
Consider kits that are easy to transport, especially if I travel for shoots.
- Carrying case included.
- Lightweight materials.
Light Diffusion
Effective diffusion is essential for soft lighting.
- Umbrellas and softboxes are preferred.
- Consider multiple diffusion options.
Compatibility
Ensure that the kit is compatible with my camera equipment and setup.
- Check for mounting options.
- Ensure stands fit my needs.
Warranty or Guarantee
A good warranty indicates a manufacturer’s confidence in their product.
- Look for at least a one-year warranty.
- Consider brands with customer service support.
Quick Comparison
A quick side-by-side comparison helps show where each option fits before the detailed reviews.
| Product | Quick take | Why we picked it |
|---|---|---|
| LINCO Lincostore Photo Video Studio Kit | The LINCO Lincostore Photo Video Studio Light Kit is a versatile solution for photographers | Includes multiple lighting options to suit different photography styles.; Comes with three versatile backdrops for varied creative needs |
| Professional Photography Lighting Kit with Backdrops | This NEEWER Photography Lighting Kit is perfect for anyone looking to enhance their photo | Includes a variety of backdrops for versatile shooting options.; Stable light stands that are easy to adjust fo |
| Kshioe Portable Photo Lighting Kit | The Kshioe Photo Lighting Kit is an ideal solution for photographers seeking versatility and | Lightweight and easy to assemble, perfect for beginners.; Includes a variety of lighting options to suit different needs |
How We Chose These Products
To curate the best umbrella lighting kits for this guide, I considered several important criteria. Each product was evaluated based on its features, user reviews, and overall value.
User Reviews
I analyzed customer feedback to gauge real-world performance and satisfaction.
Brand Reputation
Trustworthy brands known for quality and durability were prioritized.
Feature Set
I looked for kits offering essential features that meet various photography needs.
Budget Range
Products were selected across different price points to cater to a wide audience.
Versatility
Kits that offer a range of lighting options and include accessories for different scenarios were favored.
FAQs
Final Thoughts
The LINCO Lincostore Photo Video Studio Kit is the best overall option for its versatility and included accessories. For premium performance, the Neewer kit offers robust features suitable for serious photographers. If I am on a budget, the Kshioe Portable Photo Lighting Kit provides excellent value without compromising quality.
Overall, the LINCO Lincostore kit stands out as the best choice for my photography needs, combining quality and versatility. However, if I require something more specialized, the Neewer kit may serve me better.


