Recommendation: Travel with a compact personal item that fits under the seat – maximum external dimensions 18 x 14 x 8 inches (45 x 35 x 20 cm). Items exceeding that size must be purchased as a cabin carry-on (maximum 22 x 18 x 10 inches / 56 x 46 x 25 cm) or checked at the ticket counter.
Fees and purchase timing: Personal items are complimentary. Cabin carry-on and checked-bag fees depend on purchase timing: typical ranges are $30–$60 when added during initial booking, $40–$80 during online check-in, and $60–$100 at the airport/gate. Paying for baggage before arrival almost always reduces cost compared with gate rates.
Gate handling and enforcement: If a personal item does not fit under the seat, gate agents will require payment for a cabin bag or gate-check it. Gate-checked pieces are routed to baggage claim and may incur the higher gate-check fee; fragile electronics should be carried in the personal item to avoid damage.

Security and packing tips: Keep liquids in travel-size containers (≤100 ml/3.4 oz) in a clear quart (or 1 L) bag and have electronics accessible for screening. Store medications and travel documents in the personal item. Measure and weigh any bag at home – a soft-sided daypack with dimensions under the free limit and a distinct tag reduces the chance of gate fees.
Daypack rules for the ultra-low-cost carrier
Use a compact personal item that fits under the seat: maximum 18 x 14 x 8 in (45 x 35 x 20 cm). Items within this envelope travel free; anything larger requires a purchased overhead allowance.
Overhead-cabin allowance maximum: 22 x 18 x 10 in (56 x 46 x 25 cm). Buy the overhead option during booking or via the carrier app–online rates commonly run $30–$65, while gate purchases often exceed $60–$100.
Oversized pieces presented at gate will be checked and assessed checked-bag charges; checked-size limit is 62 linear inches (158 cm). Measure length + width + height before arrival to avoid surprises at the gate.
Practical steps: measure the item at home with a tape, compress soft-sided loads, place electronics inside the personal item, wear bulky clothing on board to save space, and prepay any baggage through the reservation system to secure lower fees.
Estimate add-on costs with tools such as best umbrella company calculator and confirm the carrier’s current baggage policy in the official app before travel.
Personal-item status and precise size limits
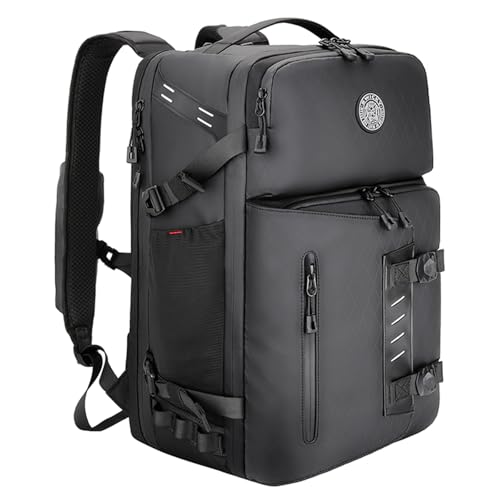
Yes – a small daypack or rucksack counts as a free personal item if it measures no more than 18 x 14 x 8 inches (45 x 35 x 20 cm), measured inclusive of handles, straps and wheels.
Measure height (top to bottom), width (side to side) and depth (front to back); include any external pockets, protruding zipper pulls or rolled items that increase bulk. Use a measuring tape with the item packed as intended for travel.
Item must fit underneath the seat in front. Items exceeding the personal-item limit will be treated as a carry-on (maximum 22 x 18 x 10 inches / 56 x 46 x 25 cm) or gate-checked at boarding; gate staff commonly use a sizer during boarding to verify dimensions.
Acceptable examples: slim laptop bag, compact tote, soft-sided daypack or camera bag that stays within the 18 x 14 x 8 limit. Bulky hiking packs, large duffels and framed packs usually exceed the allowance.
Practical tips: measure the item while packed with typical contents; prefer soft-sided designs that compress; relocate bulky items (boots, jackets, toiletries) to checked luggage if available; consider purchasing carry-on allowance ahead of travel when dimensions are borderline to avoid gate surcharges.
How to measure your pack correctly to avoid gate charges
Measure the item fully packed, zipped and compressed, including wheels, handles and external pockets; keep measured totals at least 0.5–1 cm (0.2–0.4 in) below the carrier’s published limits.
Step-by-step measuring method
1) Pack the bag as it will be carried during travel; fasten compression straps, stow side pockets and collapse any telescoping handles.
2) Place on a flat surface and use a soft tape measure. Record three dimensions: height (bottom to highest point, include wheels), width (widest point across front), depth (thickest profile from front to back, include pockets and buckles). Report in both inches and centimetres.
3) For soft-sided models, place a flat board on top and apply firm, even pressure while zipping to simulate gate sizers; re-measure after compression.
4) Build a cardboard sizer: cut a rectangular box with internal dimensions equal to the carrier limit. If the packed item slides in without forcing or bulging, the size is acceptable. If it needs folding or forced entry, reduce contents or swap to a smaller bag.
Quick tools and margin rules
Use a luggage scale for weight; aim for at least 0.5–1 kg (1–2 lb) under the published weight limit to avoid surcharges from reweighs. Tuck or remove external accessories (umbrella, stroller clips, oversized keychains) before final measuring; umbrella strollers often require separate handling – see best lightweight double umbrella stroller for travel.
Final checklist before departure: packed as usual, zipped and straps tightened, measured H×W×D including all protrusions, tested in cardboard sizer, weight checked with scale, and a 0.5–1 cm safety margin applied to each dimension.
When a small pack counts as a carry-on on the carrier and how fees are calculated
Keep a daypack within 18×14×8 inches (45×35×20 cm) and store it under the seat to avoid a charge; any item exceeding those dimensions is treated as a carry-on and requires purchase of a carry-on allowance unless already bundled with the fare.
Sizing and classification
- Personal item limit: 18×14×8 inches (45×35×20 cm) – must fit completely under the seat in front.
- Carry-on limit (overhead bin): 22×18×10 inches (56×45×25 cm). Items larger than this are classified as checked luggage or oversized pieces.
- Enforcement method: gate agents use rigid sizers and visual inspection; sizing, not strict published weight, is the primary test for hand baggage.
- Fare bundles or add-ons sometimes include a carry-on allowance; check the selected fare details during booking.
How fees are calculated and typical ranges
- Fee basis: charges depend on when the carry-on allowance is purchased (timing), route, and whether purchased as an add-on or included in a fare option.
- Purchase-timing tiers:
- At booking or during initial purchase – lowest available rate.
- Before online check-in (via manage booking) – moderate rate.
- At airport counter – higher rate.
- At the gate – highest rate, often substantially more than online prices.
- Typical U.S. domestic ranges (USD, variable by route/date): carry-on added during booking about $30–$65; at airport about $45–$95; gate purchases often $100 or more. Oversize/overweight or unauthorized carry-on that must be gate-checked can incur fees in the $100–$200 range depending on circumstances.
- Fees are non-refundable once paid; refunds require cancellation rules of the fare/add-on.
- If a daypack is presented at the gate and exceeds the personal-item sizer, an additional charge will be applied immediately unless a carry-on allowance was previously purchased.
- Exceeding carry-on dimensions converts the item to checked luggage; checked-bag pricing tables and possible overweight/oversize surcharges then apply.
- Practical measures to avoid extra charges:
- Measure the pack fully loaded (height × width × depth) before the trip.
- Compress soft items or transfer bulky contents into checked luggage purchased during booking.
- Purchase a carry-on allowance at booking or via manage-booking rather than at the airport.
- Choose fare options that explicitly include overhead-bin space when a larger bag is required.
Permitted and restricted items inside a personal item for this carrier
Pack liquids in containers ≤3.4 fl oz (100 ml) placed together in a single clear quart-sized bag; keep prescription medications in original labeled containers and carry a paper or digital prescription for verification.
Items typically permitted in the cabin
Electronics: Laptops, tablets, phones and cameras are allowed; remove larger devices from the bag for screening. Spare lithium batteries and power banks: store only in the cabin, protect terminals (tape or original packaging). Power banks up to 100 Wh require no special approval; 100–160 Wh need carrier approval; >160 Wh prohibited from both cabin and checked. Personal care: Disposable razors, safety razors, toothbrushes, contact lens solution (≤100 ml rule applies) and medical devices are permitted; carry documentation for medical equipment and extra fluids beyond 100 ml for medicines or baby formula and expect separate screening.
Items commonly restricted or prohibited from the cabin
Sharp objects: knives, box cutters and razor blades are not permitted in carry-on; scissors with blades shorter than 4 inches are usually allowed. Firearms and ammunition: must be transported in checked baggage following legal declaration, specific packaging and carrier policies; not permitted in a personal carry item. Explosives, flammable materials and compressed gases: fireworks, lighter fuel, aerosol paints, and pressurized canisters are forbidden in cabin bags. Self-defense sprays: pepper spray and similar aerosols are not allowed in the cabin (may be allowed in checked baggage under strict limits).
Packing tips: place all batteries and power banks in an accessible pocket, keep medications and travel documents on top, secure sharp tools or items that might trip screening in checked luggage, and verify any device Wh rating printed on the battery or power bank before travel. Check TSA and airport screening rules for final authority and consult the carrier’s specific hazardous items page for any carrier-specific bans.
How to stow a pack under the seat on the carrier’s aircraft – step-by-step
Place the pack flat under the seat ahead, longest side parallel to the seatback, compressed to 18×14×8 in (45×35×20 cm) or smaller; keep laptop/tablet in a sleeve on top and liquids in a clear quart bag for quick removal at security.

1. Measure and compress: use a tape measure to confirm compressed dimensions (L×W×H). Soft-sided gear compresses; rigid frames must be removed or transferred to checked luggage.
2. Empty exterior pockets: remove water bottles, umbrellas, tripods, bulky cases and stow them elsewhere or wear them on boarding to reduce overall thickness.
3. Redistribute weight: place heavy items (shoes, chargers, small camera bodies) at the base so the pack sits flat; keep valuables and documents in an easily reachable top pocket.
4. Protect electronics: slide laptops/tablets into a slim sleeve and lay that against the top of the packed items so screening removal is faster.
5. Tuck straps and handles: secure loose shoulder straps with a strap wrap or tuck them into the main compartment to avoid catching on neighboring legs or under-seat components.
6. Orientation at stowage: lay soft packs flat with the base on the cabin floor and the front panel facing the passenger; for small wheeled cases, place wheels toward the rear (seatback) and the handle accessible from the aisle.
7. Final fit check: after placing the pack, sit normally and verify knee clearance and foot space; if the pack protrudes above 8 in or reduces legroom substantially, repack or request gate assistance.
8. Quick-access items: position passports, boarding pass, earphones and medications in a front pocket or top layer so removal during boarding or security avoids full unpacking.
| Situation | Recommended orientation | Practical note |
|---|---|---|
| Soft-sided daypack ≤ 18×14×8 in | Flat, longest side parallel to seatback | Compress straps; top pocket accessible |
| Small wheeled carry bag | Wheels toward seatback, handle toward aisle | Prevents wheel intrusion into leg area |
| Thick or framed rucksack | Remove frame or place in checked luggage | Framed packs often exceed 8 in height when flat |
| Electronics and liquids | Electronics on top; liquids in quart bag visible | Speeds TSA checks and avoids unpacking |
Perform a last-second squeeze test: press down on the packed item to confirm it sits below 8 in height and does not extend past the under-seat boundary; repack until the fit is flush with the floor and does not impede foot space.
If a personal item is oversized at the gate, accept gate check and remove valuables immediately
Gate agents will measure carry items with a sizer; if the item fails, staff will tag it for gate check and it will be loaded into the aircraft hold. To avoid loss or damage, remove electronics, medication, travel documents, jewelry and fragile items before handing the bag over.

Step-by-step gate-check handling
- Ask the agent where the tagged item will be returned – at the jetbridge door or at baggage claim – and note that on the claim tag.
- Remove all items required in-cabin (meds, wallet, phone, chargers, passports) and place them in pockets or a small pouch kept on person.
- Place any lithium batteries and spare power banks in carry-on on person; do not put them in checked hold.
- Keep the gate-check stub and photograph the claim tag barcode; attach the stub to boarding pass or phone for retrieval.
- If liquids exceed cabin limits, transfer them to the items kept on person only if they meet security rules; otherwise pack them securely and note they will be in hold.
Avoiding and reducing gate fees
- Purchase baggage allowance online prior to arriving at the airport to lock in lower rates; gate fees are usually higher than web/airport kiosk prices.
- Compress or repack: move nonessential items into pockets, jacket, or a small foldable daypack that meets under-seat dimensions to avoid gate tagging.
- If travelling with companions, redistribute heavier or oversized pieces among checked/allowed items to meet sizer limits.
- When offered a paid gate-check, confirm whether that fare equals standard carry-on fee for the specific flight; request exact amount before consenting.
Immediate actions after deplaning: present the gate-check stub to ground staff at the jetbridge or baggage office; if item is delayed or damaged, file a written report with the carrier before leaving the airport and keep receipts for any emergency purchases. For unrelated reading while waiting, see best gas bbqs that are dishwasher safe your ultimate guide.