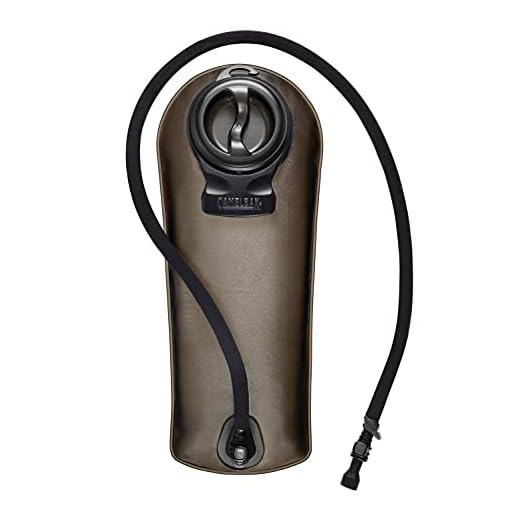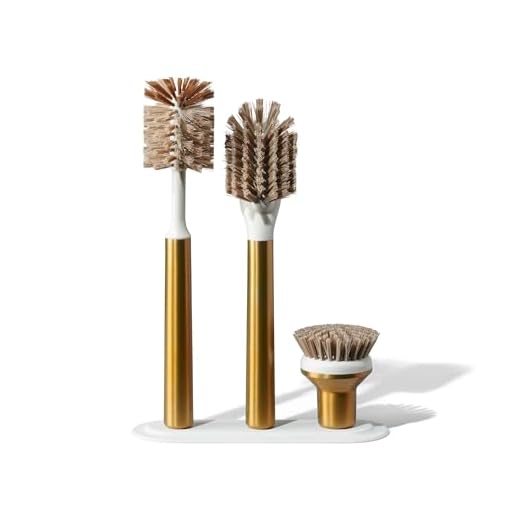

Flush the reservoir and hose with warm water (~40°C / 104°F) containing 5 mL mild unscented dish soap per liter; agitate, then use a long flexible bladder brush for the interior and a narrow tube brush for the drinking line and bite valve. Rinse repeatedly until no visible soap film and water exits clear.
For odor removal: prepare a solution of 2 tablespoons (≈30 g) baking soda per 1 L warm water, fill the reservoir and hose, let sit 20–30 minutes, scrub with brushes, then rinse thoroughly. Alternative soak: white vinegar diluted 1:3 (one part vinegar to three parts water) for 20–30 minutes; follow with multiple rinses to eliminate residual smell.
Mold or stubborn deposits: fully disassemble the drinking piece and cap; use pipe cleaners, small brushes and the baking-soda soak above. If residues persist, consult the manufacturer’s guidelines before using a diluted unscented household bleach solution; after any chemical treatment rinse until no scent remains. Replace hose, valve or reservoir when cracks, persistent discoloration or recurrent biofilm appear.
Drying and storage: hang the reservoir vertically with the opening clipped or propped open and the hose draped down; use a drying rack or a clean rolled towel to keep the mouthpiece open. Allow 6–24 hours depending on ambient humidity and airflow; ensure both bladder and tubing are fully dry before storing. Store with the valve removed or with a clean paper towel inside to prevent moisture retention and odors.
Routine schedule: flush immediately after any sugary or flavored fluids. Perform the baking-soda or vinegar deep wash weekly during heavy use, and perform a full inspection every 3–6 months. Consider replacement every 12–24 months or sooner if leaks, smell or material fatigue appear.
Deep-sanitization protocol for hydration reservoirs in day packs
Flush the reservoir immediately after each use with 1–2 liters (34–68 fl oz) of warm water and 1 teaspoon (5 mL) unscented liquid dish soap; agitate for 60 seconds, drain, then repeat if drink contained sweeteners or electrolytes.
Disassemble hose and bite valve: depress the valve to release trapped water, remove the mouthpiece and any internal pin or filter. Soak small components in warm soapy water for 10–15 minutes; use a soft-bristled valve brush or pipe cleaner to remove residue from internal passages.
Scrub the reservoir interior using a long-handled soft brush sized to the bladder opening (20–30 cm / 8–12 in handle recommended). For hoses use a flexible brush at least as long as the hose; run the brush through several times, then flush with warm water until suds are gone.
Sanitizing options: (A) Household bleach solution – mix 1 tablespoon (15 mL) of regular unscented bleach (5–8% sodium hypochlorite) per 1 L of water, fill reservoir and hose, let sit 5 minutes, then rinse 3–4 times with clean water. (B) White vinegar – fill with 1:1 vinegar:water, soak 30 minutes for odor removal, then rinse thoroughly. (C) Effervescent reservoir tablets – follow tablet packaging for soak time; discard solution and rinse.
Drying and storage: remove the bite valve, prop the reservoir open (use a hanger inserted through the fill port or gentle stuffing with clean paper towels to keep sides apart) and allow to air dry in a well-ventilated area for 24–48 hours. Store completely dry, valve open, in a cool place; for long-term storage consider placing the dry reservoir in a sealed bag in the freezer to inhibit microbial growth.
Inspection and replacement: check seams, O-rings and the valve seal for cracks or stiffness every 3–6 months depending on use. Replace the mouthpiece or hose at first sign of degradation or persistent odor that resists sanitizing.
Avoid dishwashers, boiling water and concentrated citrus cleaners; those can warp bladder material and degrade silicone components. For stubborn mold spots use a diluted bleach soak (follow recommended dilution above) and repeat rinses until no bleach odor remains.
Detach and inspect the reservoir, hose and bite valve prior to maintenance
Remove the reservoir from the pack, separate the hose from the outlet, and pull the bite valve free; perform a systematic visual and functional check immediately.
Step-by-step detachment and quick tests
- Disconnect: unclip shoulder straps, slide reservoir out through the top opening, drain remaining liquid before handling.
- Hose release: press the locking collar or twist the quick‑connect (model dependent) and withdraw the tube; note any hard-to-remove fittings.
- Bite valve removal: grasp base and pull straight out; avoid twisting on brittle valves to prevent enlarging tears.
- Leak test: fill reservoir to ~75% volume, seal cap, invert and hold for 30 seconds while observing seams, valve base and hose connection for droplets.
- Flow test: reattach hose to reservoir, squeeze reservoir steadily and measure outlet flow; a drop in flow exceeding ~30% versus new indicates blockage or internal collapse.
Detailed inspection checklist and pass/fail cues
- Interior surface: shine a bright flashlight through the fill opening; visible slimy film, black/green specks, or dark streaks = microbial growth.
- Seams and welds: inspect at 10–20 cm intervals; hairline separations, bubbling or white delamination require replacement of the bladder.
- Material integrity: pliable bladders should flex without cracking; any sticky, tacky or chalky patches mean polymer breakdown.
- Hose condition: look for kinks, flat spots, permanent creases, or external abrasions; squeeze along the length–soft, spongy sections indicate material failure.
- Bite valve function: under 2x magnification inspect the bite lip for nicks or micro‑tears; when submerged and squeezed, escaping bubbles point to leaks.
- Odor assessment: persistent sour, musty or chemical smells after airing suggest contamination that often cannot be removed completely.
- Connector seals: inspect O‑rings and gaskets for compression set, cracking or missing pieces; replace any compromised seals before reassembly.
Replacement guidance: swap bite valves at 6–12 months with daily use or immediately if damaged; replace hoses every 12–24 months under heavy use or when flow/drop issues appear; replace the reservoir when seams fail, material delaminates, or odors persist after sanitizing attempts.
Drying and storage: leave cap open, hang reservoir vertically by the fill cap to drain, remove hose and valve to allow airflow, and store dry in a cool place or in a sealed container in the freezer for long gaps between uses.
Hand-wash reservoir and tubing with mild soap, long brush and flushing technique
Use a 1 tsp (5 mL) unscented dish soap per 1 L warm water (30–40°C); fill reservoir half-full, agitate to mix, then insert a 25–30 cm soft-bristle reservoir brush and work the entire interior surface with 10–15 firm strokes. Run a 3–4 mm diameter tube brush through the hose from connector to mouthpiece, repeating 6–8 complete passes.
Perform the flushing sequence: fill reservoir to 1 L, close mouthpiece, squeeze steadily for 10–15 seconds to force soapy solution through tubing, open outlet and drain. Repeat filling/rinsing cycle until drained water is free of visible soap film (typically 3 full rinses). For rinsing efficiency, alternate warm water and a final cold rinse to help remove residue.
For sugary or electrolyte solutions, wash immediately after use; soak the reservoir and tubing in the soap solution for 10 minutes before brushing. For plain water use, perform the same procedure at least once per week or after 2–3 consecutive days of use.
Optional sanitation: fill reservoir with a 1:3 white vinegar-to-water mix, soak tubing and bladder for 20–30 minutes, then run through brush and flush thoroughly; alternatively, fill with 3% hydrogen peroxide, let sit 20 minutes, then rinse. Do not mix vinegar and peroxide simultaneously.
Drying method: prop the reservoir opening wide using a clean folded paper towel or a commercial hanger, hang vertically with hose pointing down, remove mouthpiece to allow airflow; expect full air-dry in 6–12 hours in ambient indoor conditions. Store dry and partially open to prevent moisture buildup; keep brushes and spare fittings protected under a compact rain shield such as best standard umbrella or stowed with a cover like the best umbrella stroller for grandparents.
Replace tubing or bite valve that shows persistent discoloration, stubborn odors after repeated wash cycles, or visible damage; inspect fittings for cracks and replace every 12–24 months depending on frequency of use.
Sanitize bladder and bite valve with baking soda or diluted household bleach
Bleach method: Prepare a solution of 1 tablespoon (15 mL) regular household sodium hypochlorite per 1 gallon (3.8 L) of cool water. Fill the reservoir and run solution through the hose and bite valve so all internal surfaces are wetted; leave to sit for 5–10 minutes. Open the valve periodically to ensure flow-through contact. After soaking, flush with fresh potable water until no chlorine odor remains (recommend at least three full reservoir fills and empties).
Baking soda alternative: For odor removal and light sanitizing, dissolve 1–2 tablespoons (15–30 g) baking soda per liter of warm water, fill system, agitate, and soak 10–20 minutes. Use a syringe or flow action to push solution through the tubing and valve. Rinse thoroughly with several liters of fresh water until no residue or alkaline taste is detected.
Rinsing and drying: After either method, flush until neutral smell/taste achieved. Finish with one or two fills of potable water and dispense until clear. Dry fully with reservoir open and valve detached or propped open; allow at least 8–12 hours of air drying in a well-ventilated area, tubing hung vertically to drain.
Safety and material notes: Use household bleach at standard strength (typically 5–6%); stronger concentrates require proportionally less volume. Limit bleach exposure frequency (monthly or when mold/persistent odor is present) since repeated chlorinated-soaking can accelerate degradation of some plastics and silicone. Never mix bleach with acids or ammonia (toxic chlorine gas risk). Wear gloves, ventilate the area, and inspect the bite valve and tubing for softening, cracking or discoloration after treatment–replace parts showing damage or persistent odor.
Maintain exterior shell, straps and zippers; fully dry and store to prevent mold and odors
Wash exterior shell, webbing and zipper tracks with warm water (32–43°C / 90–110°F) and 1 tsp mild, non-bleach detergent per liter; use a soft-bristle brush for sewn seams and a microfiber cloth for smooth panels, then rinse until water runs clear.
Remove detachable straps and trim hardware before washing when possible; soak straps 10–15 minutes in the same solution, agitate by hand to dislodge trapped grit, rinse thoroughly and squeeze excess water without twisting to avoid deforming foam.
Treat zipper channels by brushing loose debris with an old toothbrush, blowing out particles with compressed air, then applying a thin film of zipper wax or paraffin and working the slider through the full length 10–15 times to restore smooth action.
For mildew or persistent odors, spray affected fabric with a solution of white vinegar to water at a ratio of 1:4 (use ~250 ml vinegar per litre of water), let sit 10 minutes, agitate with a brush and rinse; for strong smells, place 1/4 cup baking soda inside pockets overnight and vacuum the next day.
Dry fully with all compartments unzipped and straps laid flat or hung in a well-ventilated area; direct sun for short periods helps UV reduction of microbes but avoid prolonged UV exposure on colored fabrics. Aim for at least 24 hours of airflow or until interior humidity reads ambient and no damp spots remain.
Store on a shelf or in a breathable cotton bag with 1–2 silica gel packs or a moisture-absorbing puck; keep slightly unzipped to allow air exchange, avoid sealed plastic bins and cold damp basements. For unrelated seasonal gear purchases, consult best cyber monday lawn mower deals.


