Recommendation: Cut 2 body panels 12″ × 14″, a base 10″ × 4″, and a front pocket 8″ × 6″. Use 8 oz cotton canvas for exterior and a single layer cotton lining. Choose a YKK 9″ zipper, 1″ polyester webbing for straps, 3/4″ plastic sliders, and two 1/2″ D‑rings. Apply medium‑weight fusible interfacing to the body panels only. Set seam allowance to 3/8″ and stitch length to 2.5 mm; use a 90/14 universal needle and 50 wt polyester thread. Reinforce attachment points with bartacks or triple stitching.
Quick assembly sequence: Step 1: Fuse interfacing to wrong side of exterior panels. Step 2: Sew front pocket to one exterior panel with a 1/8″ topstitch at the pocket opening. Step 3: Install zipper between top edge of exterior and top edge of lining using a zipper foot, sewing right sides together and then turning. Step 4: Join side seams and attach base to form a boxed bottom; press seams open and topstitch 1/8″ from seams on exterior for stability. Step 5: Create straps from webbing cut to 18–22″ finished length, fold ends through sliders, and secure to lower corners; attach top strap or handle 4″ long with cross stitch or bartack.
Finish and options: Add a 4″ × 10″ leather reinforcement at the base if carrying heavier loads. Use a short leather pull or cord on the zipper for faster access. If water resistance is desired, pre‑treat exterior fabric with a spray DWR before assembly. Expect 2–3 hours for a single unit on a home machine; allow extra time for pattern adjustments or added pockets.
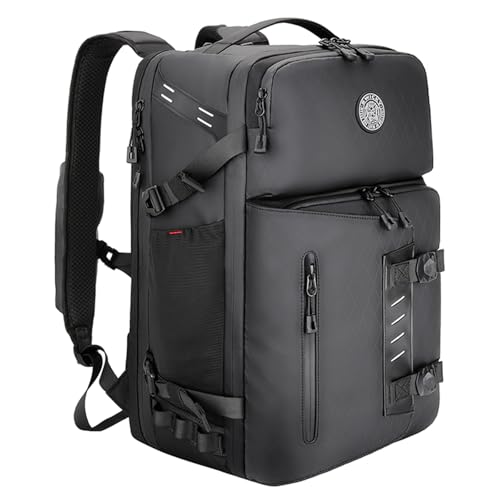
Selecting fabrics, interfacing and hardware for a lightweight compact rucksack
Use 210D ripstop nylon for the body and reserve 420D Cordura or 500D polyester for high-wear zones such as the base, strap anchors and external pocket edges.
For lining choose 190T polyester taffeta or lightweight 40–70 gsm ripstop nylon; both slide easily and reduce bulk at seams. If water resistance is required, specify a PU coating of 500–3000 mm hydrostatic head for the outer fabric or opt for an AquaSeal-style zipper and taped seams rather than a heavier waterproof shell.
Stiffen panels with a fusible woven interfacing of medium weight for pocket mouths and lid flaps, and add 2–3 mm closed-cell EVA foam for shoulder straps and back padding. For a firmer base use 3–4 mm EVA or a thin HDPE sheet inserted between lining and shell. For strap anchors and attachment points, use a sew-in heavyweight woven interfacing (equivalent to 8–12 oz/yd²) under the shell before topstitching.
Choose zippers by balancing weight and durability: coil (YKK #3 or #4) for main openings keeps weight down; molded tooth (#5) or reverse-coil for frequently stressed pockets. Specify locking sliders for security pockets and water-resistant teeth for rainy use. Keep zipper tape widths to 15–20 mm on a compact pack to avoid bulky seams.
Use polyester webbing 20–25 mm wide for shoulder straps on very small packs; 25–38 mm for more comfort if padding is added. Low-profile acetal side-release buckles (15–25 mm) from Duraflex/ITW suit strap closures; choose tri-glide adjusters sized to webbing width for smooth adjustment. Add stainless steel or brass D-rings only where metal contact or higher load-bearing is required.
Sewing: bonded nylon or polyester thread, 30–40 wt (tex 60–90), paired with a 90/14 or 100/16 topstitch/denim needle. Use 3.0–3.5 mm stitch length for structural seams and 2.5–3.0 mm for topstitching. Reinforce all strap terminations with box-X or bar-tack stitches, and backstitch 6–8 mm from edges when anchoring hardware. Finish exposed seams with a hot knife on synthetic fabrics or with seam tape for weather resistance.
Minimal hardware checklist: 1 main coil zipper (#3/#4), 1 small molded zipper (#3) for pocket, two 25 mm shoulder strap tri-glides, two 25 mm side-release buckles, two D-rings (optional), 0.5–1 m of 20–25 mm polyester webbing, 2–3 mm EVA for padding, medium fusible and heavy sew-in interfacing for reinforcement.
Draft a pattern and cutting layout for a 10×8×3 in compact pack
Recommendation: use a 1/2″ seam allowance; cut outer panels 11″×9″ (2 pieces), a single continuous gusset strip 26.5″×4″ (1 piece), and matching lining pieces – dimensions below are exact for a finished 10″×8″×3″ bag.
Pattern pieces (finished → cut with 1/2″ SA):
Outer / Lining panels – finished 10″ (W) × 8″ (H). Cut 2 outer, 2 lining. Cut size: 11″×9″. Fuse interfacing to outer panels cut to 10″×8″ (trim 1/2″ from each fabric edge to avoid bulk at seams).
Gusset / side + bottom strip (continuous) – finished wrap length = 2×height + width = 2×8 + 10 = 26″. Finished depth = 3″. Cut size (add seam allowances): length 26″ + 1/2″ overlap for joining = 26.5″; height 3″ + 2×0.5″ = 4″. Cut 1 outer, 1 lining. Fuse interfacing to strip inset 1/2″ all around; recommended interfacing size 26″×3″.
Top zipper allowance – top opening equals panel width (10″). Use a 12″ zipper to allow easy installation and tails for anchoring; for a separating zipper use the same length or a 14″ if you want more tail room for finishing.
Exterior zip pocket (optional) – finished 8″×5″. Cut outer pocket 9″×6″ (one exterior face plus backing). Use an 8–9″ zipper.
Interior slip pocket – finished 6″×5″. Cut 7″×6″ (one). Fold top edge 1/2″ for hem; remaining edges include 1/2″ SA for sewing.
Straps and attachments – webbing 1″ wide recommended. For fixed short straps cut two webbing pieces 24″ each; for adjustable shoulder straps cut two 36″ each before attaching adjusters. If fabric-covered padded straps are desired: cut four fabric strips 3″×24″ (outer), four lining 3″×24″, and foam or batting 2″×22″ (optional).
Cutting layout tips (44–45″ wide fabric): place both 11″×9″ panels side-by-side along the lengthwise grain with the 11″ dimension across the width of the fabric (two panels fit across a 45″ width). Place the gusset strip along the remaining width or cut it from fabric lengthwise; a single 4″×26.5″ strip can be cut from a 4″ wide column by cutting along the fabric length. For directional prints place panels so the pattern runs vertically (8″ direction along the length of the fabric).
Efficient nesting on narrower fabric (36″ wide): fold fabric lengthwise with right sides together, mark two 11″×9″ rectangles on the fold staggered to allow a 4″×26.5″ gusset to be cut from the fold edge; this uses less yardage and avoids seams in the strip.
Marking and transfer: mark center top points, side seam notches at 4″ from each bottom corner (these align gusset ends), zipper center, and pocket placement on lining. Add notches to gusset at each corner and at the midpoint of the bottom width (5″ from center) for accurate alignment.
Yardage estimate: outer fabric – 3/4 yard (44–45″ wide) to fit panels, gusset and pockets; lining – 1/2 yard. Interfacing – 1/2 yard of midweight fusible for panels and strip; optional 1/4 yard of lightweight for pocket and strap faces.
Sew main body and pockets: seam order, topstitching and seam finishes
Use a 1/2″ (12 mm) seam allowance for main panels and gusset joins, and 3/8″ (10 mm) for pocket seams, zipper hems and lining seams.
Seam order
1. Interface pocket pieces; press the top edge under 1/4″ (6 mm) and understitch on the lining side before folding to the outside.
2. Place pocket on front panel, align center and side offsets, baste at 1/8″ (3 mm) from pocket edge, then stitch permanent seam at 3/8″ (10 mm) allowance and finish edge.
3. Install any exterior zippers or flap closures before joining front and back panels; staystitch 1/8″ (3 mm) from raw edge to stabilize curving seams.
4. With right sides together, sew front panel to one long edge of the gusset using 1/2″ (12 mm) allowance; press seam toward gusset and repeat for back panel.
5. Sew bottom seam last: join the bottom edge of the gusset to the base with 1/2″ allowance, trim corners to 1/8″ (3 mm) to reduce bulk before turning.
6. Assemble lining the same way but leave a 3″ (75 mm) opening in one side seam for turning; clip corners and understitch where the lining meets the opening to keep it from rolling out.
Topstitching and reinforcement
Edge stitch at 1/8″ (3 mm) from finished edge for a crisp profile; use 3.0–3.5 mm stitch length and a topstitch needle (size 90/14 on midweight cotton canvas, 80/12 for lighter fabrics).
Topstitch pocket edges twice for durability: first at 1/8″ (3 mm), second at 1/4″ (6 mm) from the first row. Use bonded polyester or nylon thread, 40–50 wt.
Reinforce strap attachment points with a 1″ (25 mm) box-x or three parallel bartacks spaced 1/4″ apart; bartacks should be 12–15 mm long, 6–8 passes depending on machine settings.
| Joint | Seam allowance | Finish | Stitch length | Notes |
|---|---|---|---|---|
| Side & bottom panels | 1/2″ (12 mm) | Serge or flat-felled for heavy fabric; press open for lightweight | 3.0 mm | Trim bulky allowances to 4–6 mm at corners |
| Exterior pocket | 3/8″ (10 mm) | Serge or zigzag, then topstitch | 2.5–3.0 mm | Understitch top edge before turning |
| Zipper channel | 3/8″ (10 mm) | Finish with zipper tape; trim and serge ends | 3.0–3.5 mm | Staystitch 3 mm from edge before attaching zipper |
| Lining seams | 3/8″ (10 mm) | French seam for lightweight; serge and press for midweight | 2.5 mm | Leave 3″ (75 mm) opening for turning |
| Top opening/face edge | Fold double 1/4″ (6 mm) | Double-fold edge and topstitch | 3.2–3.5 mm | Press and clip curves before final stitch |
For delicate fabrics use a longer stitch (3.0–3.5 mm) to reduce perforation; for heavyweight canvas reduce bulk by trimming allowances and using a walking foot. Press all seams toward the thicker piece, and test a short sample of seam/finish combination on scrap with the chosen interfacing and thread before sewing full assembly.
Install zipper and attach lining with boxed corners
Use a 10″ (25 cm) nylon coil closed-end zipper, zipper foot, polyester thread, and a stitch length of 2.5 mm (size 12 needle). Trim zipper to exact finished opening length; secure cut end with a new stop or a few dense hand stitches 1/8″ (3 mm) from the teeth.
Zipper insertion (single-zipper sandwich)
1. Interface the outer top panels with medium-weight fusible interfacing on the zipper seam allowance only; fuse 12 mm (1/2″) from raw edge. Press seams flat.
2. With right sides together, align one outer top raw edge to the zipper tape (right side of zipper facing fabric). Pin or clip every 1″ (25 mm). Using zipper foot, stitch 3 mm (1/8″) from the zipper teeth; backstitch 3–5 mm at starts/stops.
3. Flip zipper toward lining side and topstitch on the outer 6 mm (1/4″) from the seam to secure. Repeat on the opposite top panel so the zipper is sandwiched between the two outer panels with neat topstitching on both faces.
4. Align lining top edges to the opposite side of the zipper, right sides together with zipper tape; stitch 3 mm (1/8″) from teeth. Leave a 3″ (75 mm) opening in one lining side seam for turning (mark opening before sewing). Trim zipper tails to avoid catching in seams.
Attach lining and form boxed corners
1. With zipper closed, sew side seams of outer and lining separately using the established seam allowance (12 mm / 1/2″). Press outer seams open; press lining seams toward lining.

2. To box corners so the base depth equals 3″ (76 mm), measure 1.5″ (38 mm) from the corner along each seam of outer and lining pieces, mark points, then draw a line connecting the two marks across the corner. The box dimension equals desired depth ÷ 2; use the same number for outer and lining.
3. With wrong sides together, align seam allowances so the corner forms a triangle. Stitch on the marked line across the corner with a 2.5 mm stitch length. Trim triangle leaving a 6 mm (1/4″) seam allowance; clip corners close to stitching to reduce bulk. Repeat for all four corners (outer and lining).
4. Turn bag right side out through the lining opening, push boxed corners fully into shape with a blunt tool, press edges flat. Close lining opening with a 6 mm (1/4″) ladder stitch or machine edgestitch very close to the fold if the opening is at a seam allowance.
5. Give a final edgestitch 3 mm (1/8″) along both sides of the zipper on the outer face to flatten the sandwich and hide the lining; reinforce zipper ends with short bar tacks. Match outer and lining corner box sizes and trim allowances if layers are bulky for a neat, square base.
Adjustable straps and reinforced strap anchors for small loads
Use 1″ (25 mm) polyester webbing with a tri‑glide slider; reinforce each anchor with a 2″ × 2.5″ leather or 6‑oz canvas patch, then sew a 1″ box‑X and add a bar‑tack plus a rivet for concentrated wear points.
- Materials & hardware
- Webbing: 3/4″ (19 mm) for very light carry, 1″ (25 mm) for comfort; polyester or nylon, 1.2–1.6 mm thickness.
- Adjusters: metal tri‑glide or ladder lock sized to webbing width.
- Backing: leather, faux‑leather, or 6‑8 oz cotton duck cut to 2″×2.5″.
- Fasteners: 5–6 mm solid rivets with washers for high‑stress anchors (optional for sub‑3 kg loads).
- Thread & needle: bonded polyester or nylon 40–60 wt; needle 90/14 (use 100/16 for thicker layers).
- Cutting and prep
- Trim webbing ends square; heat‑seal nylon or apply Fray Check to polyester.
- Fold webbing end that will be sewn back onto itself 1″ and press (use a few glue dots for temporary hold).
- Cut backing patch 1/4″ larger than stitching perimeter to allow 3–4 mm seam allowance.
- Sewing sequence for adjustable strap assembly
- Thread the free end of webbing through the tri‑glide: under, over, then under (creates the friction lock).
- Tuck the folded sewn end under the anchor point on the pack body; place backing patch behind layers.
- Sew a 1″ box and an X through all layers with a 3.0–3.5 mm stitch length; keep stitches 3–4 mm from webbing edge.
- Add a dense bar‑tack (10–14 short stitches) across the top of the box for extra shear resistance.
- If installing rivets, place them 3–5 mm outside the stitched box, with washer on the inside to spread load.
- Anchor placement and spacing
- Distance from top edge to anchor center: 1/2″–3/4″ on soft shells; 1″ on stiff shells to avoid edge pullout.
- For single strap anchors, use two parallel row stitches 3–4 mm apart plus the box‑X.
- Allow a 4″–6″ tail beyond the adjuster for easy length changes; secure tail with a short zigzag or heat tap.
- Alternative reinforcement methods
- Stitch a folded webbing loop through a metal D‑ring and tack across the overlap, then back the anchor with leather.
- Use a small nylon webbing loop sewn into a channel of 2–3 layers of interfaced fabric for invisible anchors.
- For ultra‑light designs, sew the webbing into a boxed channel and topstitch 1/8″ from the channel edge for redistribution of load.
- Machine settings and tips
- Tension: medium; test on scraps with all layers present. Increase slightly if stitches loop.
- Use a walking foot when sewing multiple thick layers to prevent feed slippage.
- Stitch length: 3.0–3.5 mm for structural seams; reduce to 2.0–2.5 mm for bar‑tacks.
For brief outdoor testing of load and fit, bring a sun shelter such as best place to buy beach umbrella near me or a compact cover like best womens folding umbrella. To remove stubborn adhesives or clean a work surface before gluing patches, consider tools listed at best pressure washers to start a business.
FAQ:
What materials and tools do I need to make a sturdy mini backpack for daily use?
First, choose a durable outer fabric such as canvas, duck cloth, Cordura, or heavy cotton twill. For the lining pick a lightweight cotton or nylon. Add medium-weight fusible interfacing for structure; for a firmer shape use foam stabilizer (like 2–3 mm craft foam) fused or hand-stitched between layers. Hardware: a zipper for the main compartment (length depends on your pattern—commonly 9–12 inches / 23–30 cm), a smaller zipper for a front pocket, webbing for straps (1–1.5 inches / 25–38 mm), strap adjusters, D-rings or rectangular rings, and a small buckle if you want a chest strap. Thread: polyester or heavy-duty all-purpose thread. Needles and feet: heavy-duty machine needle (size 90/14 or 100/16 for thick fabrics) and a zipper foot. Tools: rotary cutter or fabric scissors, ruler, pins or clips, chalk or fabric marker, seam ripper, iron and pressing surface. Optional: bar-tack or box-stitch tool for reinforcing strap anchors. Match materials to how much wear you expect; heavier options add durability but require stronger needles and slower stitching.