
Finding the right photo backpack for travel can make a significant difference in how I manage my photography gear while on the move. Whether I’m heading out for a day trip or embarking on an extended journey, a good backpack not only protects my equipment but also offers easy access and comfort. The ideal backpack should meet my needs for organization, durability, and portability, ensuring that my gear is safe and accessible at all times.
In this guide, I’ll explore some of the best photo backpacks available, each tailored for specific travel requirements. From lightweight options for quick excursions to more robust designs for serious photographers, this selection promises to help me find the perfect fit for my adventure, making my travel experience smooth and enjoyable.
Top Picks


Key Takeaways
When choosing a photo backpack for travel, several key factors come into play. Here are the most important takeaways to consider:
- Prioritize comfort with padded straps and ergonomic designs for long journeys.
- Look for water-resistant materials to protect gear from the elements.
- Consider customizable compartments for efficient gear organization.
- Ensure quick access features for easy retrieval of camera equipment.
- Check for additional functionalities like a laptop compartment or USB ports.
How to Choose Best photo backpack for travel
Selecting the perfect photo backpack for travel involves assessing various features and requirements. Here’s a detailed guide to help me make an informed decision:
9 Best photo backpack for travel
WANDRD PRVKE Pocket Photography Bundle
Pros
Cons
Overview
The WANDRD PRVKE Pocket 21L V4 is an ideal choice for photographers on the go.
Its compact design includes a dedicated camera cube and quick-access features, making it perfect for travel and daily use.
Key Features of the WANDRD PRVKE Pocket 21L V4
Practical considerations
While the WANDRD PRVKE Pocket is great for photographers seeking a compact solution, those with larger gear collections may find its capacity limiting.
It’s a perfect fit for casual photographers or those traveling light.
Real-world insight
In my experience, the quick-access features of the PRVKE Pocket are invaluable when I’m out shooting.
It allows me to capture spontaneous moments without fumbling through my gear, making it a reliable companion for any adventure.
Customizable LED Color Screen Backpack
Pros
Cons
Overview
The YOLOLAND LED Color Screen Backpack combines style and functionality, featuring a customizable LED display and a water-resistant design.
It’s perfect for travelers, with comfortable padding and a USB charging port for convenience on the go.
Key Features of the YOLOLAND LED Backpack
Practical considerations
While this backpack is great for travel, it’s essential to note that the USB charging feature requires a separate power bank, which might be an additional expense.
Additionally, if you prefer a more classic style, the bright LED display may not fit your aesthetic.
Real-world insight
As a frequent traveler, I’ve found that having a backpack with a unique feature like a customizable LED screen not only serves a practical purpose but also sparks conversations and connections with fellow travelers.
It’s a great way to express my personality while on the go.
Customizable LED Backpack with USB Port
Pros
Cons
Overview
The YOLOLAND LED Color Screen Backpack is a unique travel companion with a customizable LED display for showcasing your creativity.
It’s water-resistant and features comfortable padding, making it ideal for outdoor adventures and everyday use.
Features that matter for this backpack
Practical considerations
While this backpack is stylish and functional, it’s essential to consider that the LED feature requires a power bank for optimal use.
Additionally, if you’re planning to carry a lot of gear, it might not have the capacity you need.
Real-world insight
I find that the YOLOLAND LED Color Screen Backpack not only serves as an excellent travel bag but also as a conversation starter.
The ability to customize the display means I can easily change my look or convey messages, making it a fun accessory while traveling.
K&F CONCEPT Large Waterproof Camera Backpack
Pros
Cons
Overview
The K&F CONCEPT Camera Backpack is designed for photographers on the go, featuring a lightweight design, customizable dividers, and ample storage.
With compartments for a laptop and tripod, it’s perfect for travel and outdoor shoots.
Essential Features of the K&F CONCEPT Camera Backpack
Practical considerations
While the K&F CONCEPT Camera Backpack is a fantastic option for many photographers, those with extensive equipment might find the 16L capacity limiting.
It’s best suited for day trips or shorter excursions rather than extended shoots requiring a lot of gear.
Real-world insight
In my experience, this backpack strikes a balance between being compact and functional.
It’s particularly useful when I’m hiking or traveling, as I can easily access my gear while keeping everything organized and secure.
Versatile Waterproof Camera Backpack for Travel
Pros
Cons
Overview
The Besnfoto Camera Backpack is a versatile and waterproof solution for photographers on the go.
It offers expandable storage for camera gear and a dedicated laptop compartment, making it perfect for travel and outdoor adventures.
Features that matter for the Besnfoto Camera Backpack
Practical considerations
While the Besnfoto Camera Backpack is designed for a variety of equipment, potential buyers should consider its size and weight, as it may not be the best fit for those only needing to carry minimal gear or for short outings.
Real-world insight
As a frequent traveler and photographer, I’ve found that having a robust and organized backpack like the Besnfoto can make a significant difference in how efficiently I can move around and capture moments, especially during outdoor adventures.
DJI Mini 4K Fly More Combo Drone
Pros
Cons
Overview
The DJI Mini 4K Fly More Combo is an excellent choice for travelers and content creators.
Its lightweight design, coupled with a powerful camera and extended flight time, makes it perfect for capturing stunning aerial shots on the go.
Key Features of the DJI Mini 4K
Practical considerations
While the DJI Mini 4K offers impressive features for travel photography, it’s essential to consider that its lightweight design means it may not withstand strong winds as effectively as heavier drones.
Additionally, beginners might need some practice to fully utilize its advanced capabilities.
Real-world insight
In my experience, the DJI Mini 4K is an outstanding travel companion that doesn’t compromise on quality or functionality.
With its intuitive app and smart features, I’ve found it easy to capture breathtaking shots that elevate my travel memories.
Compact Photography Backpack for Adventurers
Pros
Cons
Overview
The BREVITE Runner is a compact camera backpack designed for photographers on the go.
With its customizable compartments, it fits all your essentials while maintaining a sleek, minimalist style.
Key Features of the BREVITE Runner
Practical considerations
While the BREVITE Runner excels in portability and style, it’s important to note that its compact size may limit storage for larger camera gear or additional equipment.
It’s best suited for those who prioritize minimalism over maximum capacity.
Real-world insight
I’ve found that the BREVITE Runner strikes a great balance between style and functionality.
It allows me to carry my essentials without the bulk of traditional camera bags, making it an excellent choice for urban adventures or weekend getaways.
Waterproof Camera Backpack with Laptop Compartment
Pros
Cons
Overview
The K&F CONCEPT DSLR/SLR Photography Backpack is designed for both functionality and comfort.
It accommodates two cameras, four lenses, and a 15.6-inch laptop, making it perfect for photographers on the go.
Key Features of the K&F CONCEPT Backpack
Practical considerations
While this backpack is ideal for serious photographers and travelers, it might feel too large for those who only need a compact solution for day-to-day photography.
Consider your specific needs before purchasing.
Real-world insight
Having used this backpack on multiple photography trips, I appreciate how the ergonomic design reduces strain on my back, especially during extended hikes.
It’s a reliable companion that keeps my gear organized and accessible.
Cwatcun Sling Bag for Cameras
Pros
Cons
Overview
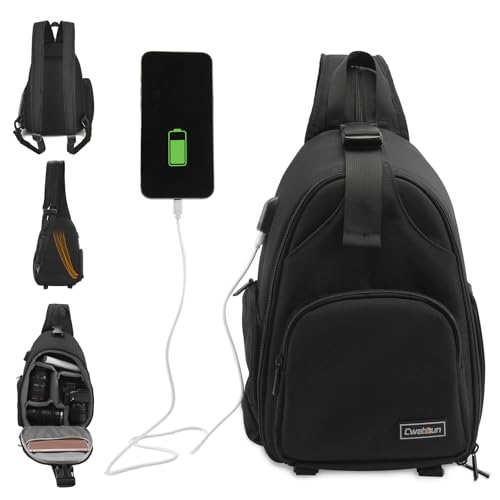
The Cwatcun Sling Bag is a versatile and practical crossbody case designed for photographers.
It comfortably holds a camera, lenses, and accessories while offering multiple carrying options for convenience on the go.
Key Features of the Cwatcun Sling Bag
Practical considerations
While this bag offers excellent storage and protection for essential photography gear, it may not accommodate larger setups or extensive equipment collections, making it better suited for casual outings or travel rather than professional shoots.
Real-world insight
I find the Cwatcun Sling Bag to be a reliable companion for day trips, allowing me to easily access my camera and quickly capture moments without the hassle of rummaging through a larger backpack.
Key Features to Look For
When evaluating different photo backpacks for travel, keep this checklist of essential features in mind:
Comfortable Straps
Look for padded and adjustable shoulder straps for maximum comfort during extended wear.
Waterproof Material
Ensure the backpack is made from water-resistant or waterproof materials.
Customizable Dividers
Customizable dividers allow for tailored organization of camera gear.
Quick Access Points
Quick access features enable fast retrieval of equipment.
Laptop Compatibility
Some backpacks offer compartments for laptops, ideal for travel bloggers.
USB Charging Port
A USB port allows me to charge devices without removing the backpack.
Quick Comparison
A quick side-by-side comparison helps show where each option fits before the detailed reviews.
| Product | Quick take | Why we picked it |
|---|---|---|
| WANDRD PRVKE Pocket Photography Bundle | The WANDRD PRVKE Pocket 21L V4 is an ideal choice for photographers on the | Compact design ideal for travel and everyday use; Quick-access opening for speedy gear retrieval |
| Customizable LED Color Screen Backpack | — | Customizable LED screen for personalization.; Water-resistant material protects against rai |
| Customizable LED Backpack with USB Port | The YOLOLAND LED Color Screen Backpack is a unique travel companion with a customizable | Customizable LED screen for personalized expression; Water-resistant design protects belongings |
Alternatives to Consider
If the options above don’t meet my needs, here are some alternatives to consider:
Sling Bags
Sling bags offer a compact and lightweight option for photographers who prefer minimal gear. They provide quick access to essentials while remaining easy to carry.
Rolling Camera Bags
For those who travel with a lot of gear, rolling bags can be a great alternative. They take the weight off my shoulders and allow for easy transport through airports.
Backpacks with Drone Compartments
If I use drones extensively, consider backpacks designed with dedicated compartments for drones and their accessories.
How We Chose These Products
Our selection process for the best photo backpacks involved a thorough evaluation of multiple factors. Here are the criteria we used:
User Reviews
We analyzed user feedback to gauge real-world performance and satisfaction.
Expert Recommendations
Consulting industry experts helped us understand the nuances of different models.
Feature Set
We focused on key features relevant to traveling photographers, ensuring versatility and practicality.
Durability Testing
We prioritized products made from high-quality materials that can withstand the rigors of travel.
FAQs
Final Thoughts
The WANDRD PRVKE Pocket Photography Bundle offers the best overall combination of portability and features. For premium experience, the YOLOLAND LED Color Screen Backpack enhances travel with style and functionality. The K&F CONCEPT Large Waterproof Camera Backpack provides excellent value with ample storage and customization options.
Each of these backpacks serves different needs, but I find the WANDRD PRVKE Pocket to be the safest choice for most travelers. Those seeking premium features may prefer the YOLOLAND option, while budget-conscious photographers can rely on the K&F CONCEPT for functionality without breaking the bank.


