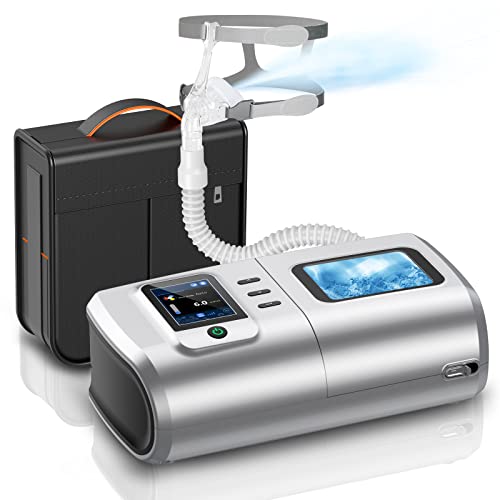
Bring the sleep-apnea device as a carry-on and declare it at check-in: most major U.S., Canadian and European carriers allow medical respiratory equipment to travel without additional airline charges when you present a doctor’s note or device labeling and follow battery rules.
Security and battery specifics: TSA guidance permits medical respiratory devices in the cabin and screening may require you to power the unit. Spare lithium-ion batteries must be carried in the cabin; cells under 100 Wh are generally accepted, batteries between 100 Wh and 160 Wh require airline approval and are limited in quantity, and batteries above 160 Wh are typically prohibited without special arrangements. Pack AC adapters and external battery packs in carry-on and mark watt-hour (Wh) ratings on batteries or accompanying documentation.
Practical checklist before departure: call the carrier 48–72 hours ahead to request written policy, print or save the airline’s medical-equipment policy, carry a physician’s letter stating diagnosis and device necessity, keep mask, tubing and power components together in a padded carry-on, label serial numbers and photograph the device for records, and be prepared to demonstrate operation during screening. For international itineraries, verify both departure and arrival country screening rules and any airline-specific surcharges or allowances.
Carry sleep-therapy devices without airline baggage charges
Take your positive airway pressure unit as carry-on and present a physician’s prescription or medical letter at check-in; most U.S. carriers and many international airlines will treat medically necessary equipment as carry-on or waive checked-baggage charges when documentation is provided.
Contact the airline’s medical or accessibility desk 48–72 hours before departure to confirm policy, allowable carry-on dimensions, and whether prior approval or a special form is required. Keep a printed copy of any airline approval on board.
Handle batteries correctly: FAA and many foreign regulators allow spare lithium-ion cells in the cabin up to 100 Wh without airline approval; devices or spares between 100 Wh and 160 Wh require airline approval; cells above 160 Wh are generally prohibited. Remove batteries from the unit for checked baggage; always carry spares in the cabin with terminals protected (tape or manufacturer caps).
TSA screening: present the device separately at the security checkpoint for X-ray inspection. If you prefer, request a private inspection; wet components (water chamber) must be emptied and dried before screening. If concerned about internal data, request a manual inspection instead of X-ray.
For international travel, carry the prescription in English, a translated summary if visiting a non-English-speaking country, and documentation of battery watt-hours. Confirm customs rules for transporting medical gear and check socket/voltage requirements plus a travel-safe adapter for the therapy unit.
Quick checklist: 1) carry-on placement and travel bag, 2) physician’s prescription/letter, 3) airline approval when required, 4) batteries removed or compliant with Wh limits, 5) empty water chamber, 6) arrive extra time at the airport.
Documentation that proves a sleep-apnea device qualifies for cabin-allowance waivers
Carry a signed physician letter on official letterhead stating medical necessity, device brand and model, necessity for in-flight use, patient full name and date of birth, diagnosis (ICD‑10 code if available), and the clinician’s contact details and signature.
What the clinician letter should include: patient identifier, specific device description (make, model, serial number if possible), explicit statement that the device is required during travel, estimated duration of need, clinic name, printed physician name, license number, daytime phone and date of issue.
Prescription and supplier proof: original or printed prescription listing the device and any accessories (mask, tubing, humidifier) plus the durable medical equipment (DME) invoice showing purchase date, supplier name, and itemized description. A recent invoice (within 12 months) strengthens the claim.
Manufacturer and regulatory documentation: user manual page that lists device classification, the manufacturer’s product specification sheet, or FDA/CE clearance documentation. PDFs saved on your phone plus one printed copy are recommended.
Battery and power documentation: label or manufacturer spec showing battery watt‑hours (Wh). For airline checkpoint and gate staff, show each battery’s Wh; note that many carriers permit up to 100 Wh without prior approval and 100–160 Wh with airline permission. Carry original packaging or manufacturer printout when possible.
Security and carrier interactions: present originals and one photocopy at screening; keep digital copies accessible offline. If international travel occurs, provide an English translation of the clinician letter and contact the carrier at least 48–72 hours before departure to verify their specific policy and any required advance approval.
Pack device and accessories in a clear, labeled carry case for inspection; keep tubing and distilled-water bottles separate and clearly marked. For packing accessories or miscellaneous travel gear ideas see best pressure washer without hose.
How to verify your airline’s policy for sleep therapy devices online and by phone before travel
Confirm the carrier’s published policy online, save a screenshot of the exact clause plus the URL, then call the airline and request written confirmation tied to your booking reference and agent name.
Online checklist: open the carrier site’s “Special assistance” or “Medical devices” page, the checked and carry-on baggage rules, and the PDF baggage policy. Use the site search with keywords: “medical device”, “electronic medical device”, “battery Wh”, “portable therapeutic device”, “carry-on allowance”, and “power supply”. Note any limits on device size, carry-on allowance, and whether an exception to baggage charges applies; copy the paragraph text and capture the page timestamp.
Battery limits to verify: spare lithium-ion cells up to 100 Wh are generally allowed in carry-on; 100–160 Wh typically require airline approval (maximum two spares); >160 Wh usually prohibited. Confirm rules for device-installed batteries versus spare batteries and for airline-specific maximums.
Documentation and submission: check whether the airline accepts a provider letter, prescription, or downloadable medical-device form. If the website offers an upload option under “Manage booking” or “Special assistance request”, attach your documents and save the confirmation number or confirmation page PDF.
Phone script (read verbatim, then record answers): “My reservation is [PNR]. I will travel with a portable sleep therapy device that contains a lithium-ion battery. Does your policy permit the device as carry-on without a baggage charge, and what documentation do you require? What is the allowed battery Wh for both installed and spare batteries? Will you add a notation to my reservation? Please provide the policy citation or URL and a reference number for this confirmation.” After the agent replies, ask: “Can you spell your name and provide the date and a confirmation ID for this call?”
What to save after the call: agent name and ID, date/time, the confirmation or case number, the exact policy clause cited (copy URL), and any email the agent sends. If the agent refuses written confirmation, request escalation to a supervisor and retain that agent’s details.
| Action | Exact phrasing to search or ask | Proof to save |
|---|---|---|
| Website lookup | “medical device” OR “electronic medical device” OR “battery Wh” OR “portable therapeutic device” | Screenshot with URL and timestamp; PDF of policy |
| Manage booking upload | “Special assistance” upload / “medical documentation” | Upload confirmation number; email confirmation |
| Phone confirmation | Script: reservation, device allowance, battery Wh, add notation, written confirmation | Agent name/ID, call timestamp, confirmation ID, follow-up email |
If travel involves a different jurisdiction, repeat the same steps on the regional carrier site and request the local policy citation; keep separate screenshots and phone records for each carrier on the itinerary.
TSA screening rules for sleep-apnea therapy devices and handling at security checkpoints
Keep the sleep-apnea therapy device in your carry-on and present it separately when you reach the security line.
Pack the unit in a protective case, then take it out of the case and place it alone in a screening bin so X-ray images show the device clearly; leave mask, tubing and power cord unattached and set them beside the device in a separate bin or clear bag. Empty the humidifier water reservoir and stow liquids elsewhere before screening.
Spare lithium-ion batteries must travel in carry-on only. Cells up to 100 Wh are allowed without airline approval. Cells between 100 Wh and 160 Wh require airline approval and are typically limited to two spares. Spare cells over 160 Wh are prohibited. Installed batteries inside a therapy unit are generally permitted in checked or carry-on, but spare batteries must have terminals taped or be in original packaging and be protected against short circuits.
Security officers may X-ray the unit, perform a hand inspection or use an explosive-trace swipe. If you prefer privacy, request screening in a private room; officers will either hand-inspect the unit there or operate the swab procedure. Be prepared to power the device on if asked; carry a charged battery or power supply to demonstrate operation.
Call TSA Cares at 855-787-2227 at least 72 hours prior to travel to request assistance or extra screening time. Allow an additional 30–45 minutes at security for domestic flights and more time for international connections or busy airports.
Label the case with contact details and your reservation code, keep tubing and mask together in a clear plastic pouch, keep inline battery Wh ratings or manufacturer stickers accessible, and tape spare battery terminals. Pack a small travel umbrella for quick access during travel planning: best umbrellas for short people.
Packing sleep apnea accessories and lithium batteries: allowed quantities and placement
Carry spare lithium‑ion batteries in the cabin only; spare rechargeable cells must not be stowed in checked baggage.
Battery capacity and limits
- Spare lithium‑ion cells ≤100 Wh: permitted in carry‑on without carrier approval; common backup packs fall here.
- Spare lithium‑ion cells >100 Wh and ≤160 Wh: allowed in carry‑on only with airline approval; limit two spare units per passenger in this range.
- Spare lithium‑ion cells >160 Wh: not allowed on passenger aircraft (may be transported as cargo under special rules).
- Installed rechargeable battery in the therapy unit: generally permitted, but most carriers request the unit be carried in cabin and available for inspection; if the battery is removable, detach it and carry it in the cabin when possible.
- Lithium metal (non‑rechargeable) cells: typically limited to 2 g of lithium content per cell in carry‑on; check cell specs if using disposable types.
Calculate watt‑hours if label shows volts (V) and ampere‑hours (Ah): Wh = V × Ah. If capacity is in milliampere‑hours (mAh): Wh = V × (mAh ÷ 1000). Example: 14.8 V × 6.6 Ah = 97.7 Wh; 12 V × 10,000 mAh → 12 × (10000 ÷ 1000) = 120 Wh.
Placement, packaging and accessory rules
- Spare batteries: carry in the cabin only; place each cell in its original packaging or an individual sleeve, tape exposed terminals, or place terminals in separate plastic bags to prevent short circuits.
- Installed battery: power the unit off, secure it inside a padded case, and keep it accessible for security checks; if airline policy requires, present the unit at check‑in or gate while retaining it in cabin.
- Mask components, tubing, filters, power supply and backup batteries intended for in‑flight use: pack in carry‑on. Pack additional disposable filters or spare non‑battery accessories in checked baggage if space needed.
- Humidifier water reservoir: drain completely before security screening. Carry distilled water in containers ≤100 mL in a clear quart‑size bag for screening, or refill after screening at airport facilities.
- Cleaning liquids and sprays: follow the 3‑1‑1 carry‑on liquid rule (containers ≤100 mL inside one clear quart bag).
- Check battery label for Wh or V and Ah; compute Wh when only mAh is shown.
- If spare batteries fall in the 100–160 Wh band, request airline approval in advance and limit spares to two units.
- Pack all spare cells in carry‑on, protect terminals, and separate each battery.
- Empty humidifier reservoir before screening; pack mask, tubing and filters in carry‑on for inflight use.
- Keep proof of battery specifications and device model accessible for staff queries at check‑in or security.
How to dispute a baggage charge at the airport when your sleep-therapy device is assessed
Immediately request a manager at the ticket counter and present your medical documentation and device; ask for a written explanation if staff insists on a checked-item charge.
At the counter and security
Say: “Please cite the exact airline policy section or Contract of Carriage that requires this device to be checked or billed.” If the agent cannot produce a policy citation, escalate to a supervisor. Record the supervisor’s name, badge number, time and counter location.
Ask staff to print or email a denial statement that includes the agent’s name and reason for the charge. If they refuse, photograph the ticket tag, the device, and any transaction receipt shown on the terminal screen.
Contact the airline’s accessibility or special-assistance desk at the airport; these teams often have authority to override counter decisions. If a phone call is required, make it on loudspeaker and note the representative’s details.
If you pay the charge or are forced to check the device
Obtain a full receipt that lists the charge description, amount, transaction ID and issuing agent. Keep boarding pass, baggage claim stub and any written denials; these are primary evidence for refund requests or disputes.
Submit a refund request via the airline’s official website immediately after arrival and attach the receipt, photographs, written denial (if obtained) and your medical documentation. Also open a dispute with your credit card issuer using the merchant receipt and the airline’s response as supporting evidence.
If the airline denies a refund, escalate to the carrier’s customer-relations email and social channels (X/Twitter can prompt faster responses); include a concise timeline, scanned receipts and the supervisor’s name. If unresolved, file a complaint with the national aviation consumer protection office for your country and keep copies of all correspondence.