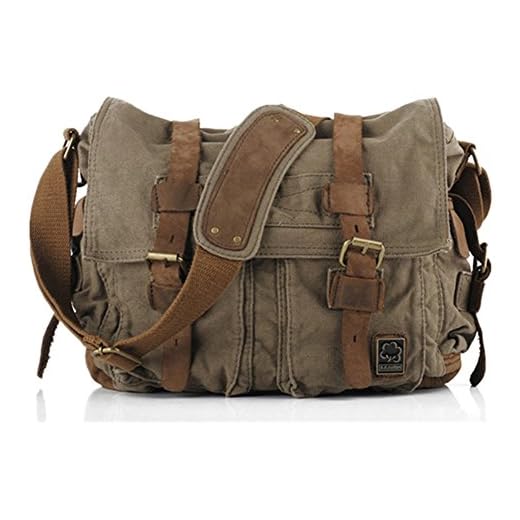


Choosing sturdy fabric and durable straps sets a solid foundation for constructing a reliable carrier. Opt for canvas or denim, which provide strength without sacrificing style. For straps, consider using thick webbing that can withstand considerable weight while remaining comfortable on the shoulders.
Before cutting materials, gather detailed measurements based on the desired dimensions. A functional design often incorporates multiple compartments, allowing for organized storage of personal items, electronics, or everyday essentials. Sketch a layout that details pocket placements and overall structure.
Utilizing a sewing machine can significantly enhance speed and precision. Use heavy-duty thread to ensure seams withstand wear and tear. Reinforce high-stress areas, such as strap attachments, with supportive stitching techniques. Pre-wash all fabrics to avoid future shrinkage that may compromise fit and function.
Finish off your creation with optional embellishments such as patches or embroidery to add a personal touch. Experiment with colors and designs that reflect your individual style, turning a practical item into an expression of creativity.
Creating the Structure
Begin with selecting sturdy materials: canvas or denim work well for durability. Cut the outer fabric into two pieces of equal size. For a more personalized design, consider adding pockets by cutting additional fabric pieces that match your chosen dimensions.
Creating the Lining
Choose a lightweight fabric for the lining, such as cotton. Cut it to the same size as the outer pieces, ensuring that it fits snugly inside. For added functionality, include a compartment for organization by cutting smaller pieces to create internal pockets.
Assembling Components
- Place the outer fabric pieces right sides together, aligning the edges. Stitch along the sides and bottom, leaving the top open.
- Repeat this process for the lining, ensuring it also has an open top.
- Turn the outer piece right side out, then insert the lining inside, aligning the tops. Pin them together for easier handling.
- Stitch around the top edge to secure the lining and outer piece together.
Adding Straps and Finishing Touches
For the shoulder support, cut two equal lengths of webbing or fabric. Attach these to the sides of the structure using strong stitches, ensuring they are secure. You may want to use reinforced stitching for durability.
Consider adding decorative elements or closures such as buttons or magnetic snaps. Complete the project by trimming excess threads and ensuring all seams are neat. Your creation is ready to be used, blending utility with style seamlessly.
Selecting the Right Materials for Your Tote
Choose durable fabrics such as canvas or cordura that can withstand wear and tear. Both materials offer excellent resistance to water and abrasions, making them ideal for outdoor use.
For a softer feel, consider using cotton twill or denim, which provide comfort without sacrificing style. When selecting colors and patterns, opt for darker shades or prints to hide stains better.
Reinforce areas that endure stress, like straps and corners, with materials like ballistic nylon or leather. These provide extra strength and longevity, ensuring your creation remains functional over time.
For added structure, incorporate interfacing or stabilizers. This will help maintain the shape of your product while providing a polished look. Select lightweight options to avoid unnecessary bulk.
Finally, evaluate hardware choices. Use heavy-duty zippers, sturdy clips, and strong buckles to guarantee reliable closures. Consider metal or high-quality plastic for a balance of aesthetics and durability.
Measuring and Cutting Fabric for the Backpack
Prepare a ruler or measuring tape and a fabric marker for accurate measurements. For a small-sized version, cut two pieces of main fabric measuring 15 inches by 18 inches. For a larger version, adjust the dimensions to 18 inches by 22 inches. Always add an extra inch for seam allowances.
Additionally, you’ll need two corresponding pieces of lining fabric with the same dimensions as the main fabric. For the pocket, consider a size of 10 inches by 8 inches, doubled for extra durability. Use interfacing for added structure to any areas that will hold more weight.
To minimize waste, layout your pattern pieces on the fabric before cutting. This helps visualize the space and allows for adjustments. Mark all cutting lines clearly and double-check your measurements to ensure accuracy.
Use sharp fabric scissors for clean edges. Cut through all layers carefully to avoid fraying. If working with thicker materials, a rotary cutter can provide a smoother cutting experience. Store the cut pieces neatly to keep them organized for assembly.
Assembling the Bag: Step-by-Step Instructions
Lay the main fabric and lining pieces right sides together, ensuring edges align perfectly. Pin around the perimeter, leaving an opening at the bottom for turning the project inside out. Stitch along the edges, using a consistent seam allowance. Be cautious around corners, using a pivot technique for smooth curves.
Once stitched, trim excess fabric at corners to reduce bulk. Carefully turn the entire unit right side out through the opening. Use a pencil or a stick to gently push out the corners for a crisp finish. Iron the outer fabric to ensure a polished look, taking care to avoid the lining unless specified.
Next, position the flap over the top section. Attach it securely using a straight stitch, ensuring it aligns well with the sides. For added durability, consider backstitching at the start and end points.
Construct the straps using the remaining fabric pieces. Fold them lengthwise, press, and sew down the long edge. Attach the straps to the sides of the main section, reinforcing with additional stitching for strength.
To finish assembly, fold in the raw edges of the opening previously left unstitched and pin in place. Topstitch around the entire perimeter of the assembly, securing everything neatly. This is an optimal moment to reinforce stress points, especially where the straps connect.
If seeking ergonomic options, explore best backpack for posture for insights on fitting designs. For those keen on lightweight travel solutions, check out best lightweight travel and umbrella strollers.
Adding Features: Pockets, Straps, and Closures
Integrate multiple pockets to enhance functionality. Consider implementing:
- Front Pocket: Ideal for quick-access items like a smartphone or keys.
- Interior Dividers: Organize space for a laptop, tablet, or notebooks.
- Side Pockets: Great for water bottles or umbrellas, ensuring easy retrieval.
For straps, adjustable options provide comfort. Use the following methods:
- Webbing Straps: Durable and adjustable for various body types.
- Padded Straps: Enhance comfort during extended carrying.
- Sewn Loops: Add versatility by allowing strap interchangeability.
When it comes to closures, select a reliable system:
- Zippers: Provide security and swift access, suitable for larger compartments.
- Snaps: Easy to manipulate for smaller pockets.
- Magnetic Flaps: Combine style with functionality, allowing for quick opening.
Don’t overlook maintenance. After crafting your item, ensure it stays in prime condition. Refer to how to clean cat pee from concrete for effective cleaning tips.
Finishing Touches: Seam Sealing and Styling
Apply seam sealing to ensure durability and water resistance. Select a suitable seam tape that matches your fabric type, using a heat-activated adhesive or pressure-sensitive option. Align the tape over stitch lines, and utilize a heat press or iron with a protective layer to activate the adhesive without damaging the fabric.
Styling Elements
Incorporate personalized accents to enhance visual appeal. Consider using decorative stitching, contrasting colors, or unique hardware. Implement these features:
| Feature | Description | Purpose |
|---|---|---|
| Embroidery | Add initials or designs. | Personalization and flair. |
| Patches | Attach fabric or leather patches. | Visual interest and character. |
| Unique Zippers | Select colorful or themed zippers. | Enhance functionality and style. |
| Hardware | Choose distinctive buckles or clasps. | Add elegance and durability. |
Experimenting with various design elements allows for a customized final product that reflects personal style while ensuring functionality and longevity.


