For optimal comfort, begin with loosening or tightening the shoulder carrying mechanism. Ensure it sits evenly on your torso to prevent undue strain on your back. Make small incremental changes to find the most suitable length for your frame.
Next, pay attention to the side that bears the weight. If you notice uneven pressure, switch the anchor points or adjust the securing hardware to balance the load. A properly positioned support will enhance your mobility and ease of access to contents.
Finally, once you achieve the desired fit, do a trial run to assess movement. Walk around, bending and reaching to ensure freedom of motion. If adjustments are still needed, repeat the process until the fit feels just right, allowing for a seamless carrying experience.


Adjusting Your Bag’s Carrying Mechanism
For optimal comfort, ensure the carrying mechanism is positioned correctly. Locate the adjustable parts on either side of the carrying system. Pull the straps to increase length or push the mechanism to shorten them. Test the fit before securing the adjustments; the attachment should rest comfortably on your shoulder, not apply undue pressure.
Steps to Perfect Fit
- Stand upright with the bag on your side.
- Observe the position: the bottom should rest around your hip level.
- Use both hands to adjust the mechanisms simultaneously for balanced length.
- After adjusting, move and ensure it remains stable during use.
Additional Tips
- If the strap slips, check for lock features that might need tightening.
- Consider different configurations for carrying styles (crossbody vs. shoulder).
- For heavier loads, experiment with adjusting the grip location for better weight distribution.
Finding the Right Length for Comfort
Adjust the length for a snug fit against your body, ensuring the load sits comfortably without straining your shoulder or back. Aim for a position where the weight is evenly distributed, preventing unnecessary pressure points.
Techniques for Measuring
- Stand up straight while wearing the accessory.
- Position the shoulder section at a height where the base of the item rests near your hip.
- Check that you can easily retrieve items without excessive bending.
Testing Adjustments
Once modified, take a walk around. Notice if it shifts excessively or feels restrictive. Readjust as needed until it feels right during regular movement.
For those seeking convenient accessories on-the-go, consider the best foldable umbrella singapore.
Techniques for Quick Adjustments
For rapid modifications, utilize the built-in sliders or buckles on the carrying mechanism. Identify the adjustment points that allow for swift release and tightening of the materials. Practice manipulating these components until you achieve a smooth process for readjustment on the go.
Utilizing the Sliding Mechanism
Many designs feature a sliding mechanism that lets you change the length without completely detaching the hardware. To engage this feature, pull the webbing through the slider and pull it back as needed. This method enables instant length changes for different carrying positions.
Quick-Release Buckles
Harness systems often incorporate quick-release buckles. Press the release button or squeeze the sides to detach. Reattach by inserting the ends back into the buckle housing, providing an easy way to adjust storage access. For enhanced versatility, incorporate use with adjustable straps for seconds saved when switching styles.
For more home appliance insights, check this article on are there any a rated fridge freezers.
Tips for Maintaining Strap Stability
Regularly inspect connecting points for signs of wear or looseness. Tighten any screws or fittings that may have loosened over time to ensure secure attachments.
Utilize additional features, such as stabilizing clips or grips, if available. These components can enhance the overall steadiness of the carrying system, preventing unnecessary sagging or movement during use.
Material Care
Clean the fabric and components regularly using a damp cloth to prevent dirt buildup, which can cause friction and loosen ties. Ensure that all buckle systems are free from debris.
Storage Practices
When not in use, store the carrying apparatus in a cool, dry place. Avoid excessive weight on the components, as this can compromise structural integrity and lead to instability over time.
Addressing Common Strap Issues
To prevent slippage, ensure that the adjustment mechanism is tightly secured. Periodically check for wear on the mechanism itself, as fraying or damage can compromise effectiveness. If your attachment points are misaligned, realign them by loosening the hardware, repositioning, and re-tightening.
Dealing with Friction
Regularly lubricate metal parts using a silicone-based spray to reduce friction. If the materials are rubbing against each other excessively, consider adding a protective covering or cloth between the areas causing friction.
Preventing Twists
To maintain a straight configuration, periodically inspect and untwist the sections during use. Store your item properly when not in use, laying it flat to avoid inadvertent twists. If twists are frequent, examine your loading technique to distribute weight evenly.
| Issue | Solution |
|---|---|
| Slippage | Check and secure adjustment mechanism. |
| Friction | Lubricate metal parts with silicone spray. |
| Twists | Inspect and untwist regularly; store flat. |
Choosing the Best Carrying Position
For optimal comfort and convenience, position the item across your body rather than solely on one shoulder. This distributes weight more evenly, reducing strain. Aim to rest the load low on your hip, ensuring easy access to contents while keeping the center of gravity stable.
Left or Right Shoulder?
The decision whether to drape the load over the left or right shoulder depends on your dominant side. Use the dominant shoulder for balance, allowing for easier adjustments and movement. If frequently switching sides, check for any discomfort or fatigue.
Adjusting to Activities
Consider the activity while transporting. For biking or walking, a higher position may prevent swinging, while sitting or commuting might require a lower, more relaxed placement. Keep in mind the need for quick access to items–choose a position that allows for easy retrieval.
Lastly, take note of clothing worn. Bulkier layers can require repositioning for a secure fit, while lighter outfits may allow for a looser feel. Adjust as needed for varying attire. An informed selection of carrying position enhances both functionality and comfort.
FAQ:
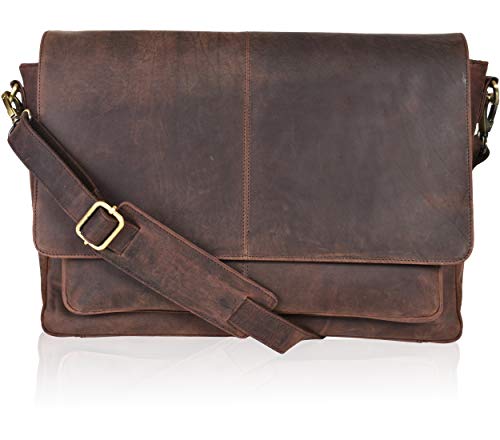
How can I make the strap of my Crumpler messenger bag more comfortable?
To enhance the comfort of your Crumpler messenger bag strap, consider adjusting the strap length. Begin by loosening the adjustments which typically involve sliding the strap through the buckles on either side. Once the strap is at a comfortable length that suits your height and body, tighten it securely. Additionally, if your bag comes equipped with a padded section on the strap, ensure it is positioned correctly over your shoulder to distribute weight evenly. This setup can greatly reduce strain during use.
What should I do if the strap on my Crumpler messenger bag feels too loose?
If you find that the strap on your Crumpler messenger bag is too loose, you can easily adjust it for a snugger fit. Look for the adjustment hardware on the strap, typically located near the side where it connects to the bag. Slide the strap through the buckle or adjuster until you achieve the desired tightness. Make sure to test the fit by wearing the bag and ensuring it sits securely on your shoulder. If it continues to slip, inspect the adjustment mechanism for any wear or damage that might need attention. Tightening the strap not only improves comfort but also ensures the security of your belongings.