Choose sturdy materials like cotton webbing or nylon for robust support. Measure the desired length accurately, ensuring it complements the dimensions of your creation. A well-fitted handle enhances comfort and usability.
Securely attach the ends using heavy-duty stitching. Reinforce each connection point, focusing on both aesthetic design and functional integrity. Additionally, consider using a sewing machine for consistent results; straight stitches work best for this type of project.
Incorporate adjustable hardware if versatility is needed. An adjustable mechanism allows for personal preference in length, catering to various carrying styles. Finally, test the handle for strength before use, ensuring it meets your expectations for durability and comfort.
Crafting a Carrying Component
Select a sturdy fabric, such as canvas or denim, for durability. Cut the material into a length of approximately 50-60 inches and a width of 2-4 inches, depending on desired thickness.
Preparing the Ends
Fold each end of the strip inward by half an inch, and press with an iron for a clean finish. Pin the folds in place. If using a contrasting color, consider adding decorative stitches or trim for enhanced visual interest.
Joining and Finalizing
Stitch along the edges using a straight stitch, maintaining a distance of 1/4 inch from the folded edge. For added strength, reinforce the seams with a zigzag stitch or by sewing a second line parallel to the first.
| Step | Action |
|---|---|
| 1 | Choose fabric |
| 2 | Cut to size |
| 3 | Fold and press |
| 4 | Pin folds |
| 5 | Stitch edges |
After securing the stitches, trim any excess fabric to avoid bulkiness. Attach the completed component to your creation using heavy-duty hardware, ensuring it aligns comfortably for carrying.
Choosing the Right Fabric for Durability
Opt for heavy-duty materials such as canvas, denim, or ballistic nylon for sturdiness. These fabrics provide excellent resistance to wear and tear, ensuring longevity. Additionally, consider treating the fabric with a water-resistant coating to protect against moisture and spills.
Weight and Thickness
Thicker fabrics generally offer better durability. For instance, select canvas with a weight of at least 12 oz per square yard. Denim should also ideally be at least 12 oz for optimal strength. The thickness adds structure and minimizes stretching over time.
Reinforcement Techniques
Integrate additional layers or use interfacing to enhance strength. Incorporate double-stitching or rivets at stress points for improved load-bearing capacity. Examine the seams closely, ensuring they are tight and secure to prevent fraying.
For further understanding of materials’ properties, you might find insights in articles related to which of the following is not a function of proteins.
Measuring Length for Comfort
To achieve an optimal fit, the length of the strap should be measured carefully. For a comfortable carry, it’s recommended to add about 10-15 inches to your desired length. This extra length allows for adjustments and ensures that the accessory can be worn crossbody or over the shoulder without difficulty.
Steps for Accurate Measurement
- Grab a flexible measuring tape.
- Decide where you want the accessory to sit on your body. Typically, this is at hip level for crossbody wear.
- Measure from the starting point (where the strap attaches to the accessory) across your body to your desired endpoint.
- Add the additional length for comfort; this is crucial for mobility and ease of access.
Consider Personal Preferences
Some individuals may prefer a shorter or longer fit based on their style or comfort. If possible, try on straps from different sources to get a feel for what works best. You can also refer to articles like the best backpack for cruise excursions for comparisons of various strap lengths and their functionalities.
Cutting Fabric Pieces with Precision
Utilize a rotary cutter with a cutting mat for clean edges. This tool allows for straight cuts and minimizes the risk of jagged lines. Ensure the blade is sharp to prevent fabric fraying.
Measuring Techniques
For accurate measurements, use a clear quilting ruler. Align the ruler with the fabric grain for the best results, and double-check the dimensions before cutting. Mark cutting lines with tailor’s chalk or fabric markers, as these can be easily removed later.
Layering Fabric
When cutting multiple layers, pin them together securely to avoid shifting. Consider placing weights on the fabric edges if pinning is not feasible. Cutting through several layers at once saves time and ensures uniform pieces.
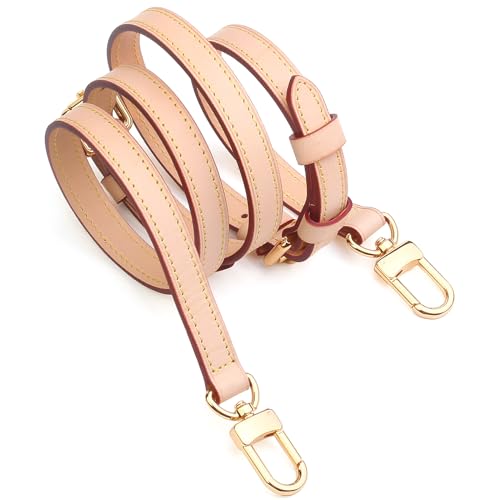
Attaching Hardware Securely to the Strap
To achieve stability, utilize quality hardware such as rings, clips, and buckles that can withstand pulling and weight. Begin by determining the placement of the hardware on the strap. Measure and Mark specific points to ensure even distribution and alignment.
Use a strong thread, like polyester, to reinforce the attachment points. When sewing, employ a box stitch or an X-pattern for added strength at the junctions where hardware connects to the fabric.
After positioning the ring or clip, fold the fabric over the hardware, securing it snugly. This fold not only provides support but also protects the hardware edges from wear. Make sure to leave enough fabric for a secure grip.
For added reinforcement, consider utilizing a piece of interfacing between the hardware and the fabric. This layer will enhance durability and prevent the fabric from tearing over time.
Check that all connections are firmly secured. Perform a pull test on the hardware to ensure the integrity of the attachment. This precaution helps avoid mishaps during use.
Finally, regularly inspect the hardware and stitching for wear, reinforcing as necessary to maintain functionality and style.
Sewing Techniques for Strong Seams
Utilize a straight stitch for the main seams to ensure durability. This stitch creates a solid line that holds layers together. Adjust the stitch length to 2.5-3mm for a balanced look and strength.
Reinforcement Methods
Implement backstitching at both ends of the seam to prevent unraveling. Additionally, consider using a zigzag stitch along the edges of the fabric to minimize fraying, particularly for woven materials.
Layering Strategies
When working with multiple layers, pin layers in place to maintain alignment while stitching. Employ a walking foot attachment to prevent shifting, promoting an even feed through the machine. For heavier fabrics, opt for a heavy-duty needle to ensure smooth sewing.
Finishing Touches for a Professional Look
Applying a top-stitch along the edges enhances durability and adds a polished appearance. Choose a contrasting thread color to make the stitching stand out, or a matching one for a subtle finish.
Using bias tape to cover raw edges is an effective way to prevent fraying while contributing to aesthetics. Select a fabric that complements the main material for visual harmony.
Consider adding decorative elements, such as patches or embroidery, that reflect personal style without compromising functionality. Ensure these embellishments are securely attached to withstand regular use.
Applying interfacing to the inner layer can enhance sturdiness. Opt for a lightweight version to maintain the softness of the piece while providing structure.
Inspect all connections meticulously. Tighten any loose hardware and verify that all seams are smooth and free from puckering. A seamless finish promotes longevity and enhances visual appeal.
Finally, perform a thorough cleaning to remove any fabric dust or markings. This final step ensures the item is pristine and ready for use or gifting.