Begin with a detailed outline that defines each step involved in fabric selection, design conception, and assembly stages. Utilize a software tool like Lucidchart or Microsoft Visio for a visually appealing and clear representation of these phases.
Identify key components such as sourcing materials, drafting patterns, cutting fabric, sewing components, and quality inspection. Each of these elements should be represented in distinct phases on the diagram, creating an intuitive pathway that guides the viewer through the manufacturing cycle.
Incorporate decision points that evaluate material integrity and design feasibility. Use diamond shapes for these junctures, making it easy to see where alternatives may arise and influencing the subsequent steps.
Finally, ensure that feedback loops are depicted where necessary. This enables continuous improvement based on consumer feedback or production efficiency, reinforcing the adaptability of the entire operation.
Selecting the Right Tools for Flow Diagram Development
Utilize software that offers intuitive interfaces and a variety of shapes and symbols. Options like Lucidchart, Microsoft Visio, or Draw.io are particularly useful for their ease of access and collaborative features.


Prioritize tools that support exporting in multiple formats such as PDF, PNG, or SVG, allowing for easy sharing and presentation of your visual representation. Verify that the selected tool includes templates specifically for illustrating workflows, which can expedite diagram development.
Assess compatibility with other applications, especially if integration with project management or design software is necessary. Ensure that the chosen program allows real-time collaboration for seamless teamwork during the creation stage.
Consider user reviews and feedback when selecting a platform, focusing on those that highlight reliability and customer support. Additionally, seek out resources like tutorials or community forums that provide assistance and tips for maximizing the tool’s features.
Finally, conduct a trial of your preferred options to experience their functionality firsthand. This approach allows for assessing which tool aligns best with your specific requirements and style of visualization.
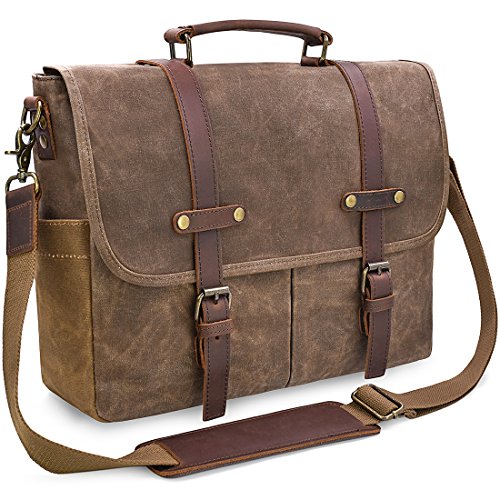
Defining Key Steps in the Messenger Bag Production
Begin with material selection, ensuring high durability and aesthetic appeal. Suitable fabrics such as nylon or canvas are recommended for their resilience and overall quality.
Next, design the layout of the components. Incorporate compartments strategically to enhance functionality. Tools like CAD software can facilitate precise visualization during this phase.
Cutting the materials comes after the design phase. Use sharp cutting tools to guarantee clean edges, which is critical for assembly. Maintain inventory of fabrics to minimize waste.
Assembly follows cutting. Stitch components together with reinforced seams to improve strength. Employ industrial sewing machines for efficiency. Ensure each piece aligns with the predetermined design specifications.
After assembly, focus on finishing touches. This may involve adding zippers, pockets, or straps. Ensure that all hardware is securely attached for longevity.
| Step | Description |
|---|---|
| Material Selection | Choose durable fabrics like nylon or canvas. |
| Design Layout | Create a compartmentalized design for functionality. |
| Cutting Materials | Utilize sharp tools to cut fabric cleanly. |
| Assembly | Stitch components using industrial sewing machines. |
| Finishing Touches | Add zippers, pockets, and check hardware security. |
Finally, quality assurance is paramount. Inspect the final product for any defects or inconsistencies. Performing tests for durability can ensure customer satisfaction and positive reviews, akin to selecting the best outdoor umbrella base for wind to enhance outdoor experiences.
Identifying Inputs and Outputs for Each Step
Detail the resources required for each segment of the creation journey, including materials, tools, and labor. For instance, during the initial design phase, inputs include sketches and fabric swatches, while outputs involve finalized design specifications and cutting patterns.
In the manufacturing stage, common inputs consist of raw materials such as canvas, zippers, and threads. The expected outputs will be semi-finished products ready for assembly. Ensure each step has clear connections to subsequent actions, establishing traceability of components.
During quality assurance, utilize inputs like inspection checklists and testing tools. The outputs should reflect the assessment outcomes, documenting any defects or compliance with quality standards. This ensures accountability throughout the pipeline.
Distribution requires inputs such as packaging materials and transport logistics. The final outputs are the packed items ready for shipment, reflecting the culmination of all prior steps. Accurate identification of these elements is crucial for maintaining clarity and coherence in the overall workflow.
Mapping Workflow for Material Handling and Assembly
Establish a clear sequence for material flow and assembly operations. Start by identifying all materials required for production and their respective locations within the workspace. This facilitates easy access and minimizes handling time.
Defining Material Movement
Document the paths taken by materials from receiving to the assembly area. Outline both manual and mechanized transport methods. Assign specific roles and responsibilities for each stage of movement, ensuring clarity in who handles which materials.
Optimizing Assembly Stations
Arrange assembly workstations to streamline operations. Each station should be equipped with necessary tools and supplies immediately available to workers. Ensure ergonomic layout to enhance productivity and reduce the risk of injury during assembly tasks.
Incorporate feedback mechanisms for continuous improvement. Regularly analyze assembly workflows, seeking input from operators on potential bottlenecks. This iterative approach leads to enhanced workflow efficiency, ultimately improving output quality.
Maintain clear documentation of workflow stages, including revisions when adjustments are made. Visual aids, such as schematic representations, can support understanding and adherence to the defined material handling practices.
Incorporating Quality Control Checkpoints in the Chart
Integrate quality assurance stages at critical points throughout the manufacturing sequence. Each phase should include specific verification methods to ensure standards are met.
- Material Inspection: Confirm incoming materials against specifications. Utilize a checklist to validate quality before utilization.
- Mid-Production Review: Conduct assessments after major assembly phases, focusing on stitching integrity and component fit. This can prevent costly alterations later in the workflow.
- Final Product Evaluation: Implement a thorough examination of the completed items. Assess functionality, durability, and visual appeal. Documentation of findings should be imperative.
- Feedback Loop: Establish a system to capture issues and suggestions from team members. This will inform future batches and inventory management.
Visual documentation of these quality checks within your schematic serves as a guide for staff, ensuring compliance with quality standards.
For those looking for inspiration in design and structure, the best aquarium in New York City exemplifies attention to aesthetic detail and quality control that can be mirrored in your operations.
Testing and Validating the Flow Diagram with Stakeholders
Engage key participants early by organizing review sessions. Present the preliminary schema and facilitate discussions to gather feedback on clarity and accuracy.
Structured Feedback Sessions
Schedule targeted meetings where stakeholders can voice concerns or suggestions. Utilize specific prompts to guide discussions on each segment of the schematic, ensuring that all elements are aligned with operational realities.
Iterative Refinements
Incorporate the feedback systematically, making adjustments to the representation accordingly. Share revised versions with stakeholders for further evaluation, ensuring continuous alignment throughout the validation process.