

Verify the interior serial stamp. Authentic pieces typically have a heat-embossed code on a leather tab arranged in two rows with consistent font and spacing, usually 10–12 digits; digits align horizontally and avoid random letters or extra zeros. Counterfeits often show uneven embossing, mismatched kerning or incorrect line breaks. Compare the tab against high-resolution reference images to confirm font height, stroke thickness and placement.
Assess material, pattern alignment and stitching. Genuine coated fabric presents a tight, slightly glossy finish and uniform monogram repeat; seams match the pattern across joins. Leather trim shows even grain and firm structure; edges are painted cleanly without excess glue. Structural seams typically feature 6–8 stitches per inch with no loose threads. Hardware should feel weighty for its size, have even plating and crisp engravings on buckles and zipper pulls; zippers operate smoothly without snags.
Examine logo typography, interior labels and packaging. Logo proportions must match official references: letter spacing, stroke width and placement of monogram elements are precise. Interior heat stamps commonly include model codes and country of manufacture with consistent capitalization and spacing; counterfeit stamps may use incorrect case or misplaced wording. Original dust bags and care cards use quality cotton or thick paper and accurate printing; barcodes and invoices from authorized retailers strengthen provenance. Prices far below typical retail (roughly more than 40–50% lower) represent a strong warning sign.
Use comparison photos and expert verification. Acquire clear, well-lit images of serial tags, close-ups of stitching, pattern repeats and hardware for side-by-side comparison with verified examples. If doubts persist, submit images to a reputable third-party authentication service or request an in-person inspection at an authorized store; many services provide a detailed report. Quick practical checks – weight, smell of materials and functional testing of pockets and zippers – often reveal inconsistencies that images alone might miss.
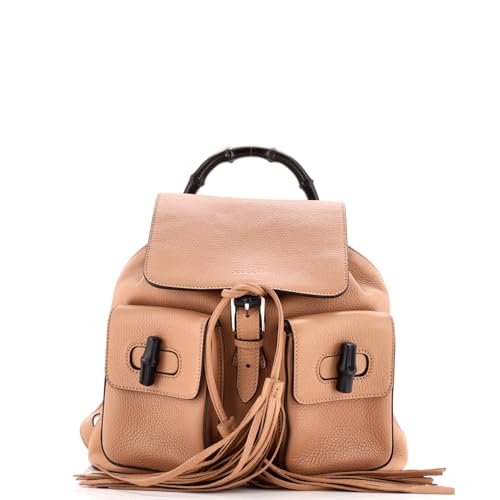
Authentication Checklist for an Italian Luxury Rucksack
Immediate action: inspect the internal leather tag for a two-line embossed numeric code (typically 10–13 digits). Genuine tags show deep, even embossing with no ink or printed numerals; the top row usually denotes model/style, the bottom row production/batch. Photograph both rows and compare with trusted seller records or an image archive before purchase.
Examine patterned coated fabric for symmetry: repeats should match across seams and center panels; misaligned motifs or off-center placement indicate reproduction. Trim leather should have consistent tone and finish, with neat edge painting and no excess glue residue along seams.
Assess hardware weight and markings: pulls, buckles and D-rings feel substantial, not hollow. Zipper manufacturers commonly used by luxury ateliers include Lampo and RiRi; branded zipper sliders should operate smoothly and bear crisp maker marks. Look for uniform plating with no flaking or uneven color.
Check typography and heat-stamp details: interior stamp that states country of manufacture must use a narrow, evenly spaced font with clean letterforms; spacing between letters and alignment to the tag edge are consistent on authentic pieces. Smudged, crooked or shallow stamps are red flags.
Inspect stitching quality and reinforcement: stitches are tight, uniform length and color-matched to surrounding leather; stress points feature reinforced bar tacks. Loose threads, skipped stitches or varying stitch length along the same seam suggest inferior assembly.
Evaluate linings, labels and paperwork: care booklets printed on thick stock with sharp text and accurate multilingual content; dust bag made from soft cotton with a well-centered brand stamp and sturdy drawcords. Retail stickers on original tags include barcode, style code and color code–confirm those match the embossed serial numbers.
Use sensory checks: genuine leathers emit a rich, non-chemical aroma and the piece carries noticeable weight from quality hardware and structured materials. Extremely light weight or strong solvent smells are inconsistent with authentic manufacturing.
If doubts persist, obtain high-resolution close-ups (interior tag, stamp, zipper maker mark, stitching, pattern junctions) and submit to a reputable third-party authenticator or request verification from an authorized boutique; decline offers lacking clear provenance or detailed imagery.
Authenticate the Serial Number, “Made in” Tag and Font Details
Inspect the serial-number leather tab first: genuine pieces show two rows of deeply stamped numerals with consistent depth, spacing and alignment.
Serial-number checks
- Layout: authentic tags most commonly display two numeric rows – top row of six digits and a bottom row of four to six digits (total usually 10–12 numbers). Variations exist for vintage models; modern items rarely include letters, hyphens or slashes.
- Stamp quality: digits must be sharply debossed, identical in height and thickness, and free of ink or printing. Shallow, fuzzy or uneven impressions indicate reproduction.
- Character shapes: look for uniform zeroes (0) and ones (1) – counterfeit fonts often use an oval zero or a one with a serif that differs from genuine examples.
- Placement: serial block should sit centered on the reverse of the leather tag, with consistent margins and straight baseline. Off-center or crooked blocks are red flags.
- Verification step: photograph the tag (macro/magnified), compare to photos from official product pages or reputable resellers, and submit serial plus photos to the label’s customer service or an accredited authenticator for confirmation.
“Made in” tag and font details
- Front tag markings: the brand wordmark on the front is heat-stamped with even pressure; letters must be uniformly spaced and crisply defined. Blurred edges, inconsistent depths or irregular kerning suggest imitation.
- “MADE IN ITALY” line: usually stamped in uppercase directly beneath the wordmark on the same leather tab; check for even letter height, straight alignment and matching font weight to the wordmark.
- Letterform comparisons: examine specific letters that reveal mistakes on fakes – common errors include an overly rounded “G”, a narrow “U”, and a slanted “Y”. Use a magnifier and compare these details against authenticated images.
- Material and stamping interaction: genuine leather tabs accept a clean, deep stamp; if stamping sits on a plasticky or overly smooth surface, or if the leather puckers around letters, authenticity is doubtful.
- Final verification: if serial appearance, tag placement and letterforms match authenticated references and the label’s customer service confirms the code, reliability of the item’s origin is strongly supported. When uncertainty persists, request an expert opinion from a trusted third-party authenticator that documents fonts and serial formats in their report.
Assess Materials: Leather, GG Coated Textile and Interior Lining
Inspect leather edges and flesh side first: authentic calf or cowhide will show a velvety suede underside, consistent grain on the face, and smoothly burnished or edge-painted trim rather than raw, fraying layers or visible fabric backing.
Smooth leather attributes to verify: a subtle, natural sheen without plastic gloss; slight elasticity when pinched; uniform pores that vary slightly in size; no repeating stamp patterns. Embossed signature leather should have sharp, deep embossing with crisp edges and no soft, fuzzy emboss borders.
GG monogram coated textile should present a tight woven base beneath a thin polymer coating. Surface cues: even sheen, no bubbling or peeling at folds, and monogram elements aligned across seams. Bend the material–authentic coating will flex without white cracking or flaking; counterfeit pieces often reveal brittle cracking or exposed textile threads.
Interior lining materials commonly used include dense microfiber suede and heavyweight cotton twill. Microfiber suede feels plush with a uniform nap; cotton twill must be tightly woven with a matte finish. Lining color and texture should match the model’s documented specifications and be free of glue stains, loose fibers or uneven dye patches.
Stitching and assembly specifics: stitch length typically falls between 2.5–3.0 mm (roughly 8–10 stitches per inch), with straight, evenly spaced stitches and matching thread color. Pocket openings and zipper channels are top-stitched neatly; interior pocket edges are trimmed with edge-painted leather, not raw cuts. Hardware attachments use reinforced stitching and metal washers or rivets that sit flush, without puckering or exposed adhesive.
Practical checks: smell the leather (natural leather emits a warm, organic scent; heavy chemical/plastic odors suggest synthetic); run a damp fingertip discreetly–authentic finishes rarely bleed dye; use gentle pressure on coated monogram areas to confirm flexibility without surface flaking; inspect seams under magnification for pattern alignment and consistent coating edge sealing.
Inspect Stitching, Edge Paint and Construction Symmetry
Use a 10x loupe and a millimeter ruler to inspect stitch spacing: luxury leather goods typically show 7–9 stitches per inch (≈3–4 mm) with uniform stitch length and equal tension across seams.
Look for clean stitch starts/ends: stitch runs should not have long backstitches, visible knotting or loose ends; reinforcement at high-stress points (strap bases, zipper ends) normally appears as dense bar-tack clusters of roughly 8–12 tight stitches or a small boxed stitch rather than messy overlapping threads.
Examine thread type and color under magnification: bonded polyester or waxed nylon with a slight sheen and consistent dyeing is common. Mismatched thread hues between panels, fuzzy fraying, or flat matte cotton thread indicate lower-quality construction.
Assess edge paint: it should form a smooth, continuous seal 0.1–0.3 mm thick with no brush streaks, runs or pooling at corners. Edge paint must stop cleanly at stitch lines without bleeding onto thread; visible cracking, flaking or a layered appearance is a defect.
Check seam finishing inside compartments: raw edges should be folded, heat-sealed or overlocked and adhesives, if used, must not be visible. Excess glue residue or uneven sealing at seams signals poor assembly.
Verify bilateral symmetry: measure distances from centerline to strap anchors, zipper centers and external hardware – matching positions should be within about 1–2 mm. Pattern motifs (if present) and panel joins should align across seams; off-center motifs or mismatched repeats reveal sloppy cutting or assembly.
Inspect zipper alignment and pull orientation: teeth should meet evenly along the entire run, sliders glide smoothly without wobble, and pull tabs mirror each other in shape and placement. Uneven zipper tracks or angled sliders suggest misassembly.
Quick checklist: 7–9 SPI, bar-tack clusters ~8–12 stitches, edge paint 0.1–0.3 mm smooth seal, no visible glue, hardware positions ±1–2 mm symmetry, and internal edges neatly finished. Use magnification and a mm ruler for objective comparison against a verified example.
Check Hardware: Zippers, Clasps, Engravings and Weight
Begin by moving every metal part: zipper sliders must glide smoothly with even resistance and no side-to-side play; teeth should mesh perfectly without gaps or misshapen links. Look for full-metal sliders (brass or nickel-plated brass) rather than hollow or stamped alloy; genuine high-end pieces use solid components that produce a dense, non-hollow sound when tapped gently.
Examine zipper markings and tape: reputable manufacturers stamp brand names such as LAMPO or RiRi on the slider body or pull, often on both front and reverse faces. Tape color matches main fabric and stitching runs directly into the zipper tape without raw glue lines. Pull tabs are typically soldered or riveted cleanly; flimsy folded tabs or heat-glued ends indicate lower quality.
Assess clasps, D-rings and hardware fittings: hinges operate with consistent spring tension and return to closed position without wobble. Screws should be used where visible (not crude rivets), heads flush and countersunk. Edges receive fine chamfering; rough burs, excess solder or visible glue inside hinge cavities signal aftermarket replacements. Plating must be uniform – check for micro-pitting or early flake that reveals a copper-colored base metal beneath gold tone.
Read engravings with magnification: use a 10x loupe to verify font weight, letter spacing and engraving depth. Authentic pieces show crisp, evenly-deep letters with straight baselines and exact kerning; blurred, shallow or hand-etched characters are red flags. Engravings often appear on the underside of clasps, on the back of zipper pulls and on rivet heads – compare placement and font to high-resolution official photos.
Use weight and magnet tests as quick checks: substantial brass hardware adds noticeable heft; a full complement of genuine brass fittings on a medium-sized item will feel weighty in hand rather than tinny. A small magnet should not cling to brass or most nickel-plated brass parts; strong attraction suggests low-grade ferrous steel. Beware: magnet alone is not definitive – combine with visual and tactile inspections.
Document and compare: photograph hardware close-ups (front, reverse, hinge internals) and compare to authenticated references from the brand’s official site or reputable retailers. For pre-cleaning and workshop prep when inspecting or restoring metal parts, consult best pressure washer for detailing business for appropriate equipment choices.
Verify Provenance: Receipts, Retailer Records and Third-Party Authentication
Request the original itemized purchase receipt plus the retailer’s invoice export; confirm purchase date, store code or outlet ID, masked payment digits, transaction ID and SKU/model code before accepting provenance.
On receipts check for: full store name and physical address, VAT or tax ID, cashier terminal ID, timestamp with seconds, barcode or QR code matching the invoice, and an itemized line that includes the manufacturer model code. Cross-check the invoice barcode/QR by scanning – it should open a seller-hosted order page or contain a numeric transaction that matches the printed Transaction ID.
For retailer records obtain a scanned copy of the point-of-sale record or the original order export from the retailer’s backend (PDF with header/footer, Message-ID from confirmation email, and shipping label with carrier tracking). Ask the retailer to confirm the order in writing (official store email domain) and to provide an internal reference number or screenshot of the order line in their inventory system showing the same SKU/model code and serial block.
Use remote authentication services for a second opinion: photo-based expert reviews generally return within 24–72 hours and cost roughly $20–$60; certified in-person inspections run $50–$150; laboratory material analysis (leather protein tests, dye analysis) starts near $200. Require a verifiable certificate number and a link to the authenticator’s online database entry that displays the submitted photos and verdict.
| Document / Service | What to verify | Red flags |
|---|---|---|
| Original receipt | Store name, address, VAT/Tax ID, Transaction ID, SKU/model code, masked card digits, timestamp, scannable barcode/QR | Blank store address, generic “online sale” line, missing transaction number, non-matching SKU |
| Retailer system record | Order export screenshot or PDF from official store domain, shipping label with carrier and tracking, internal ref number | Seller-supplied screenshots with cropped headers, image edits, different timestamps |
| Payment proof | Bank/processor notification showing masked digits matching receipt and same date as order | Only a PayPal “sent” page without transaction details, mismatched payment dates |
| Third-party authentication | Certificate ID, public database entry, photos used for assessment, method (photo vs. in-person), turnaround time and cost | No certificate number, “internal only” verdicts, unverifiable expert identity |
| Marketplace / reseller proof | Original invoice from first purchaser, transfer of ownership paperwork, consignment contract or shop intake form | Generic resale listing without original invoice, seller unable to produce proof of purchase |
When a certificate is provided, paste the certificate ID into the authenticator’s public lookup and save both the lookup screenshot and the certificate PDF. If relying on a photo-based opinion, require at minimum: clear shots of the item’s interior label, full exterior, hardware close-ups, and a high-resolution image of any serial or production code. Maintain chain-of-custody by documenting timestamps of every exchanged file and the email domains involved.
Additional resources: best travel backpack daypack and best umbrella insurance state farm.
FAQ:
How can I check the serial number inside a Gucci backpack to see if it’s authentic?
Look for the small leather tag sewn into the interior—often behind a pocket or near the top seam. Genuine tags have GUCCI in uppercase on the front and a heat-stamped serial number on the reverse, usually arranged in two rows of digits; the font, spacing and depth of the stamp are consistent and crisp. Fake tags commonly show blurry or shallow digits, incorrect fonts, uneven spacing or sloppy stitching around the tag. Ask the seller for sharp close-ups of both sides of the tag and the surrounding stitches, then compare those images to photos of confirmed authentic pieces or contact Gucci support or a trusted authentication service for verification.
What are the most reliable physical signs to tell a real Gucci backpack from a counterfeit?
Begin with the materials and pattern alignment: the GG canvas should be even and symmetrical across seams and panels, with logos centered where appropriate. Check the leather trim and stitching—stitches should be tight, uniform and straight, without loose threads or glue residue; real leather has a consistent feel and ages naturally, while fake leather can feel plasticky or have a strong chemical odor. Inspect hardware: authentic pieces use solid, heavy metal hardware with clean engraving or branding; plating should be smooth and not flake, and zippers should operate smoothly and feel substantial. Examine interior details: lining materials and pocket construction match the model’s known specs, and inner stamps (GUCCI and made in italy) use the correct font and casing. Packaging and extras matter too—authentic dust bags, boxes and care cards are made from high-quality fabrics and printing; cheap or generic packaging is a red flag. Finally, compare high-resolution photos with official product images, review the seller’s reputation and return policy, and request a proof of purchase when possible; if doubts remain, use an established authentication service or bring the bag to an official store for inspection.