

Measure torso length from the prominent C7 vertebra (neck base) down to the top of the iliac crest; match that number to the pack frame size. Typical ranges: <40 cm = XS, 40–46 cm = S, 46–52 cm = M, 52–58 cm = L, >58 cm = XL. If the measured value falls between sizes, choose the smaller for a more stable carry or the larger for added comfort with bulky layers.
Position the hip pads over the iliac crest so the belt sits level across the pelvis; fasten the buckle and pull the webbing until the pads press firmly but not painfully. With most loads, the pelvis should bear 60–70% of weight for day trips and 70–80% for heavy, multi-day loads. If shoulders do the work, increase hip-belt tension and slightly loosen shoulder straps.
Tighten shoulder straps only to remove gaps between torso and harness; straps should contour to the shoulder without digging. Set the sternum strap about 10–15 cm below the collarbone and clip it loosely enough to allow deep breaths while preventing strap slip. Use short, incremental pulls on the shoulder webbing so the pack rides close without lifting the hips.
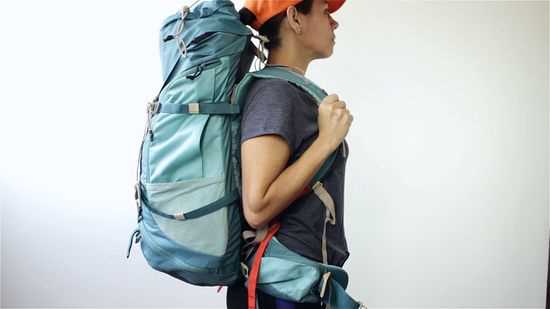
Set the load-lifter straps at roughly a 45° angle from the pack to the shoulders; pull until the pack’s top is drawn into the upper back and the frame leans 10–15° toward the body. Stow heavy items centered and as close to the spine and mid-back as possible (within ~10 cm), place medium-weight items above/beside them, and put compressible/light items at the bottom or outer pockets. Tighten side compression straps to eliminate shifting but avoid deforming the internal load.
Choose pack volume for trip length: 20–35 L for day use, 35–50 L for overnight, 50–80 L for multi-day. Target carried weight at or below 20% of body weight for comfort; trained hikers may carry up to 25%. Do a short test walk with the full load and re-tune hip belt, shoulder straps and load-lifters until the feel matches these guidelines.
Place hip belt over iliac crest and tighten to shift load off shoulders
Place the hip belt so the padded band sits squarely on the iliac crest and tighten until roughly 60–80% of total load rests on the pelvis rather than the shoulders.
- Positioning: center the hip pad over the top of the pelvis (iliac crest), not the soft abdomen; padding should contact bone without pinching soft tissue.
- Tension target: start snug, then increase until shoulder straps carry only stabilizing tension; aim for hips to bear the majority of weight (60–80%).
- Two‑finger comfort test: you should be able to slide two flat fingers between belt and hip bone; more gap means under‑loaded hips, less means potential circulation or nerve pressure.
- Walking test: tighten, walk 100–200 steps, then reassess shoulder pressure; if shoulders still take most weight, incrementally tighten hip belt and re‑test.
- Load placement: keep the heaviest items high and centered above the hip belt line so force transfers directly into the pelvis.
- Stabilizers: use short hip stabilizer straps to pull the pack body against the hips; tighten in 3–5 mm increments until torso feels steady without additional shoulder strain.
- Pressure troubleshooting: if the belt digs into the iliac fossa or causes numbness, lower the belt 1–2 cm or redistribute interior weight to reduce hotspots.
- Pack to typical weight and stand upright.
- Fasten hip belt, center over iliac crest, tighten to two‑finger gap.
- Walk 100–200 steps; if shoulders feel loaded, increase hip tension slightly and re‑walk.
- When hips bear most weight and breathing is unrestricted, secure stabilizer straps and set shoulder straps only for balance.
Tighten shoulder straps to remove slack while leaving a finger’s width between strap and collarbone
Tighten shoulder straps until a single finger fits between strap and clavicle – target 1.5–2.0 cm (0.6–0.8 in). Pull both straps evenly until the webbing lies flat against the trapezius with no visible loops of slack along the strap channel.
With the pack settled on the hips and load compressed, shorten straps in 5–10 mm increments; test after each small change. Aim for the shoulder strap to carry contact across the upper third of the deltoid, not the trapezoid apex; this prevents straps riding onto the neck or slipping off the bone.
Position the sternum strap roughly 2–3 cm below the jugular notch and fasten it to prevent strap splay; tighten only enough to keep shoulder straps aligned, then fine-tune shoulder webbing for the single-finger clearance. If load lifters are present, set them at a 30°–45° angle from the pack to pull the top of the load toward the shoulders without lifting the hip belt.
Perform a dynamic check: walk 50 steps, climb two flights of stairs, then jog 10–20 m. Signs of over-tightening – pins & needles, numbness, shallow breathing or red pressure marks – require loosening the shoulder straps by 5–10 mm and re-testing. If straps still dig, redistribute contents so heavier items sit closer to the torso.
For unrelated outdoor build guidance see how to build a wooden dog run fence.
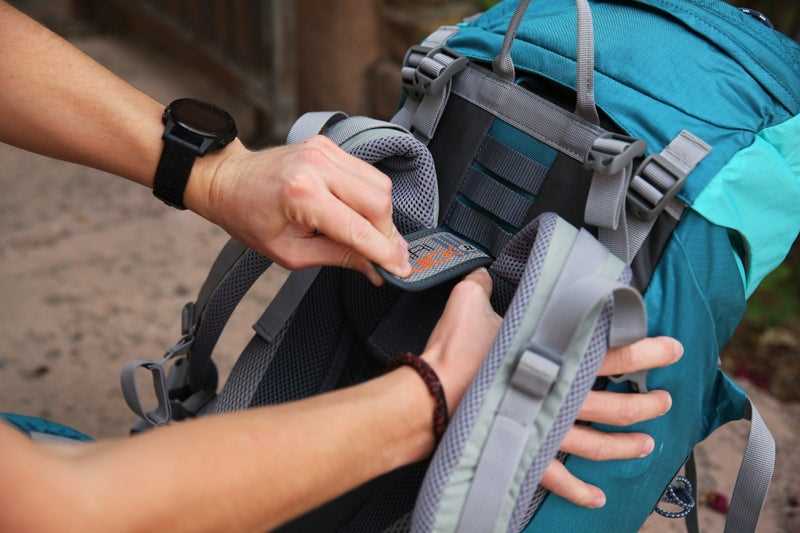
Set torso length: locate C7 to iliac crest and slide the harness to match measurement
Recommendation: Measure C7-to-iliac-crest and position the harness so the shoulder-strap anchors rest at that exact distance; record to ±0.5 cm (±0.2 in).
Locate C7: Tilt head forward; the most prominent vertebra at the base of the neck is C7. Mark it with a fingertip or small sticker.
Locate iliac crest: Hands on hips, thumbs to spine, palpate the top of the pelvic bone on both sides and use the midpoint of those points as the measurement endpoint.
Measure: With a flexible tape, follow the spine from C7 down to the midpoint of the iliac crests. Stand upright, neutral posture, light clothing. Record measurement in cm and inches to the nearest 0.5 cm.
Position harness: Open the harness access (Velcro panel or sliding plate), move the harness so the center of the shoulder-strap anchor aligns with the marked measurement on the back panel, then reseal the retention. For stepped sliders, choose the step whose center matches the measured length.
Tolerance and functional check
Acceptable deviation: ±2 cm (≈0.8 in). Perform a short test walk with the hip belt fastened and 5–10 kg on the hips; if the anchor shifts more than tolerance, reposition the harness one step (≈1–2 cm) and repeat.
Torso length reference
XS: <41 cm (<16 in) · S: 41–46 cm (16–18 in) · M: 46–51 cm (18–20 in) · L: 51–56 cm (20–22 in) · XL: 56–61 cm (22–24 in). Use these bands to select harness range or to verify slider placement.
Compare alternative carry solutions: best luxury briefcase for men and best submersible backpack.
Position and tension the sternum strap and load lifters to pull the pack close to the upper torso
Place the sternum strap 2.5–5 cm (1–2 in) below the clavicles; fasten and cinch until shoulder-strap spread is stopped but full chest expansion remains possible.
Set the load-lifter straps so they form a 30–45° angle from the shoulder seam toward the top of the frame; draw them snug until the pack’s top panel tilts toward the upper torso and any gap between the frame and the upper back is eliminated.
Tension targets
Sternum strap: light to moderate tension – enough to stabilize shoulder straps without compressing the ribcage (target: allow 2–4 cm vertical chest movement during deep breath). Load lifters: moderate tension bearing roughly 20–30% of the perceived shoulder load; lifters should stop the pack’s top from canting outward.
Functional checks
With a full load, walk 60–90 seconds and jog on the spot 20 seconds; the pack should remain close to the upper back, shoulder straps should not ride up into the neck, and the hip belt should continue to carry the majority of weight. If the pack pulls the head forward, increase load-lifter tension slightly; if breathing feels restricted, ease the sternum strap by one notch.
Place heavy items low and centered, then compress side straps to stop shifting

Place the heaviest items in the lower third of the main compartment, flush against the internal frame or back panel and centered within 2–4 cm of the pack’s midline.
Typical heavy items: multi-day food (in 1–2 L stuffsacks), metal cookset nested together, fuel canister, spare batteries. Consolidate weight into a single concentrated mass rather than multiple scattered items.
Placement specifics
Limit lateral offset to <5 cm. For a main compartment height of ~60 cm, position the vertical center of mass roughly 15–20 cm above the base. If heavy gear is bulky, compress it into one stuffsack and seat that sack directly against the frame-facing wall.
Compression technique and testing

Run side-compression straps across the heavy mass and tighten until there is no visible gap between load and frame and lateral play is eliminated. Aim for strap tension that prevents noticeable movement but does not overly deform soft contents. Validate with a dynamic test: walk briskly or jog in place for 30 seconds – acceptable shift: <3 cm. If shift exceeds that, re-center the mass and re-cinch straps.
For uneven or long items, use both upper and lower compression straps to create a triangular clamp; place rigid pieces against soft sacks to keep shape and reduce internal shifting.


