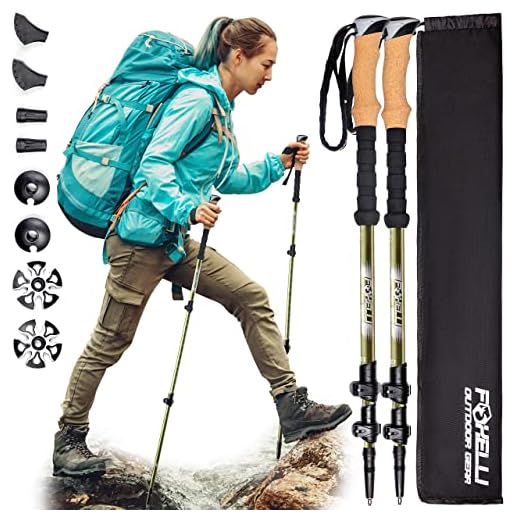

Thread collapsed shafts through the side compression straps so the tips sit under the lower webbing and the handles reach the lid or shoulder area; then clip the wrist loops to a small wiregate carabiner on the shoulder strap for secondary retention. This method prevents vertical sliding and keeps grips accessible without removing the rucksack.
Collapse walking sticks to their shortest length – typical folded lengths are 55–70 cm for most models. Place the lower contact point roughly 20–30 cm above the pack base and the upper contact 10–15 cm below the lid or across a daisy-chain. For stability, store tips-down when trail speed is low and terrain is straightforward; switch to handles-up and clip to the hipbelt when negotiating steep or technical sections so the shafts don’t catch on obstacles.
Use dedicated hardware: a light wiregate carabiner (~7–15 g), a 2–3 mm shock cord loop of about 15 cm, and a short webbing strap with a ladderlock or quick-release buckle (12–20 mm wide). Add rubber tip covers to prevent fabric wear and reduce noise. If your rucksack has a built-in pole carrier, nest the collars into the carrier and tension one compression strap; if not, create two tie points (top and bottom) so the sticks cannot pivot.
Field-check: load the rucksack with typical weight, then shake the pack for 5–10 seconds; acceptable movement is under 1–2 cm. If there’s more play, add a second tie or shorten the shock cord. Avoid routing sticks across hipbelt pockets or hydration hose runs. When clearing dense brush, unclasp and carry the sticks in hand rather than risking snagging while they remain secured to the rucksack.
Pass collapsed hiking sticks vertically through side daisy chains and clip with a carabiner
Pass collapsed hiking sticks through at least two daisy-chain loops (one near the lid, one midway) so the shaft runs vertically along the pack side, then clip a carabiner through the top loop around the shaft to lock position.
Placement and dimensions
Collapsed length: most fold to 35–50 cm; choose daisy loops spaced 10–20 cm apart so the shaft is supported at two points. Position handles up and tips down: tip should be seated in a lower pocket, under a compression strap, or tucked behind the hipbelt to prevent lateral swing. If your pack side pocket is shallow, route the tip under the lower lash point and add a rubber tip protector.
Securing and anti-rattle measures
Use a small shock cord (1.5–3 mm) or a 15–20 cm velcro strap around the shaft and a middle daisy loop to eliminate play. Clip a carabiner through the top loop and around the shaft above the cord so the shaft cannot slide downward. Orient the carabiner gate facing the pack and tucked into the loop to reduce accidental opening. For extended fast hikes or technical terrain, use a screw-lock carabiner; for fastpacking, a lightweight wire-gate is preferable.
| Carabiner type | Typical weight (approx.) | Use case |
|---|---|---|
| Wire-gate | 10–25 g | Lightweight carry, minimal added bulk |
| Solid-gate | 25–45 g | Everyday reliability, slightly heavier |
| Locking (screw or twist) | 40–80 g | Maximum security when walking over rough terrain |
Protect webbing from shaft abrasion by adding a short sleeve of heat-shrink tubing or a strip of cloth under the shaft where it contacts the daisy chain. Before each outing check that loops and stitching show no fraying. For urban transit or minimal-gear days consider an alternative carry option such as a best stuffable travel tote.
Secure walking sticks horizontally under compression straps to stop swinging
Place collapsed walking sticks parallel to the pack frame, handles up, tips rearward; route them directly beneath the compression straps so the webbing clamps the shafts flat against the pack body.
- Placement: position the center of the paired shafts at the pack’s midpoint (roughly shoulder-blade level) to keep mass close to your torso and reduce pendulum motion.
- Strap spacing: use two straps spaced 20–30 cm apart for full-length shafts; one strap alone is insufficient for longer sections – add a third strap for >120 cm total shaft length.
- Tension: tighten straps until lateral and fore/aft play is eliminated; stop when grips depress slightly but are not crushed. For carbon shafts use lower tension and add a soft pad under the strap to spread load.
- Packing order: place foam or neoprene sleeve between metal and pack fabric to prevent wear and rattling; rubber O-rings or small velcro wraps at both ends stop micro-movement.
- Tip management: use hard tip covers or fold baskets inward; if no covers, place the tip ends against a reinforced pack panel to avoid piercing or catching on brush.
- Telescoping locks: collapse and lock telescopes fully before clamping; unsecured sections will shift and damage locking collars.
- Materials note: aluminum tolerates firmer clamping than carbon – for carbon, add 3–5 mm of closed-cell foam under the strap and avoid sharp-edged webbing.
- Quick-release bridle: run a short shock cord from tip area to a strap loop, cinched with a cord lock to capture the distal end and prevent axial slide during rough terrain.
Clean shafts after muddy trips to avoid abrasive grit between shaft and pack fabric; for heavily soiled sections consider heavy-duty cleaners (example: best pressure washer soap for concrete) and rinse thoroughly before storing to protect finish and locking mechanisms.
Slide walking sticks into a front vertical sleeve for upright, quick access
Insert collapsed walking sticks tip-first into the front vertical sleeve of the rucksack so grips remain exposed about 10–15 cm above the collar for one-handed retrieval.
Choose a sleeve at least 75% of the collapsed shaft length: most 3‑section collapsible shafts collapse to 35–45 cm, so a 40–50 cm sleeve is ideal; full‑length two‑piece shafts that collapse to 55–65 cm need a 60–70 cm sleeve. Sleeve width: 3–4 cm for a single staff, 6–8 cm to stow a pair side‑by‑side without binding.
Protect tips with rubber caps or a short length of inner‑tube before sliding them in to prevent abrasion or piercing the liner. Align the staff along the pack’s centerline to reduce lateral swing; place heavier items low in the main compartment to counterbalance the vertical load.
Secure the exposed grips by looping a short elastic cord or a 10–15 cm webbing strap through the sleeve’s top lash and around the handles–tension should prevent upward jostle but not compress foam grips. For micro‑adjustments, tuck a 2–3 cm foam pad between handles and the lid to stop rattle without impeding a quick draw.
For rain or extra protection when not in use, stow a compact cover in the same pocket or consider gear that doubles as shelter; see a compact option here: best travel golf umbrella.
Fasten walking sticks beneath the pack lid using the top strap or a bungee loop
Place handles up under the lid lip with tips pointing down and leave 10–15 cm of grip exposed for a one-handed grab.
Pass the lid’s top strap over the exposed grips and tighten until movement is under 2 cm when you shake the rucksack; for cam straps that generally means 3–4 full turns of the cam before it locks.
When a bungee loop is available, form a 15–25 cm elastic loop around the handles and seat the knot beneath the lid. Use 3–4 mm shock cord or factory bungee; tie a double overhand or figure-eight and melt synthetic ends for a tidy finish.
Protect contact points with 5–10 cm of duct tape, a short neoprene sleeve, or 2–3 mm foam insulation to stop abrasion and reduce clatter under load.
For backup, run a 15 cm accessory cord or a small locking carabiner through the wrist straps and clip to a lower lash point or rear haul loop so the sticks remain secure if the top strap loosens.
Verify security by loading the rucksack, bending forward, and performing a 20-second shake test; if vertical or lateral movement exceeds 3–4 cm, shorten the bungee by 2–5 cm or re-tension the top strap.
Protect pack fabric: cover tips and baskets before securing sticks
Slip silicone or rubber tip caps over metal tips or wrap with self-fusing silicone tape (19 mm wide) before securing hiking sticks to the pack; this prevents metal-on-nylon abrasion and snagging of fabric. If using tape, wrap 50–75 mm of shaft with 2–3 complete turns, overlapping ~50% and finishing with a 5–10 mm removal tab.
Materials and sizes
Recommended items: silicone/rubber tip caps (inner diameter matched to tip: common sizes 8–11 mm), self-fusing silicone tape (19 mm or 25 mm width), 3M electrical tape (19 mm) as a secondary layer, small cable ties (2.5–4.8 mm width), short PVC or plastic cup sections for basket guards (30–50 mm diameter), a caliper or ruler, and scissors. For carbide tips measure with caliper; pick a cap 0.5–1.0 mm smaller for snug fit.
Application steps
1) Clean metal tip and adjacent shaft with isopropyl alcohol; remove grit and burrs with 120–220 grit sandpaper. 2) Fit cap or start tape at the tip, stretching silicone tape slightly to activate bonding; apply 2–3 revolutions up the shaft, smooth each layer to eliminate gaps. 3) If using a cap, add one short cable tie over the cap’s rim, trim the tail flush. 4) For baskets, cut a plastic cup to cover the basket profile and slide it over the basket stem, or wrap the basket hub with a foam donut and secure with tape; fasten with a small zip tie if movement is likely. 5) Keep protective material at least 10–20 mm away from any collapse/locking mechanisms to avoid interference. 6) Color-code caps or tape (bright tape) for quick identification on the trail and leave a small pull-tab for removal.
Maintenance: inspect coverings daily for wear, re-wrap after abrasion or moisture exposure, store spare caps and a short roll of silicone tape in the repair kit, and remove soft caps when using on wet, freezing conditions where trapped moisture could freeze against metal.
Set lock torque and clamp orientation to prevent accidental telescoping while mounted
Tighten and orient before you clip or stow: twist sections until a firm one‑handed pull cannot extend them; close lever clamps fully and rotate their handles to face away from likely snag directions.
Twist‑lock adjustment
Clean shaft threads and wipe dry. Rotate clockwise until the inner tube resists a firm pull with one hand; if it still slides, tighten another quarter‑turn and test again. For carbon shafts stop when the joint feels secure but you can still turn with two fingers to avoid over‑compression. Mark the locked position with a narrow strip of heat‑shrink tubing, a few wraps of thin tape or a permanent marker so you can spot loosening on the trail.
Flip‑lock orientation and secondary security
Close flip levers until they click; orient lever heads so they point toward the pack centerline when shafts are stowed upright, and so they face up (not down) when carried horizontally. Prevent accidental opening by adding one of these simple measures: a 2–3 mm elastic cord loop (~8–12 cm) slipped over closed levers, a 3–4 cm length of self‑adhesive silicone tape across the lever hinge, or a small zip tie through any lever hole (trim flush). Perform a quick pull test after securing and again after 15–30 minutes of movement to confirm no gradual loosening.


