

Locate the interior leather tab: open the main compartment and photograph the rectangular tag close-up. The embossed stamp should include the country of manufacture and a two-line production code on a stitched leather piece. Fonts must be sharp, evenly spaced and centered; blurred embossing, uneven depth or misaligned text indicate a counterfeit.
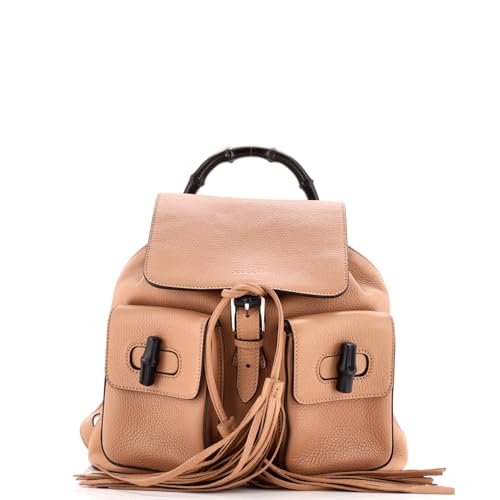
Inspect pattern alignment and logo treatment: the GG motif repeats with perfect symmetry across seams and pockets. Logos are crisp, not pixelated; G pairs mirror each other with consistent spacing. Check that printed monogram edges are clean and that seam lines do not cut the repeat irregularly.
Examine stitching and construction: stitches are uniform in length, tightly set and without loose threads. Edges are painted or sealed professionally with no glue residue. Interior linings use high-grade suede, microfiber or canvas–feel the material and compare weight and texture to official product photos or a boutique sample.
Assess metal hardware and zippers: hardware carries precise engravings (brand initials and model marks), solid weight and smooth action. Common premium zipper makers include Riri and Lampo; sliders should glide without catching. Screws, rivets and rivet heads have consistent finishes with no flaking or uneven plating.
Packaging and accessories matter: dust bag fabric is dense cotton with a centered logo tag; box printing is high-resolution with crisp product codes. Ask for the original invoice showing store name, date, model code and VAT details–a price hundreds below current retail is a red flag.
Use verification services and direct confirmation: request a machine-assisted certificate (e.g., Entrupy) or a trusted third-party authenticator and supply high-resolution photos of the serial tag, interior stamp, logo close-ups, hardware engravings and zipper codes. If possible, bring the item and its serial code to an authorized boutique for confirmation.
Milanese label rucksack: authentication checklist
Verify the internal leather serial tag: authentic pieces usually feature two rows of numbers embossed cleanly (commonly six digits per row), no letters, evenly spaced digits and no ink-filled impressions; the front leather stamp must include the brand name in uppercase and “MADE IN ITALY” centered beneath it with a small registration mark to the upper right.
Hardware and zippers
Assess metal weight and engraving: genuine fittings feel dense, solid brass or plated, with crisp, shallow engraving of the label name (letters evenly spaced, no filled paint). Zippers commonly come from premium makers (RiRi, Lampo or high-grade YKK) – sliders operate smoothly and show consistent tool marks; loose plating, light pingy metal sound, or stamped letters that look stamped off-center indicate counterfeit hardware.
Stitching, pattern alignment and materials
Inspect seams and monogram placement: stitches must be uniform in length and tension, no backstitching visible on exterior panels, and no glue residue on seam edges. The monogram canvas should match across seams – motifs centered on face panels and mirrored where applicable. Interior lining should be high-quality suede or tight microfiber with a neat heat stamp; leather edges are burnished, not raw. If the canvas print looks faded, off-register, or the interlocking motif proportions are slightly distorted, treat the piece as suspect.
Confirm provenance: request original receipts, full serial-tag photos, and clear packaging shots (dust bag fabric, drawstring tag, box labeling). Compare serial digits and font to multiple authenticated examples, and consult a specialized authentication service or the label’s customer support when discrepancies persist. Pricing far below current retail for the same model greatly increases likelihood of inauthenticity.
Locate and decode the interior serial number tag
Locate the rectangular leather tab sewn into the inner seam of the main compartment, typically behind or adjacent to a zip pocket; the reverse side of that tab contains the stamped serial number.
Typical serial format: two rows of digits, most often six numbers on the top row and six on the bottom (example: 123456 789012). Variants exist: some pieces use a single-line numeric string of about 10–12 digits. Genuine tags contain only numerals, no letters, no hyphens and no decorative marks within the code.
Decode the rows: the upper sequence usually corresponds to the style/model identifier; the lower sequence indicates factory, batch or production run. Verify the style identifier against official product references or high-quality listing photos to confirm match with material, color and hardware.
Inspection details to check under magnification: embossing should be crisp with uniform depth; digits must share consistent font weight and spacing; rows should be centered and parallel. The leather tab edges are neatly finished and stitched into the seam with straight, evenly spaced stitches. Counterfeit tags often show shallow or uneven stamping, irregular digit shapes, extra characters, or off-center alignment.
If the tag is missing or the format looks atypical, request close-up photos of both sides of the tag, the surrounding stitching, and any accompanying authenticity cards or receipts. Compare those images to verified examples from authorized retailers or trusted archives; mismatches in format, font or placement are strong indicators of inauthenticity.
Assess GG monogram and material alignment across seams
Verify that GG motifs run continuously across every seam; visible offset or a repeat shift greater than 2 mm is a red flag.
Lay the piece flat and smooth panels for inspection. Track a single interlocking-G unit across vertical and horizontal seams: the printed G shapes should meet edge-to-edge with matching orientation and spacing, not staggered or rotated. Use a rigid ruler or caliper to compare center-to-center distances of adjacent motifs on each panel–measurements should be consistent within ±2 mm.
Examine areas where panels meet piping, zippers and strap anchors. High-quality construction either centres a full GG on a primary panel or deliberately cuts the pattern so seams conceal half-motifs symmetrically; random cropping, mismatched halves at a visible front seam, or a motif split by piping indicate poor cutting or assembly. Check that the pattern on the gusset lines aligns with the main panel rather than stopping abruptly at the stitch line.
Quick alignment checklist
Visual flow: single GG tracked across at least three contiguous panels without lateral shift.
Repeat uniformity: spacing deviation ≤ 2 mm across inspected sections.
Trim consistency: motifs meet piping and zipper areas with mirrored or continuous placement, not arbitrary trimming.
Additional tip: If surface dirt obscures pattern edges, clean gently before measuring; for heavy exterior cleaning guidance see best pressure washer for pool deck.
Inspect stitching quality, seam backing and edge paint
Reject the item if stitch length varies more than ±0.5 mm, threads skip, or edge paint flakes after a gentle flex test.
- Tools to use:
- 10× loupe or magnifier
- LED inspection light
- ruler with millimetres or calipers
- white microfiber cloth for rub test
- Stitching metrics
- Target: 8–10 stitches per inch (approx. 2.5–3.2 mm per stitch) across flat panels.
- Uniform tension: stitches lie flat against material without puckering or raised loops.
- Thread colour: exact match to adjacent seams; no amateur thread substitutions at joins.
- Stress points: reinforced bar tacks or dense backstitching at strap bases, zipper ends and handle attachments; visible single rows are a red flag.
- Seam backing and interior finish
- Interior seams should have folded edges or a narrow cloth/tape binding–no exposed raw fibres or loose fabric threads.
- Seam tape, when present, should be evenly adhered with no wrinkles or lifted corners; width typically 5–10 mm depending on seam.
- Glue residue: tiny invisible traces can appear, but visible blobs or streaks along seams indicate poor assembly.
- Check seam transitions where materials meet (e.g., trim to body): stitching continues straight with consistent stitch rhythm, not interrupted by sudden long stitches.
- Edge paint inspection
- Finish: single smooth coat with clean termination at joins; no brush strokes, pooling or uneven thickness.
- Flex test: bend a corner sharply; paint must not crack, flake or transfer colour onto the white cloth.
- Edge profile: paint should be flush with the leather/trim surface, without raised ridges or feathered edges.
- Colour match: edge paint must match or intentionally contrast the trim exactly; sloppy overlaps onto face material are unacceptable.
- Common red flags
- Variable stitch length (>1 mm difference across same seam).
- Loose thread tails or unfinished backstitches at ends.
- Frayed seam tape, visible raw edges inside pockets or under linings.
- Edge paint that rubs off, shows bubbles, or has visible brush marks.
- Glue smears along seams or visible adhesive residue near hardware.
- Quick pass/fail checklist (use loupe + light)
- Stitch length uniform? – Pass/Fail
- Thread tension even, no skipped stitches? – Pass/Fail
- Seam backing present and tidy? – Pass/Fail
- Edge paint smooth, no transfer on rub test? – Pass/Fail
Test zippers and buckles: smoothness, engravings and weight
Zipper diagnostics
Operate every slider through at least 20 complete cycles; genuine luxury sliders run with steady resistance, no catching, and return to perfect alignment. Check slider markings: reputable manufacturers use Riri, Lampo or YKK Excella and engravings appear on the pull tab or reverse of the slider – letters are sharp, equally spaced, and set into the metal, not painted on. Metal teeth should be solid brass or nickel-plated brass; run a small magnet along the teeth – strong attraction indicates inexpensive steel. Observe the tooth finish: uniform plating, no bubbling or flaking, and teeth should mesh without visible gaps under light tension.
Perform a cold test: briefly cool the zipper with ice or a cold surface and cycle it again; low-quality molded or coated zippers stiffen noticeably, while quality metal systems remain smooth. Inspect the zipper tape only for uniform color and secure bonding to the tape edge (no glue smears or loose fibers). Listen: a consistent soft metallic whisper is normal; grinding, rattling or intermittent clicks suggest aftermarket components.
Buckle and hardware diagnostics
Weigh representative pieces on a small scale: small D-rings typically register 8–20 g, medium strap buckles 25–60 g, and larger decorative closures 40–120 g. Extremely light fittings often indicate hollow or low-density alloy. Test with a fingertip: clasps and spring mechanisms must snap back with immediate, consistent force; any lag, wobble or uneven return points to inferior springs or poor assembly.
Examine engravings and stamps on buckles and rivets: authentic marks are recessed with crisp edges, uniform depth and consistent font; enamel-filled letters sit flush without excess. Check screw heads and pin joints for machining marks – countersunk, even slots and hex fittings imply factory tooling; sloppy punches, uneven countersinks or asymmetrical rivets indicate aftermarket finishing. Finally, assess plating wear patterns: authentic plating wears evenly to a base-brass tone, while plating that flakes to a silver-grey substrate suggests cheap zinc or steel beneath the finish.
Verify packaging and documentation: dust bag, box and receipt details
Match the receipt SKU, date and final price to the barcode and model code on the box and to any tag attached to the item; any mismatch or generic description (e.g., “leather goods”) signals high risk of counterfeit.
Inspect the dust bag: genuine pieces are made from dense brushed cotton or heavyweight flannel without shine, with neat overlocked or narrow double-stitched seams, a sewn-in rectangular care tag on an interior seam and a precisely printed logo (no smudging, no uneven ink). Drawstring should be braided cotton or leather with cleanly finished ends – glued or heat-melted raw edges are a red flag.
Examine the box: construction should use thick chipboard (rigid two-piece lid or clamshell with a firm closure), consistent colour inside and out, and a centered foil-stamped logo with slight embossing. Turn the box over: an underside sticker must show a clear model/code string, color code, barcode and country code; blurry, missing or hand-written stickers are suspicious.
Check paper documentation: authenticity/care cards are printed on heavy uncoated card stock (no cheap glossy stock), with sharp typography, correct typeface weight and clean rounded corners. Care booklets are saddle-stitched or glued with high-quality paper. Holograms, microprinting or subtle foil elements on cards are common on original items; plain thin cards without embossing usually indicate a fake.
Verify the receipt: boutique receipts include full store name and address, VAT/tax ID, merchant/register number, transaction time, payment method and last four digits of the card. Online invoices show order number, billing/shipping address and a merchant confirmation email header. Receipts lacking store details or provided as a generic POS printout with minimal info deserve further scrutiny.
Request high-resolution photos before purchase: box underside label, close-up of dust-bag interior tag, front and back of authenticity card, full care booklet spread and the complete receipt header. Compare proportions, font spacing and logo placement with official images or known authentic examples; if the seller cannot supply these or refuses comparison, treat the offer with low confidence. For alternate reliable everyday options see best lightweight backpack for everyday use.