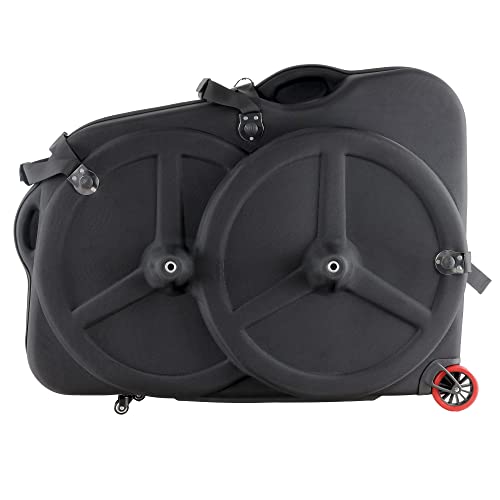


Yes, it is feasible to include a bicycle in your checked bags when traveling by air. Most airlines permit this, although specific guidelines may vary by carrier. Typically, it is required to disassemble the cycle partially, removing pedals and the front wheel, and to secure it in a sturdy hard case or designated bike box for protection during transit.
To ensure compliance with airline regulations, it is advisable to verify the specific policies of your chosen airline prior to your trip. Some carriers impose weight limits on checked items that may affect your ability to transport a cycle without incurring additional fees. Commonly, fees associated with transporting larger items can range from $50 to $150, depending on the airline’s policy.

For optimal packing, consider using foam padding or bubble wrap to safeguard delicate components, and label the case with your contact information. Arriving early at the airport can facilitate any necessary adjustments to your approach, ensuring a smoother experience. Always account for the possibility of unexpected situations that might arise during travel.
Transporting a Bicycle as Checked Baggage
Yes, it is possible to transport your cycle as checked baggage on most airlines. Before proceeding, check the specific airline’s regulations regarding dimensions, weight limits, and packaging requirements. Many carriers require that the frame be disassembled, with handlebars turned parallel to the frame and pedals removed.
Use a hard-shell case or a padded bag designed for cycles to ensure adequate protection. Some airlines may charge a fee for oversized items, so confirm any additional costs that may apply. It’s advisable to contact the airline beforehand to clarify all necessary arrangements.
Preparation Tips
Prepare the cycle by removing any accessories, such as water bottles, lights, and GPS devices. Inflate the tires partially to avoid damage, and mark the case with your contact information. Always have a copy of your itinerary and any receipts for extra fees handy during travel.
At the Airport
Arrive early to account for the check-in process, as it may take longer with larger items. When checking in, ensure the bicycle box is securely closed and clearly labeled. Finally, track your item upon arrival to ensure safe delivery to the baggage claim area.
Understanding Airline Policies for Bicycle Transport
Familiarize yourself with specific regulations of the airline you are using; each carrier has its own set of rules and fees associated with transporting two-wheeled vehicles. Review the airline’s website or contact customer service for detailed information regarding dimensions, weight limits, and packaging requirements.
Some airlines may require the removal of certain components like pedals, handlebars, or wheels, and suggest using a hard case for protection during transit. It’s advisable to prepare the cycle accordingly to meet these guidelines, as failure to comply may result in additional charges or denial of transport.
Keep in mind that there’s generally a limited amount of space allocated for larger items, so confirming availability in advance is recommended. Additionally, check the policies regarding liability for damages; some airlines may limit their responsibility for items considered non-standard baggage.
When booking your ticket, consider selecting the option that allows for the largest allowed dimensions, as this can reduce the need for extensive modifications to the cycle. Always include the transport request during initial booking or directly after to ensure smooth handling upon arrival at the airport.
Review any potential charges thoroughly; some airlines may offer competitive rates, while others might have hidden fees that can significantly impact your travel budget. Proper planning and adherence to regulations will enhance your experience when transporting your equipment.
Steps to Disassemble Your Bicycle Safely
Begin with removing the front wheel. Release the quick-release lever or use a wrench, depending on your setup. Place the wheel aside carefully.
Next, detach the handlebars. Loosen the bolts on the stem using the appropriate tool, ensuring you keep the spacers in order. This prevents misalignment during reassembly.
Proceed to take off the seat. Adjust the seat post clamp, then lift the seat out gently. Store all small parts such as bolts in a secure container to avoid misplacement.
Remove the rear wheel following the same procedure as the front. Pay attention to the chain and gear mechanism; avoid pulling on the chain excessively.
Disconnect the pedals using a pedal wrench. Remember that the left pedal has a reverse thread, requiring counter-clockwise to loosen.
Finally, wrap the frame with protective materials, such as bubble wrap or foam, to prevent scratches or damage during transportation.
For additional care tips, consider checking out the best time to prune umbrella tree. Proper maintenance ensures your equipment remains in optimal condition for future use.
Choosing the Right Packaging Materials for Your Bicycle
Select suitable materials based on protection and weight. Use a sturdy cardboard box specifically designed for cycle transport; this provides solid support and reduces the risk of damage during transit.
Foam Padding and Bubble Wrap
Employ foam padding to cushion delicate components such as the frame and gears. Wrap fragile parts, including the derailleur and chainrings, in bubble wrap for added security. Ensure no sharp edges are exposed.
Straps and Adhesive Tape
Utilize heavy-duty straps to secure the bicycle within the box. This prevents movement during handling. High-quality adhesive tape should seal all openings to keep the packaging intact throughout the journey.
Avoid using plastic bags for key parts, as moisture can accumulate and potentially harm the bicycle. Instead, opt for breathable materials when additional protection is needed.
Always label the package clearly, indicating that the contents contain delicate items. This informs handlers to exercise caution during transportation.
Checking Weight and Size Restrictions for Luggage
Verify the specific dimensions and weight limits for checked items provided by the airline. Standards typically range between 23-32 kg (50-70 lbs) for checked baggage, while size limits often cap at 158 cm (62 in) total linear dimensions (length + width + height).
Measure and document the packed dimensions, ensuring they adhere to regulations to avoid extra charges. Utilize a digital scale to confirm the weight. International and low-cost carriers may impose stricter regulations; checking their guidelines is critical.
Specific Airline Guidelines
Each airline publishes detailed policies regarding large or oversized items. Review these documents carefully. Some might allow excess weight but impose additional fees, whereas others may restrict oversized packages altogether.
Consequences of Non-Compliance
Non-compliance could result in hefty fees, denied boarding, or forced repacking at the airport. Preemptively understanding the limitations prevents unexpected challenges during travel.
Tips for Avoiding Damage During Transit
Use a hard shell case for maximum protection against impact during travel.

- Ensure all parts are securely fastened to prevent movement inside the case.
- Remove pedals, front wheel, and handlebar to minimize bulk and risk of damage.
- Wrap fragile components, like the derailleur and brake levers, with bubble wrap or foam.
- Utilize additional padding, such as towels or blankets, to fill gaps and absorb shock.
Label the exterior of the container with “Handle with Care” for extra caution.
- Check for any loose items or tools inside the case before closing.
- Take a photo of your setup before disassembly for reference during reassembly.
Use zip ties or tape to keep disassembled parts together, making them easier to track.
- Consider marking items with unique identifiers for a smooth recovery process at your destination.
- Research handling practices at your specific airline to anticipate any potential issues.
Keep vital tools and repair kits in your carry-on to address any potential issues upon arrival.
What to Do if Your Bicycle is Damaged Upon Arrival
Immediately inspect your equipment once it arrives. Document any damage with photographs, focusing on specific parts, such as the frame or wheels. This documentation will support your claim if needed.
Next, report the issue to the airline or transport provider without delay. Use the customer service desk at the arrival point for immediate assistance. Ensure you fill out any required damage report forms, as this will initiate the claims process.
| Action | Details |
|---|---|
| Document Damage | Take photos of the damage. Include close-ups and wide shots to show context. |
| Report Immediately | Contact the airline’s customer service and provide details of the issues. |
| File a Claim | Complete the necessary forms for compensation or repair claims based on the airline’s policy. |
| Keep Receipts | Save receipts for repairs or replacement parts, as they may be required for reimbursement. |
Check the terms and conditions of the airline regarding damage claims. Some may require claims to be filed within a specific timeframe.
Consider contacting your travel insurance provider if applicable. They may cover damages that occur during transit, providing an additional layer of protection.
For suggestions on popular travel destinations, including attractions, check out the best aquarium in north carolina.