

Rule: U.S. TSA, EU and UK authorities exempt infant formula, breast milk and ready infant meals from the 100 ml / 3.4 oz liquid limit. Present these items separately for inspection, tell the security officer, and allow manual inspection or testing by X-ray. Airlines expect amounts to be “reasonable for the duration of the trip,” but there is no strict universal millilitre cap.
Quantities to carry: Use actual feeding needs as a guide – many infants take 60–150 ml per feeding depending on age. Practical reserve: calculate total = (flight time in hours × 100–150 ml) + 2 extra feedings. Example: 3‑hour flight → 300–450 ml + 200–300 ml reserve = 500–750 ml total. For solids or jars, bring clearly labelled, sealed portions sufficient for flight + 1–2 extra meals.
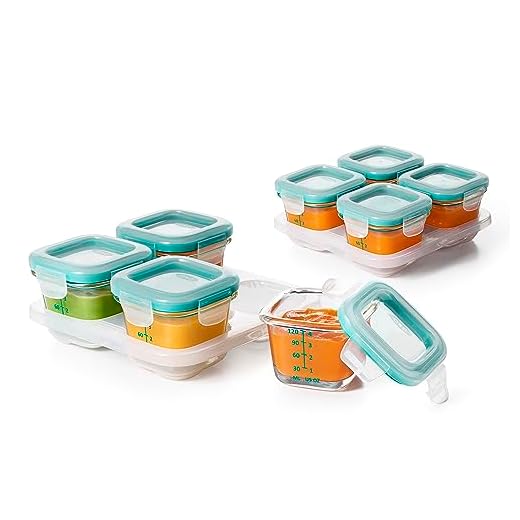
Containers, cooling and screening: Use screw‑top or leak‑proof bottles and transparent, resealable containers for measured servings. Frozen ice packs permitted when solid at screening; if thawed they are treated as liquids. Keep items accessible in your cabin bag to speed up security checks; expect separate X‑ray or hand inspection and occasional testing for explosives residue.
Operational tips: Label containers with content and preparation time, carry a pumping/sterilising plan if relevant, and bring disposable bibs and spare utensils. Contact the airline and check both departure and arrival country rules before travel – some national authorities or carriers require advance notice or have specific limits. Allow extra time at the checkpoint to avoid stress during transfer or boarding.
Bringing Infant Meals in Cabin Baggage
Bring enough formula, expressed milk or pureed meals for the entire trip plus an extra 2 hours; present these items separately at security for inspection.
Security screening steps
Declare any liquids or thawing frozen items at the checkpoint. Authorities in the US and EU allow quantities over 100 ml / 3.4 oz for infant nutrition, but each container will be X‑rayed or opened for testing. Powdered mixes are usually treated as solids and are not subject to the liquid limit, yet may be swab‑tested.
Keep items in clear, resealable containers and place them in an accessible compartment. Expect manual inspection of sealed cold packs; they may need to be partially thawed for screening.
Storage, temperature and international rules
Use insulated coolers with ice packs or vacuum flasks to keep perishables at ≤5°C (≤41°F) until consumption. Once warmed or opened, consume within 2 hours or refrigerate and use within 24 hours for prepared formula. For overseas travel, check the destination country’s agricultural import restrictions–commercial glass jars with meat, dairy or fresh produce are frequently prohibited at border control.
Request hot water from cabin crew when needed and bring single‑use measuring scoops to avoid cross‑contamination. Carry ingredient lists or receipts for commercial jars to speed customs clearance during transfers.
Permitted amounts and liquid limits for infant meals at airport security
Bring only the volume needed for the trip plus one extra feeding; larger-than-100‑ml containers containing infant nourishment are generally allowed but must be declared and screened separately.
- US (TSA): formula, breast milk, expressed milk and juice are permitted in quantities exceeding 3.4 oz (100 ml). Declare these items at the checkpoint for X‑ray and possible additional inspection; officers may ask to open containers or perform explosive trace detection.
- EU / Schengen: the 100‑ml liquid rule does not apply to infant milk and similar nourishment needed for travel. Bring amounts appropriate to flight duration; security staff will conduct extra checks.
- UK: larger amounts for infants are allowed; present items separately for inspection and expect checks similar to other regions.
- Purees and strained jars: treated as liquids/gels and fall under the same exceptions when intended for infant consumption. Solid snacks (biscuits, dry cereal) are not classified as liquids and pass through standard screening.
- Frozen or chilled items: allowed if fully frozen solid at checkpoint. Thawed or partially melted items are treated as liquids and screened accordingly; ice packs and cooling gel packs must follow the same rule.
- Medication and special dietary items: prescription liquids require medical documentation where applicable; non-prescription nourishment usually needs no doctor’s note but must be declared.
Practical recommendations:
- Measure volumes in millilitres on bottles or containers; bring pre-measured servings to speed inspection.
- Keep all infant nourishment accessible in your carry‑on for immediate declaration and screening; use clear resealable bags for small jars and pouches.
- Label containers and keep disposable feeding cups and utensils handy to avoid opening sealed packages in the queue.
- If flying internationally, check both departure and arrival security rules and the airline’s policy for permitted quantities; airlines sometimes restrict amounts to “needed for the journey.”
- Consider a well-organized carry‑on bag such as best luxury travel duffel bag to keep items separate, reachable and ready for inspection.
How to present and declare infant feeding items and bottles during screening
Declare all infant feeding liquids and bottles to the security officer and place them separately in an accessible tray or a clear resealable bag before screening; state total volumes and whether items are frozen, chilled or at ambient temperature.
Step-by-step actions at the checkpoint
1) Remove feeding containers and ice packs from cabin baggage and place them together in a single clear bag or tray. 2) Verbally declare the contents (e.g., expressed milk, prepared formula, liquid supplements, ice packs). 3) If any containers are frozen solid, tell the screener; frozen blocks and solid ice packs often require different handling. 4) Keep bottles accessible for potential opening or testing; do not re-seal after inspection unless requested. 5) Present powder mixes separately – powders are usually screened as solids but can be subject to additional checks.
Screening procedures you may encounter
Security personnel commonly use: X-ray of containers, chemical swabs, or explosives trace detection (ETD) on outer surfaces. If agents request to X-ray liquids, note that many authorities allow larger-than-standard-volume liquids for infant needs; if an X-ray is declined for a particular liquid, expect a manual or swab test or a request to open the container for inspection. If any sample is taken, request to watch the process and request prompt return of items.
| Item | How to present | Likely screening outcome |
|---|---|---|
| Expressed milk / breast milk | Clear containers, declare volume, indicate frozen/chilled status | X-ray or alternative test; may be opened or swabbed if inconclusive |
| Prepared liquid formula or ready-made feeds | Place bottles/jars together, verbal declaration of quantity | Allowed in quantities beyond 100 ml for infant needs; X-ray or ETD/swab |
| Powdered formula | Present in original packaging or sealed container | Usually screened as a solid; may be subject to additional checks |
| Frozen blocks / ice packs | Keep frozen solid and declare frozen status | If solid, often permitted through X-ray; partially thawed items may require extra testing |
| Empty or sterilised bottles | Place with other items or in tray; label if steriliser used | Typically pass as empty; if containing residue, may be inspected |
Carry clear labeling (content, date, volume) on containers and keep receipts or prescriptions for speciality formulas or medically required supplements. For cleaning equipment and bulky sterilising tools consult product guides such as best pressure washer for cars in india to ensure items meet transport and hygiene needs.
Use vacuum‑insulated stainless‑steel jars with frozen gel packs to keep perishable infant meals below 5°C (41°F) for up to eight hours; for warm bottles, preheat a vacuum flask with boiling water and use it to maintain >60°C (140°F) for several hours.
Container selection
Choose vacuum‑insulated stainless‑steel jars (double‑wall, screw‑top with silicone gasket) for best thermal retention and leakproof performance; typical useful volumes are 60 ml (2 fl oz) for purees, 120 ml (4 fl oz) for single servings and 240 ml (8 fl oz) for older children. Tempered glass wide‑mouth jars with locking clips are fine for short trips but cool faster than steel. Flexible silicone squeeze pouches (BPA‑free) reduce waste and are lightweight for purées; look for reclosable spouts and fill limits of 100–150 ml.
Screw caps with silicone seals, tamper‑evident lids and wide mouths ease spooning and cleaning. Sterilise reusable containers by boiling for 5 minutes or using a dishwasher cycle ≥65°C; mark each container with content and prep time using waterproof labels or masking tape.
Insulation tactics and in‑flight handling
Freeze high‑quality gel packs flat at ≤‑18°C for at least 12–24 hours; two medium packs (120×80 mm) in a soft insulated cooler will typically keep chilled meals ≤5°C for 4–8 hours depending on ambient cabin temperature and cooler thickness. For longer durations, use a rigid hard‑sided cooler or add an extra gel block. Keep chilled containers packed tightly with minimal air gaps – loose items lose cold faster.
For warm servings, preheat a vacuum flask by filling it with boiling water for 5 minutes, empty and immediately add the bottle or sealed jar; vacuum flasks from reputable brands commonly hold above 60°C for 4–12 hours depending on size and model. Reheat sealed jars by submerging in hot water from the crew for 5–10 minutes rather than relying on in‑seat heating or microwaves.
Practical in‑flight tips: bring single‑serve portions to avoid repeated openings; freeze one portion per meal so it doubles as an ice block during the first hours and thaws by mealtime; use a digital or stick thermometer to verify service temperature (aim 60°C); store the insulated cooler under the seat rather than in an overhead compartment to reduce temperature swings; keep spare spoons, resealable waste bags and an extra sealable container for leftovers.
Check carrier and destination rules at least 72 hours before departure and retain written confirmation (email or screenshot)
Visit the operating airline’s official website: locate sections titled “Special requirements”, “Carry-on allowances” or “Travel with children” and save the exact page or a PDF of the policy. If the web page is ambiguous, call customer service and request an e-mail confirmation or reference number; record date, agent name and time of call.
What to verify with the airline
Confirm these items: whether liquids and prepared infant meals are exempt from standard volume limits; required proof of age for the child (passport, birth certificate); any documentation accepted for medical or formula prescriptions; rules for connecting flights operated by partner carriers; handling at check-in versus security screening. For multi-carrier itineraries, obtain written confirmation from each operator or an explicit statement from the ticketing carrier about transfer acceptance.
Country- and airport-level checks
Consult destination and transit border/agriculture authorities for import restrictions on dairy, meat, fruit and prepared meals. Use these official sources: TSA or CBP for United States, gov.uk for United Kingdom arrivals, Department of Agriculture/Biosecurity for Australia, CBSA/CFIA for Canada, European Commission/DG MOVE or national civil aviation/security pages for EU states. Note that Australia enforces strict biosecurity with routine seizure and fines for undeclared items; many countries also prohibit certain dairy and fresh produce regardless of intended consumption.
Create a short travel dossier: screenshots or PDFs of airline and government pages, printed copies of prescriptions or medical letters, child’s passport/birth certificate, and customer-service reference numbers. Present this dossier at check-in and retain it for security screening and customs interviews.
If you encounter conflicting written policies between carrier and a security agency, request escalation to a supervisor and ask for confirmation in writing; arrive at the airport earlier than usual (extra 45–60 minutes) to allow time for secondary screening and possible paperwork.


