


Immediate action: Call your nearest branch with the vehicle year, make and model, then place a reservation for a crossbar set or rooftop carrier. Expect pickup requirements such as photo ID, a credit card hold, and a printed reservation confirmation.
Key specifications to verify: crossbar load capacity commonly 75 kg (165 lb); typical hard-shell carriers provide 300–450 L of cargo volume. Check the vehicle owner’s manual for maximum roof load (often 75–100 kg) and confirm that the chosen kit mounts to the roof type you have (factory rails, raised rails, fixed mounting points, or bare roof).
Practical setup steps: inspect clamps and bolts at pickup, follow supplied torque values, use supplied locking hardware, position the carrier so weight sits over the crossbar centers, and secure items inside with straps. Re-check fastener tightness after the first 50 km and at each long-stop; maintain highway speeds within the carrier manufacturer’s recommendation (commonly up to 120 km/h / 75 mph).
Cost and protection: ask about daily versus weekly pricing, deposit amounts, late-return fees, and optional damage waivers or collision coverage. If a local outlet lacks the specific kit you need, compare specialty auto outfitters, outdoor retailers, and online marketplaces that offer same-day pickup or delivery to ensure compatibility and the best total cost.
Reserve a rooftop cargo carrier at a local moving-equipment center – call ahead with vehicle make, model, year; staff will confirm compatibility and install on-site.
Sizing and load limits
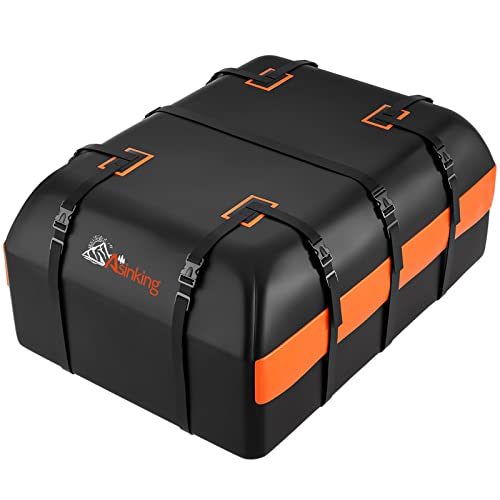
Choose hard-shell boxes (8–18 cubic feet / 226–510 L) or soft carriers (10–16 cu ft / 283–453 L). Typical external dims: small ~36″×24″×14″ (91×61×36 cm), medium ~48″×30″×14″ (122×76×36 cm), large ~75″×34″×16″ (190×86×41 cm). Manufacturer load ratings usually 100–165 lb (45–75 kg); vehicle roof load rating may be lower – check owner’s manual and keep combined cargo plus mount below the stated maximum. Crossbar systems commonly accept 165 lb (75 kg) dynamic load; verify clamp compatibility with raised rails, flush rails, fixed points, or bare roofs.
Booking, pickup and installation
Daily hire rates typically range $10–35 per day; weekly pricing often equals 3–5x daily. Deposit or credit hold may be $50–100. Center staff can fit mounts on many vehicle makes; bring clear photos of the roof and rail type, or provide VIN and trim code to speed handover. Installation process: staff attach base rails or clamp kits, center the carrier, tighten clamps to manufacturer torque, and demonstrate locking. Drive 30–50 miles (50–80 km) then recheck fasteners and strap tension. Recommended maximum speed with a mounted unit is 65 mph (105 km/h) unless carrier documentation states a different limit. Use a weatherproof cover when using a soft carrier; secure internal tie points and use rated straps plus locks to reduce theft risk.
If pets ride near the rear, consult how to dog proof bottom of fence when planning load layout and pet containment.
How to check local inventory: roof crossbars and rooftop cargo boxes at the U rental company
Use the company’s website or mobile app to search inventory by ZIP code, product SKU or name, vehicle make and model, then call the local branch and confirm availability, dimensions, mounting hardware, and maximum load (lbs / kg).
Provide exact pickup ZIP and desired pickup date/time when reserving; note branch ID and reservation number. When you call, read the SKU aloud, ask whether adapter kits are included, confirm crossbar length and whether mounts attach to raised rails, flush rails, fixed anchor points, or factory towers, and verify whether installation help is available and what the hold window or deposit policy looks like.
Measure usable roof area: distance from windshield seal to rear edge (in inches or cm), width between side rails or gutters, and any roof curvature that reduces usable width. Record vehicle make, model, year and VIN or trim level so staff can consult fit guides. Check the vehicle’s roof load limit and plan a 10–15% safety margin below that figure.
Take clear photos of the roof, rails and mounting points, attach them to the reservation or email them to the branch, and request the exact SKU that will be held at pickup along with total fees and any extra hardware costs.
| Input | Sample entry | Why it matters |
|---|---|---|
| ZIP / Postal code | 02139 | Limits results to nearby branches with stock |
| Product SKU or short name | CBX-40 | Ensures staff locate the exact item rather than a similar model |
| Vehicle make / model / year | Toyota RAV4 2019 | Used to verify mount compatibility and required adapters |
| Mount type | Raised rails | Determines which adapter or bracket is needed |
| Usable measurements | Length 48 in, width 44 in | Confirms the carrier will physically fit the roof |
| Maximum roof load | 165 lb (75 kg) | Prevents overloading and reduces safety risk |
| Pickup date / time | 2025-08-22 10:00 | Secures stock availability and prepares branch staff |
| Branch phone & confirmation | Branch ID 123, conf 987654 | Provides proof of reservation and direct contact on pickup day |
Step-by-step process to reserve a roof-top cargo carrier online and by phone
Use the website to secure a carrier quickly; call the local center when you need confirmation of stock, installation help, or special delivery.
1) Prepare: have your driver’s license number, credit card, vehicle make/model/year, roof type (fixed rails, raised rails, flush rails, or bare roof) and crossbar spacing (in inches). Measure usable roof width and note maximum load capacity you expect (typical carriers support 50–165 lb).
2) Online reservation: log into the moving-supply firm’s site, go to “accessories” or “cargo carriers,” enter your ZIP code, select pickup location, choose pickup and return dates, then pick the specific roof-mount carrier model. Select optional damage waiver/insurance if offered and proceed to payment. Expect a confirmation number emailed within minutes; save the PDF and screenshot the QR code.
3) Online payment and holds: many outlets accept full prepayment or place a temporary authorization on your card. Small accessory holds commonly fall between $0–$50; confirm the hold amount on the checkout screen and note taxes and environmental fees shown before finalizing.
4) Pickup checklist: arrive within the reservation window with printed or digital confirmation, photo ID, the same credit card used to reserve, and your vehicle. Inspect the carrier with staff for dents, missing hardware, or torn straps; request staff initials on the receipt or a quick photo timestamp of the carrier condition.
5) Installation: if you cannot install the unit yourself, ask staff whether they provide free assistance or a paid installation service. Confirm mounting hardware compatibility with your roof type and verify torque specs or strap routing before driving away.
6) Return and late fees: confirm the return time to avoid daily overage charges. Get a return receipt signed or an emailed confirmation showing return time. Keep receipts for dispute resolution.
7) Phone reservation steps: call the local center number listed on the company site, state you want to reserve a roof-mount carrier, provide the prepared vehicle and payment details, ask explicitly about on-hand inventory and how long they will hold the unit without full payment, request the reservation ID, and ask for the staff name and terminal number handling your order.
8) Questions to ask by phone: ask about exact carrier model on shelf, weight limit, mounting kit included, whether assistance is available at pickup, cancellation window and any prepayment policy. If you need delivery to a specific address or installation at a third-party shop, request next-step contacts and written confirmation.
9) Troubleshooting: if confirmation doesn’t arrive, check spam, then call the pickup center quoting the card last four digits and intended pickup date. If a reserved item is unavailable at pickup, request an equal-or-better substitute at no extra charge or full refund and a printed explanation.
10) Practical tips: photograph the carrier on pickup, note strap condition, and keep digital copies of all confirmations. If transporting suitcases, check size compatibility before choosing a carrier. Additional reading: best luggage to take to italy and advice on outdoor shade gear: best offset patio umbrella brands.
Pricing, deposits, and typical use periods
Budget roughly $10–$30 per day; weekly totals commonly fall between $40 and $120; monthly arrangements may be available at a lower daily equivalent depending on location and demand.
Typical rate examples
- Small hard cargo box (compact): $8–$15 per day; $35–$70 per week.
- Large hard cargo box (high-capacity, roof-top): $15–$30 per day; $60–$140 per week.
- Roof basket or open carrier: $10–$25 per day; $45–$100 per week.
- Crossbar sets or mounting hardware: $5–$12 per day; $20–$50 per week.
- Soft cargo bag: $6–$18 per day; $30–$80 per week.
Deposit, holds, billing rules and practical tips
- Security hold: commonly $25–$150 placed on a credit card at pickup; higher-value units may trigger holds up to $200. Hold released after unit return and inspection; bank processing may take 7–30 days.
- Reservation fees: some locations add a small nonrefundable fee ($0–$25) to guarantee availability; others allow free holds. Confirm prior to confirming the booking.
- Billing increments: charges typically measured in 24-hour blocks; late returns usually incur an additional full-day charge.
- Weekly pricing: many outlets switch to a weekly rate once a certain threshold is reached (commonly day 5); ask the local desk how they apply weekly caps to avoid overpaying.
- Extensions and changes: additional days are usually added at the prevailing daily rate; extensions can be arranged by phone or at the pickup location when inventory exists.
- Payment and ID: major credit/debit cards accepted; cardholder name and a matching photo ID are frequently required at pickup.
- Peak-season impact: summer months and holiday weekends often push daily rates toward the high end of listed ranges and increase deposit/availability requirements; reserve earlier to lock lower pricing.
- Accessory charges: tie-down straps, installation labor, and vehicle-specific adapters may carry extra daily or one-time fees–expect $5–$25 depending on item and location.
Vehicle compatibility, roof types, weight limits: rooftop cargo systems
Confirm vehicle manufacturer roof-load rating and required tower/foot kit prior to selecting a rooftop cargo system.
Bare roofs: require clamp-style towers plus a vehicle-specific fit kit that anchors at the door jamb or factory anchor points. Raised side rails: use wrap-around towers that clamp beneath the rail; measure rail height and rail-to-rail distance. Flush rails: need low-profile feet or channel-mounted adapters that engage the rail groove. Factory crossbars: verify crossbar profile (square, aero, round), crossbar width, and longitudinal spacing; many carriers need minimum spacing near 24 inches and maximum near 36 inches. Fixed mounting points (pre-drilled anchors): use dedicated feet that bolt into those anchors beneath removable covers.
Typical roof-load ratings span roughly 75–220 lb (34–100 kg). Passenger sedans frequently list 100–165 lb, many compact SUVs 165 lb, larger SUVs and vans up to ~220 lb. Rooftop boxes and soft carriers usually advertise payloads in the 100–165 lb range; empty container weight commonly 20–50 lb. Calculate allowable cargo by subtracting container weight from vehicle roof-load rating (example: 165 lb roof limit − 35 lb box = 130 lb remaining payload). Always comply with the lowest rated component between vehicle roof, crossbars, and carrier hardware.
Load placement and fastening: center mass between crossbars and keep the heaviest items near the roof centerline and slightly forward of midpoint. Use industry-grade cam straps or ratchet straps rated for highway use, route tie-downs as instructed, and attach secondary internal tie points when available. Re-torque mounting hardware after the first 25–50 miles and inspect fasteners at regular intervals on long trips. Observe carrier-specific maximum speed guidance; many manufacturers recommend limits in the 65–75 mph range.
When requesting compatibility at a branch or service desk, supply year, make, model, roof type (bare, raised rails, flush rails, factory crossbars, fixed points), roof width (edge-to-edge), existing crossbar spacing if present, presence of sunroof, and distance from windshield to desired front crossbar. Ask which foot/tower kit part number matches the vehicle and whether the kit includes any trim pieces or installation tools. Photograph roof attachment areas when possible to speed verification and reduce installation errors.
Alternatives when nearby moving centers don’t offer roof cargo systems
Buy a soft rooftop cargo bag or a hitch-mounted cargo tray as the quickest, lowest-cost solution and install it the same day.
Sizing & compatibility checklist
Measure usable roof length from windshield gasket to rear trim and subtract 6 inches at each end; choose a box/tray shorter than that number. Measure crossbar center-to-center; most hard shells require 24–44 in spread. Check vehicle roof load limit in the owner’s manual – common dynamic limits: 75–165 lb. For hitch carriers, confirm hitch class: Class II ≈ 200–350 lb tongue weight, Class III ≈ 350–600 lb; trailer ball not required for trays but receiver dimension (1.25″ vs 2″) must match. Expect added vehicle height: soft bags +6–8 in, hard shells +12–18 in, hitch trays extend rear 30–48 in; allow garage and parking clearance accordingly.
Where to buy, borrow and recommended specs
Retail purchase: soft rooftop bag $30–$150 (10–18 cu ft, 100–165 lb recommended max), hard shell $250–$900 (12–18 cu ft, 40–70 lb box weight), hitch tray $120–$450 (metal mesh platforms rated 300–500 lb). Sources: big-box retailers, auto parts stores, outdoor outfitters, online marketplaces. Short-term borrowing: local classifieds and neighborhood apps often list gear for $20–$60 per day or used sale prices at 25–60% of new.
Installation notes: use non-abrasive padding under straps; route straps around crossbars or through door openings as manufacturer instructs; tighten evenly and secure loose strap ends; use at least two safety straps on hitch trays. Check fasteners after first 20 miles and at fuel stops; inspect straps for chafing and retorque hardware after 100 miles. Maintain speeds ≤65 mph with rooftop systems; reduce to ≤60 mph for large soft bags in high wind. Photograph equipment condition and keep receipts if borrowing; verify that vehicle and homeowner policies cover borrowed or purchased gear. If load extends rear >4 ft, attach high-visibility marker and confirm local overhang regulations (many states require a red flag for loads over 4 ft).