


Utilize a vacuum cleaner to remove dust and debris from the crevices of your travel cart. Choose a vacuum with a narrow nozzle attachment for precise cleaning.
Next, prepare a solution of warm water mixed with a mild detergent. Dampen a microfiber cloth in this mixture and gently wipe down all surfaces, paying special attention to handles and wheels where grime accumulates.
For stubborn stains, apply a paste of baking soda and water, letting it sit for a few minutes before scrubbing with a soft brush. Rinse thoroughly with a clean, damp cloth to prevent residue buildup.
Finally, inspect the wheels for dirt and obstructions. A toothbrush or an old cloth can help dislodge trapped particles, ensuring smooth movement. Allow everything to air dry completely to prevent moisture-related issues.
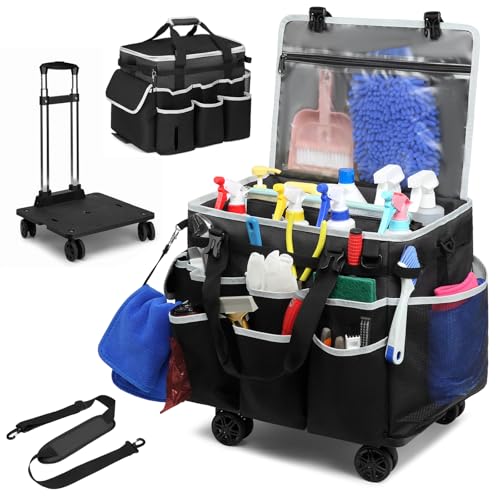
Cleaning Your Travel Cart
Utilize a damp cloth with mild soap to wipe down surfaces. This method effectively removes dirt and grime without damaging the material.

For stubborn stains, apply a solution of vinegar and water. Let it sit for a few minutes, then scrub gently with a soft brush.
Don’t forget to check the wheels. Use a small brush or an old toothbrush to clear debris caught in the treads. For a smoother roll, consider a silicone spray on the wheel bearings.
Regularly inspect the frame for signs of rust or wear. If spotted, treat the affected area with rust remover and consider repainting to prevent further damage.
After thorough cleaning, ensure everything is dry before storing away. This prevents mold and unpleasant odors.
| Item | Cleaning Method |
|---|---|
| Surface | Damp cloth with mild soap |
| Stains | Vinegar and water solution |
| Wheels | Brush or toothbrush, silicone spray |
| Frame | Rust remover and repainting |
Gather Necessary Cleaning Supplies
Collect the following items for thorough maintenance of your wheeled carrier:
- Soft microfiber cloths
- Bucket or basin for water
- Gentle all-purpose cleaner
- Baking soda for tough stains
- Disinfectant wipes for sanitizing
- Soft brush or toothbrush for detailed areas
- Spray bottle for easy application of solutions
Ensure the cleaner is safe for the materials of your transport device. Check labels to avoid damaging surfaces.
Consider wearing gloves to protect your hands while handling cleaning agents and debris.
Remove Debris and Dust from the Trolley
Begin by flipping the cart upside down or tilting it for better visibility of the wheels and base. Use a handheld vacuum cleaner to extract loose dirt and small particles accumulated in the crevices. For tougher debris, employ a soft brush to dislodge and collect particles from the surfaces, especially around the wheels and framework.
For stubborn residues, a damp microfiber cloth or sponge can be utilized. Lightly moisten the cloth with a mixture of water and a mild detergent, and carefully wipe down all visible areas, ensuring to reach corners and joints. Avoid soaking any parts; excess moisture can damage mechanisms.
Thorough Wheel Inspection
Concentrate on the wheels, which tend to accumulate grime. Check for hair, strings, or other obstructions wrapped around the axles. Manually remove these using scissors or tweezers. Periodically check for signs of wear that may require further maintenance or replacement.
Final Touches
Once the surfaces are clear, finish by polishing the exterior with a dry microfiber cloth to achieve a clean sheen. This will not only enhance appearance but also protect against future buildup. Regular maintenance prevents the accumulation of dirt and extends the lifespan of your equipment.
Choose the Right Cleaning Solutions
Select natural or commercial products based on the materials of your travel cart. For metal frames, an all-purpose cleaner with degreasing properties is beneficial. If your equipment has fabric components, opt for a mild detergent mixed with water, ensuring it’s safe for that particular material.
For persistent stains or marks, spot-test a small area first. Vinegar and baking soda are effective for minor touch-ups, providing a non-toxic alternative. If you prefer industrial-grade options, find those that explicitly indicate compatibility with metal and plastic surfaces.
Pressure washing can be an efficient method for deeper cleaning. Choosing the best bit for a pressure washer might enhance the performance, particularly for removing tough grime. Always adjust the pressure setting to avoid damaging surfaces.
Ensure any chemical solutions are environmentally friendly to prevent harm to surroundings. Always follow product instructions carefully for safe and optimal outcomes.
Clean the Wheels Thoroughly
Utilize a soft brush or an old toothbrush to dislodge dirt from the wheel crevices. Pay extra attention to the areas where debris tends to accumulate, such as around the axles and inside the wheel rims.
Soak a cloth in warm, soapy water and wring it out. Wipe down each wheel, ensuring that all residues are removed. For stubborn stains, a mixture of baking soda and water can serve as an abrasive cleaner.
After scrubbing, rinse the wheels with clean water using another cloth or a spray bottle to remove soap and cleaning agents. Allow them to dry completely to prevent moisture from causing rust or corrosion.
Inspect the wheels for any signs of wear or damage. If necessary, apply a drop of silicone lubricant to the bearings to ensure smooth operation post-cleaning.
Wipe Down the Frame and Handle
Utilize a microfiber cloth dampened with a gentle cleaning solution to tackle the frame and handle. Focus on areas where fingerprints and smudges accumulate. Ensure the cloth is not soaking wet to avoid damaging any components.
Pay attention to the junctions where the handle extends, as grime often builds up there. For stubborn spots, a soft-bristled brush may help dislodge dirt. After wiping, dry the surfaces immediately with a clean cloth to prevent streaks.
For metal parts, a suitable polish can enhance shine and provide a protective layer. Regular attention to these areas not only maintains appearance but can extend the life of the equipment.
Schedule this maintenance routine frequently, especially after travel, to keep everything looking fresh and new. Store the setup in a dry place to minimize the risk of moisture damage.
Deodorize and Protect Your Luggage Trolley
To effectively eliminate odors, sprinkle baking soda generously on the surfaces and allow it to sit for several hours or overnight. This method absorbs unwanted smells efficiently. Afterward, vacuum the baking soda away to lift any lingering dirt.
Applying a fabric freshener can provide a pleasant scent. Ensure it’s suitable for the materials used in your carrier. Lightly spray and wipe with a soft cloth to distribute evenly. Avoid saturating the fabric to prevent damage.
Consider using essential oils mixed with water in a spray bottle as a natural deodorizer. A few drops of lavender or tea tree oil can add a refreshing aroma. Test it on a small area first to ensure compatibility with the fabric.
After deodorizing, apply a protective spray designed for the specific materials of your gear. This protects against stains and helps repel dirt. Follow product instructions for the best results.
For added resilience, store your equipment in a cool, dry place, avoiding high humidity areas. Consider purchasing protective covers or pouches to shield it from environmental factors.
For challenging weather conditions, investing in the best umbrella for storms can prevent moisture-related issues that might affect your gear.


