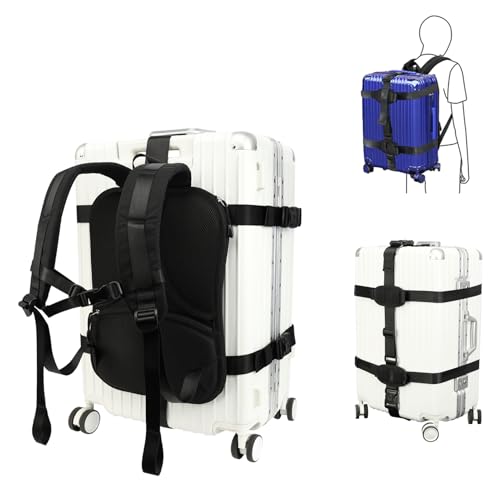


For optimal portability, attach an adjustable strap to the main compartment’s D-rings or attachment points. This simple modification turns a suitcase into a versatile carrier, enhancing ease of transport.
Choose heavy-duty webbing for durability. Cut the strap to the desired length and secure it with a reliable buckle, ensuring a snug fit. This setup allows for uniform weight distribution, reducing strain during your travels.
Upgrade functionality by adding a padded panel if comfort is a priority. This can easily be fashioned from foam and fabric, providing support for longer duration. Consider integrating compressible pockets to maximize storage space.
Test the new configuration with actual weight to ensure stability and comfort on the go. Adjustments can always be made based on personal preference, ensuring a tailored fit for any adventure.
Transforming a Travel Bag into a Backpack
Use durable straps. Detachable and adjustable options can enhance comfort and adaptability. Look for padded designs for shoulder support and to distribute weight evenly.
Steps to Achieve the Transformation
1. Secure the straps to the bag’s sides. Consider using heavy-duty sewing techniques or fabric adhesives for a reliable hold.
2. Create an attachment point at the top. This can help with even distribution when worn. Use sturdy hardware like D-rings or clips.
3. Reinforce stress points. Pay special attention to areas where the straps connect, ensuring they can withstand the load during travel.
Recommended Accessories
| Accessory | Purpose |
|---|---|
| Compression Straps | Reduce bulk and secure contents |
| Chest Strap | Improves stability and comfort |
| Waist Belt | Shifts weight to hips for easier carrying |
Test the setup before travel. Ensure the fit is comfortable and the adjustments hold firm. Make modifications as needed for personal comfort and weight distribution.
Choosing the Right Materials for Conversion
Select durable fabrics that withstand wear and tear. Options like ripstop nylon or polyester provide excellent strength while being lightweight.
Consider foam padding for comfort. This can be added to shoulder straps and back panels to enhance usability during transport.
- Webbing: High-strength webbing is essential for straps and loops. Look for materials that can handle significant weight.
- Fasteners: Use quality buckles and clips that ensure reliability. Adjustable options are ideal for creating a custom fit.
- Zippers: Choose heavy-duty zippers that are smooth-running and resistant to snagging. Waterproof zippers can offer added protection.
To maintain the structure, a sturdy frame may be necessary. Lightweight aluminum or plastic supports can be integrated without adding excessive weight.
Incorporating reflective materials increases visibility during low-light conditions, enhancing safety during evening outings.
Lastly, for a more eco-friendly option, consider recycled materials without compromising on strength. Look for brands that prioritize sustainability.
For additional insights on selecting equipment, check out this guide on best cylinder mower striped lawns.
Step-by-Step Guide to Detach Luggage Loops
Begin with identifying the seams where the handles are attached. This is typically where you’ll want to apply pressure for removal. Use a seam ripper to carefully cut the threads, ensuring not to damage the fabric surrounding the handles.
Once detached, examine the area for any remaining thread. Remove any excess threads using scissors for a cleaner finish.
If necessary, apply a fabric adhesive or patch to reinforce the area where the handle was removed. This adds durability and prevents fraying.
For a polished look, consider sewing a decorative patch or fabric over the exposed area, blending the colors to match the overall design.
Before finalizing, test the resistance of the new attachment points to ensure they can bear weight. Check for secure attachment and comfort during use.
Attaching Straps to Create Backpack Functionality
Select high-quality webbing straps, ideally around 1-2 inches in width, for optimal support. Choose adjustable options to allow for a customized fit. Incorporating padded shoulder straps guarantees comfort, reducing strain on the shoulders during use.
Utilize strong, reliable connectors, such as D-rings or clips, to ensure secure attachment points. Position these connectors at key areas where weight distribution is optimal, minimizing pressure points.
Consider using a Y-shaped harness that routes straps across the chest for added stability. This design prevents slipping and enhances the overall balance of the load carried.
When securing the straps, employ a sewing machine to reinforce stress points. Double stitching will add durability, ensuring the transformation withstands regular use.
For additional functionality, integrate side pockets using fabric similar to that of the base unit. This provides extra storage options and enhances usability on the go.
Before finalizing the assembly, test the setup by adding weight to assess comfort and functionality. Make subsequent adjustments as needed to perfect the configuration.
Adjusting for Comfort and Fit
Make adjustments to ensure the shoulder straps are properly positioned. They should rest comfortably on the shoulders without digging in. Use a measuring tape to determine the ideal strap length based on the user’s height and personal comfort preferences.
Strap Placement and Padding
Consider adding extra padding to the straps for enhanced comfort. Foam or gel padding can drastically reduce pressure points. Ensure that the straps are wide enough to distribute weight evenly, which minimizes strain during prolonged use.
Weight Distribution and Adjustability
Check the attachment points for balance. A well-balanced carrying system prevents fatigue and enables easier maneuvering. Test various positions and adjustments while loaded to find the most comfortable fit. Ideally, weight should rest close to the back for stability.
Testing Your New Backpack for Durability
Conduct thorough stress tests to assess the strength of your newly crafted carry solution. Begin by filling it with weight; simulate typical loads you’ll carry. Aim for 10%-15% of your body weight to evaluate performance under realistic conditions.
Load Stability and Comfort
While wearing the pack, walk, jog, and perform various movements to check its stability and comfort level. Observe if the straps distribute the weight evenly across your shoulders and hips. If anything feels off, adjustments may be necessary.
Weather Resistance Evaluation
Expose your gear to different weather conditions. Light splashes or short rain showers should be tested to determine if water-resistant features hold. Consider adding additional protective layers or coatings if needed. Also, check seams for potential weak spots. For outdoor activities, you might want to explore options like the best camera waist pack for hiking to enhance your experience.