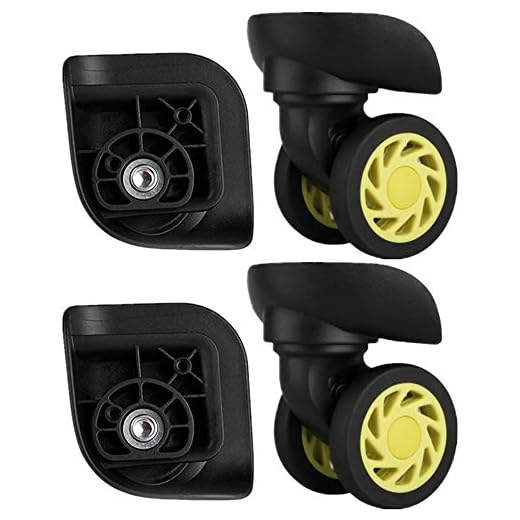


For immediate improvement, consider purchasing a compatible set of replacement rollers from a reliable manufacturer. Make sure to measure the current components accurately to ensure a proper fit. Utilizing the correct size prevents complications during installation and enhances durability.
Disassembling the current setup involves removing screws or clips that hold the existing rollers in place. Use a screwdriver or pliers to handle stubborn parts gently. Take special care to not damage the surrounding material while removing them.
Once the old parts are detached, align the new ones carefully and secure them using the original or new fasteners as required. It’s advisable to test the smoothness of movement after installation before your next trip to guarantee everything is functioning correctly.
Replacing Wheels on Kipling Bags
Begin with identifying the specific model; some designs may require unique fittings. Prepare necessary tools: a screwdriver, replacement casters, and possibly pliers for removing old hardware.
First, access the wheel area by turning the bag upside down. Most models will have screws or a cover that must be removed. Once exposed, unscrew the old casters, noting their orientation for accurate installation of the new components.
Position the replacement casters in line with the original holes. Ensure they fit securely and rotate freely before securing them with screws. Tighten gently to avoid stripping the screws, which could compromise stability.
If the wheel assembly is damaged beyond simple replacement, consider a complete assembly kit. Some retailers offer specialized kits that match various styles, ensuring a seamless compatibility.
After installation, conduct a performance check by rolling the bag over different surfaces. This ensures proper function and stability during use. If any resistance occurs, double-check the screw fittings and wheel alignment.
For ongoing maintenance, periodically inspect the wheels for debris and remove any buildup that could impede mobility. Lubrication may be necessary if wheels begin to squeak or slow down over time.
Identifying the Right Replacement Wheels for Your Kipling Luggage
Begin by measuring the diameter and width of your existing rollers. This ensures that new parts will fit correctly. Standard sizes for most bags range from 50mm to 100mm in diameter.
Examine the attachment mechanism. Some casters utilize screws or bolts, while others may be riveted or glued. Knowing how the old pieces are secured helps in selecting compatible options.
Check the material composition of the original casters. Common types include hard plastic, rubber, or a combination of both, impacting durability and noise levels on different surfaces.
Consider the rolling mechanism; look for ball-bearing systems that provide smoother mobility. Reviewing customer feedback on performance for different brands can guide you toward durable choices.
For quality alternatives, explore options from trusted manufacturers. Products like the best luggage brand tumi offer high-level craftsmanship and reliability.
Finally, confirm the weight capacity for each option, as overload can lead to premature wear. Selecting parts suited to your specific travel needs enhances durability and function.
For added convenience during your trips, you might also explore the best travel backpack that fits under airplane seat, ensuring all travel gear is optimized for comfort and accessibility.
Tools Needed for Wheel Replacement
Gather the following items to ensure a successful task:
- Replacement Wheels: Ensure compatibility with your item.
- Screwdriver: A Phillips or flat-head, depending on the fixture.
- Pliers: Useful for gripping and twisting stubborn parts.
- Utility Knife: For cutting through any adhesive or fabric around the wheel area.
- Socket Wrench: Necessary for loosening any nuts or bolts if applicable.
- Measuring Tape: To confirm the specifications of the new components.
Having these tools ready will streamline the process significantly.
Step-by-Step Instructions for Removing Old Wheels
To successfully detach the existing casters from your bag, follow these steps:
| Step | Instructions |
|---|---|
| 1 | Flip the bag upside down on a clean, flat surface to access the base. |
| 2 | Examine the wheels to identify how they are secured (screwed, riveted, or snapped in place). |
| 3 | If screws are present, use a screwdriver to unscrew them. Keep these screws safe for reinstallation with new casters. |
| 4 | For riveted wheels, use a drill to carefully remove the rivets. Ensure not to damage the surrounding area. |
| 5 | If the wheels are snapped in, locate the release mechanisms and press or pull them to detach the casters. |
| 6 | Once detached, inspect the area for any debris or leftover parts and clean it before installing the new components. |
This method ensures a smooth transition for your casters, allowing for seamless replacement with new ones tailored for your item.
Installing New Wheels on Your Kipling Luggage
Begin by aligning the new components with the existing mount points on the case. Ensure that the holes match up precisely; this guarantees a secure fit. Insert the screws through the wheel assembly into the relevant holes, applying firm but gentle pressure. Use a suitable screwdriver to tighten each screw until snug, taking care not to overtighten, as this might damage the assembly.
Final Adjustments
After securing the new assemblies, gently test each wheel by rolling the bag to ensure smooth movement. Make any necessary adjustments to align the wheels properly. If there’s any wobbling, recheck the screws for proper tightness. A quick inspection can prevent potential issues later on.
Maintenance Tips
Periodically check the tightness of the wheel screws to maintain stability. Clean the wheel areas regularly to avoid buildup that may hinder performance. For additional care, consider applying a small amount of lubricant to the axles to ensure optimal functionality. If you’re also considering improvements in your freezer choices, are samsung american style fridge freezer any good might provide great insights.
Testing the New Wheels for Smooth Operation
Prior to taking your travel gear out on the road, ensure adequate functionality of the new components. Begin by rolling the suitcase on various surfaces to evaluate performance. Check for any unusual noises or resistance while moving. Smooth, quiet movement indicates proper installation.
Test the ability to maneuver around corners and through tight spaces. Lift and drop the bag from a low height to see if the wheels handle shocks and impacts effectively. Observe how well they return to their original position after being lifted.
Assess the stability of the bag during movement. It should remain upright without tipping over. If available, try it out on multiple terrains–smooth floors, gravel, and carpet–to confirm versatility and reliability under different conditions.
Lastly, consider a weight test by loading the bag to its typical travel weight. This simulates actual use and ensures that the new components can handle the expected load without compromising functionality.
Maintenance Tips for Prolonging the Life of Your Kipling Luggage Wheels
Regular cleaning is essential. Remove debris and dirt after each trip. A damp cloth with mild soap should suffice.
Inspect and Lubricate
Periodically check for wear. Apply lubricant to the axle to ensure smooth movement, using silicone spray or a similar product.
Proper Storage
Store your travel gear in a cool, dry place. Avoid stacking heavy items on top, which can deform the components.
- Avoid rolling over rough surfaces to minimize wear.
- Check screws and fasteners regularly; tighten if necessary.
- Consider using a protective cover during transport.
Following these practices will help maintain functionality and longevity of your travel gear’s rolling mechanisms.


