To repurpose a handbag into a crossbody that blends functionality and style, begin by detaching the existing straps. If your handbag doesn’t have a long enough strap for a crossbody style, consider adding a durable and adjustable strap that complements the color and material of the original piece.
Next, reinforce the attachment points of the strap. Sew heavy-duty D-rings or clips onto the sides of the handbag for a secure hold. This modification ensures that the bag hangs comfortably across the body. Choose threads that match the fabric to maintain a cohesive look.
For added convenience, add a flap or zipper to provide easy access to the interior while keeping belongings secure. If the handbag features pockets, reposition them to the outside for additional storage and aesthetics. This approach not only revamps the design but also enhances practicality.
Finally, personalize the accessory with decorative elements. Adding patches, embroidery, or unique charms can elevate the overall appearance. This transformation results in a versatile and fashionable accessory suitable for various occasions.
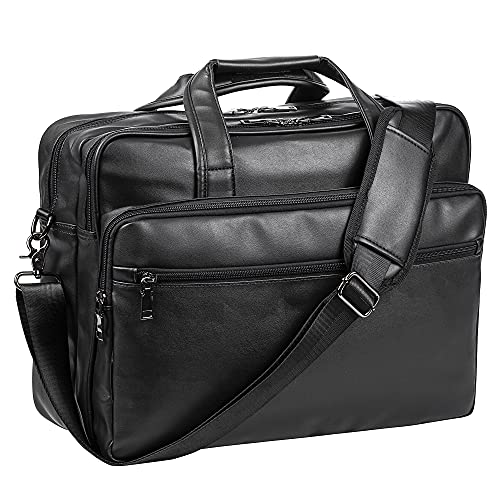
Choosing the Right Purse for Transformation
Opt for a design with a structured shape, such as a tote or a satchel, which can easily adapt to new forms. Ensure the material is durable–canvas, leather, or high-quality synthetic fabrics offer longevity. An adjustable strap can enhance versatility; consider options that allow for different lengths and styles.
Pay attention to the purse’s closures. Zippers provide security, while magnetic snaps facilitate easy access. Look for interior pockets that can be repurposed for organization, aiding functionality in the new format.
Colors and patterns should align with your desired outcome; classic shades allow for broader versatility, while bold prints can make a statement. Assess the overall weight, ensuring comfort when worn, as transitions should prioritize practicality.
Evaluate additional embellishments like hardware or decorative elements; these can either complement or complicate the transformation process. A minimalist design often yields better results when reimagining the item.
Before committing to a particular piece, visualize the intended outcome. Sketch ideas or create a mood board to establish clarity in the transformation process, guiding each step along the way.
Necessary Tools and Materials for the Project
Gather the following supplies to successfully transform your chosen accessory: a sharp fabric scissors, a strong needle, and durable thread suitable for your chosen material (nylon or leather). A sewing machine can expedite the process but isn’t mandatory.
For the strap, select robust webbing or leather, depending on the desired aesthetic and strength. Additionally, D-rings or hooks will facilitate the attachment of the strap. Don’t overlook the importance of a measuring tape or ruler to ensure precise dimensions during your creation.

It’s advisable to stock up on fabric markers for marking stitches and cuts without damaging the original piece. A heavy-duty fabric adhesive can serve as a backup if stitching isn’t feasible for certain areas.
To protect your work surface and keep everything organized, a cutting mat will be valuable. Pins or clips will help hold pieces together while assembling.
Finally, consider incorporating unique embellishments like patches or studs to enhance the final appearance. Each item adds character to the final product.
For an engaging perspective on materials, one can explore the intricacies of biology, such as which organelle is responsible for protein synthesis.
Step-by-Step Instructions for Conversion
1. Prepare the Base
Inspect the selected accessory for any wear or damage. Clean it thoroughly and remove unnecessary elements like embellishments or unused straps. This base will serve as the core for your new design.
2. Modify the Structure
Assess the desired dimensions. Using fabric scissors, trim the sides if necessary to achieve a rectangular shape. Ensure edges are even for a polished finish. Consider reinforcing the base by adding interfacing for sturdiness.
3. Create a Flap
Cut a piece of fabric from the original item or choose a complementary material. The flap should extend wider than the opening for adequate coverage. Attach it with fabric adhesive or sew securely along the top edge.
4. Adjust the Strap
If the current strap is too short, extend it by adding a piece of webbing or fabric. Secure connections with heavy-duty thread or rivets for durability. Adjust length for comfort during use.
5. Finishing Touches
Add pockets or other organizational elements as needed. Use fabric glue or stitching to attach additional compartments inside or outside, depending on preference. Check all edges and seams for any loose threads or gaps.
6. Final Assembly
Once all parts are ready, assemble the sections. Make final adjustments to ensure functionality and aesthetic appeal. Test the closure and strap for ease of use before completing the transformation.
Tips for Adding Functional Features
Integrate adjustable straps to enhance versatility. Use sturdy webbing or leather for a durable, comfortable fit. Consider including a crossbody option to distribute weight evenly.
Creating Additional Compartments
- Implement interior pockets for easy organization. Small zippered sections can hold essentials securely.
- Attach exterior pockets for quick access to frequently used items. Magnetic closures or snaps can provide convenience.
- Incorporate a dedicated area for tech items, ensuring cushioning for devices like tablets or laptops.
Incorporating Weather Resistance
- Consider applying a water-resistant coating or using a synthetic material to protect contents.
- For additional protection, add a removable rain cover that can be stored within the design.
- Reinforce seams to prevent moisture from penetrating vulnerable areas.
To maintain the condition of the original materials, consult resources like the best way to clean outside porch umbrella for cleaning tips that can be adapted for your fabric choices.
When considering travel, ensure the modified item meets specific needs. For family excursions, look into options similar to the best luggage when traveling with kids for added functionality.