


For achieving striking imagery of garments, utilizing three light sources positioned at strategic angles can make a significant difference. This article provides a detailed guide on how to effectively illuminate apparel using three separate lighting units, ensuring even distribution of light and minimizing shadows.
This guide is ideal for photographers, online sellers, or fashion enthusiasts looking to enhance their visual presentations. By following the outlined techniques, you can elevate the quality of your images, making them more appealing to viewers and potential buyers.

We will cover the optimal placement of each light, recommended settings for your camera, and tips for adjusting the intensity to highlight textures and colors accurately. Additionally, we will discuss common pitfalls to avoid, enabling you to create professional-level images that stand out.
Best Way to Photograph Clothing with 3 Umbrella Lights
Position the three light sources strategically to create an even distribution of illumination. Place one light at a 45-degree angle to the left, another at the same angle to the right, and the third directly in front of the subject. This setup minimizes shadows and highlights the texture of the fabric effectively.
Adjust the power of each light according to the effect desired. For a softer look, use diffusers on the umbrellas to spread the light. Balance the intensity of the front light with the side lights to avoid overexposure and maintain detail in the garment.
Key Techniques
Consider the following techniques to enhance your results:
- Background Choice: Use a neutral or contrasting backdrop to make the clothing stand out.
- Camera Settings: Set a low ISO to reduce noise and ensure sharp images. A wider aperture can create a pleasing depth of field.
- Angles: Capture the clothing from multiple angles to showcase its design and fit.
Experiment with the distance of the lights from the subject to find the sweet spot where the garment looks its best. Adjust the height of the lights to avoid reflections and unwanted glare on shiny fabrics.
Take multiple shots and review them on a larger screen to assess how well the lighting interacts with different textures. Post-processing can further enhance the colors and details captured during the shoot.
Choosing the Right Umbrella Lights for Clothing Photography
Selecting appropriate lighting sources is fundamental for achieving desirable results in the portrayal of garments. The characteristics of the light can significantly impact the overall appearance of the material, colors, and textures. Focus on lights that offer diffused illumination, as this helps to minimize harsh shadows and highlights, ensuring a more even distribution of brightness across the subject.
Consider the size of the umbrellas. Larger umbrellas tend to create softer light, which is ideal for capturing delicate fabrics. Conversely, smaller umbrellas may produce more concentrated beams, suitable for highlighting specific details. Experimenting with different sizes can help determine what works best for the type of clothing being photographed.
Key Features to Evaluate
When assessing lighting options, keep these features in mind:
- Light Output: Look for adjustable power settings to control the intensity of the illumination.
- Color Temperature: Consistent color temperature ensures that the colors of the garments appear accurately without unwanted color casts.
- Portability: If mobility is important, choose lightweight and compact options that are easy to set up and transport.
- Durability: Opt for sturdy materials to withstand frequent use during shoots.
Additionally, consider using a combination of different lighting techniques. Experimenting with backlighting or side lighting can add depth and dimension to the images, enhancing the visual appeal of the clothing. Adjusting the angle and distance of the lights can also yield various effects, so be prepared to test multiple configurations to find the most flattering setup.
In conclusion, the right illumination can transform garment photography. By carefully selecting lighting sources based on size, output, and other features, one can achieve remarkable results that showcase clothing in the best possible light.
Setting Up Your Lighting Environment for Optimal Results
Position three light sources strategically around the subject to achieve even illumination. Place one light at a 45-degree angle to the front-left, another at a similar angle on the right side, and the third directly overhead. This arrangement minimizes shadows and highlights details effectively.
Adjust the intensity of each light to create a balanced exposure. Use a light meter or the camera’s histogram to assess the lighting. Ensure that no single source overpowers the others, allowing textures and colors to remain true to life.
Considerations for Placement
- Distance: Maintain equal distance from the subject to avoid uneven lighting.
- Height: Ensure that the overhead light is slightly angled downwards to reduce glare.
- Softening: Utilize diffusers to soften the output, minimizing harsh reflections on fabric.
Background and Environment
Select a neutral backdrop that complements the items being showcased. Avoid busy patterns or colors that may distract from the main focus. The background should enhance the overall composition without overwhelming the subject.
- Test different backgrounds to find one that works best with the items.
- Consider using a seamless paper roll for a clean look.
Final Adjustments
Before capturing images, take test shots to evaluate how the light interacts with the items. Make necessary adjustments to angles and intensities based on the results. Pay attention to reflections and adjust accordingly to achieve the desired appearance.
Positioning and Angling Umbrella Lights for Even Illumination
To achieve balanced lighting in your setup, arrange three softboxes strategically around the subject. Place two of them at 45-degree angles on either side of the item, ensuring they are at the same height as the clothing. This positioning helps to eliminate harsh shadows and creates a flattering glow.
The third softbox should be positioned directly above or slightly in front of the subject. This overhead light serves to fill in any remaining shadows and adds depth to the overall appearance. Adjust the angle of each source to ensure the light is directed toward the center of the clothing.
Adjusting Distance and Angle
Experiment with the distance of each light from the subject. If the illumination appears too harsh, move the lights further away. Conversely, if the lighting is too soft or lacks definition, bring them closer. Use a light meter or your camera’s histogram to assess the exposure accurately.
For optimal results, consider the following:
- Softening the Light: Utilize diffusion materials if shadows remain too pronounced.
- Creating a Catchlight: Ensure at least one light reflects off the fabric, enhancing texture.
- Balancing Color Temperature: Check that all sources emit a consistent color temperature to avoid unwanted color casts.
Regularly review the outcomes and adjust the angles as needed to ensure every detail of the fabric is captured effectively. This method will result in clear, well-illuminated images that showcase the clothing beautifully.
Post-Processing Tips for Enhancing Clothing Images
Adjusting exposure levels is critical. Use software to fine-tune brightness and contrast, ensuring that the details and textures of the fabric are visible. This adjustment can highlight the quality of the material and the intricacies of the design.
Color correction plays a significant role in making the images more appealing. Utilize tools for saturation and hue adjustments to achieve accurate colors that reflect the true essence of the garments. Be cautious not to oversaturate, as this can misrepresent the actual product.
Additional Techniques to Consider
- Retouching: Remove any imperfections or distractions in the background. This will keep the focus on the apparel itself.
- Sharpness: Increase the sharpness to enhance the clarity of the details. This is particularly important for intricate patterns or textures.
- Background Blur: Applying a subtle blur effect to the background can help the subject stand out more prominently.
- Cropping: Utilize cropping to frame the garment properly. This can help eliminate unnecessary space and guide the viewer’s attention to the item.
Incorporating these techniques will elevate the overall quality of your images, making them more appealing to potential buyers. Fine-tuning each aspect during post-processing ensures that the final result accurately represents the product while attracting attention.
Best way to photo clothing with 3 umbrella lights
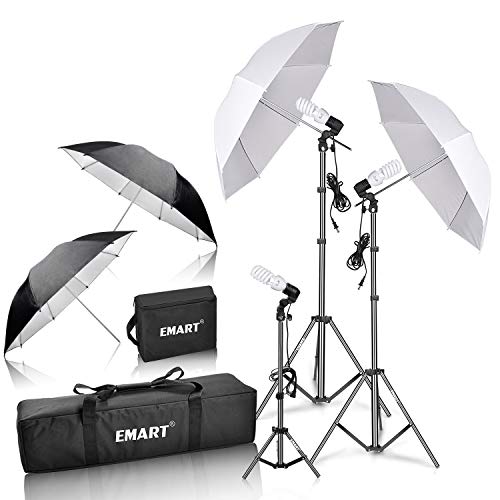
Complete Umbrella Photography Lighting Kit
Features
| Part Number | EM-ULK45 |
| Model | EM-ULK45 |
| Warranty | NO |
| Size | Umbrella Photography Kit |
Photography Umbrella Lighting System Pack
Features
| Part Number | EM-2ULK |
| Model | EM-2ULK |
| Warranty | 1 |
| Color | Color Temperature: 5500K |
| Size | 2 Pack |
Andoer Professional Softbox Lighting Kit
Features
| Part Number | SI-D9765 |
| Warranty | 1 |
| Color | 3 PCS |
| Size | 85W 3 SETS |
Coffee and Editing V-Neck T-Shirt
Features
| Color | Black |
| Size | Small |
Torjim Professional Softbox Lighting Kit
Features
| Part Number | TBC001 |
| Model | TBC001 |
| Warranty | 1 |
| Color | Premium Set |
| Release Date | 2023-10-08T00:00:01Z |
Video:
FAQ:
What are the benefits of using three umbrella lights for clothing photography?
Using three umbrella lights for clothing photography offers several advantages. Firstly, they provide even lighting, which helps reduce harsh shadows and highlights, making the clothing appear more flattering. Secondly, the umbrellas diffuse the light, creating a soft and natural look that enhances the texture and color of the fabrics. This setup also allows for flexibility in positioning the lights, enabling photographers to experiment with different angles and distances to achieve the desired effect. Lastly, having multiple lights can help illuminate the entire outfit, ensuring that every detail is captured clearly.
How should I position the umbrella lights for optimal results?
To achieve the best results with three umbrella lights, consider this common setup: place one umbrella light at a 45-degree angle to the left of the clothing, pointing downwards, to act as the key light. This light will provide the primary illumination and define the shadows. Next, position a second umbrella light at a similar angle on the right side to serve as a fill light, balancing the shadows created by the key light. For the third light, place it behind the clothing to create a backlight effect; this will add depth and separation from the background, highlighting the edges of the garment. Adjust the intensity of each light as needed to avoid overexposure.
What settings should I use on my camera when photographing clothing with umbrella lights?
When photographing clothing with umbrella lights, start by setting your camera to manual mode for greater control. A good starting point for aperture is f/8, which provides a good depth of field while ensuring sharp focus on the clothing. Adjust your ISO to around 100 or 200 to minimize noise, especially with studio lighting. The shutter speed should be set to at least 1/125 seconds to prevent motion blur. However, you may need to adjust based on the power of your lights and the ambient light in the room. It’s also advisable to shoot in RAW format, as this allows for more flexibility during post-processing.
How do I avoid reflections and glare when using umbrella lights?
Avoiding reflections and glare when using umbrella lights requires careful positioning and adjustments. First, ensure that the lights are positioned at an angle that minimizes direct reflections on the clothing. Adjusting the distance between the umbrella lights and the garment can also help; the further away the light source, the softer the light and the less chance for glare. Additionally, consider using a matte fabric or clothing that has less sheen, as shiny materials are more prone to reflecting light. Lastly, if reflections persist, you can use polarizing filters on your camera lens to reduce glare and enhance the overall image quality.