
If you want to secure your sunshade firmly in place, the right installation tools make all the difference. This article focuses on the most reliable tools for anchoring your sun protection to the sand, ensuring stability against wind and providing a comfortable space for relaxation. You’ll learn about the top options available on the market, their features, and how to choose the best one for your needs.
This guide is beneficial for beachgoers, outdoor enthusiasts, or anyone looking to enjoy a day under the sun with minimal hassle. Whether you’re setting up at the shore, a park, or a backyard, the right tools will enhance your experience and keep your shade secure.
We’ll explore various designs, materials, and brands that excel in durability and ease of use. Comparing these options, you’ll find recommendations based on customer reviews, expert opinions, and practical testing. By the end of this article, you’ll be equipped with the knowledge to make an informed decision for your next outing.
Best Beach Umbrella Drill Bit and Auger
Choosing the right tool for securing a sunshade can significantly enhance your outdoor experience. A specialized tool designed for this purpose allows for quick installation, ensuring stability even in windy conditions.
When selecting a drill attachment for your sunshade, consider the material and size of the pole. A robust design is key to preventing bending or breaking during use. Look for features that facilitate easy removal and reinstallation, as this will simplify the process of setting up your shade.
Key Features to Consider
- Durability: Opt for high-quality materials that resist wear over time.
- Compatibility: Ensure the tool fits various pole sizes for versatility.
- Ease of Use: A user-friendly design will streamline the setup process.
- Portability: Lightweight options can be easily transported to different locations.
Additionally, a well-crafted auger can make the installation process smoother. It effectively drills into various soil types, providing a secure base for your shade structure. A spiral design can enhance grip and stability, preventing the unit from shifting during use.
Investing in quality tools designed specifically for securing outdoor canopies ensures a comfortable environment during sunny days. By prioritizing durability and ease of use, you can enjoy your time outdoors without worrying about your setup.
Choosing the Right Drill Bit for Beach Umbrellas
Selecting the appropriate tool for securing shade structures involves understanding specific features that enhance performance. The ideal drill attachment should provide robust support while accommodating various soil conditions found at coastal locations.
Focus on the drill bit’s material and design. High-quality steel options demonstrate durability and resistance to wear, while twisted or auger designs facilitate easier penetration into sandy or loose soil. These characteristics ensure a secure fit, preventing unwanted movement when exposed to wind.
Factors to Consider
- Length: Choose a length that matches the expected depth for optimal stability. Longer bits may be necessary for loose sand.
- Diameter: A wider diameter allows for a more substantial grip, enhancing resistance against tipping.
- Threading: Look for spiral threading, which aids in easier removal of the bit from the ground.
Compatibility with your power tool is another critical aspect. Ensure the drill bit fits securely in your drill’s chuck to avoid slippage during operation. Additionally, consider the weight of the bit; lighter options facilitate easier handling, especially in challenging terrain.
Finally, assess the ease of cleaning and maintenance. A bit that can be easily rinsed off after use will prolong its life and maintain its performance for future outings.
Auger Options for Securing Shade Structures
Choosing the right tool for stabilizing your shade setup can significantly enhance your outdoor experience. Strong and durable anchors are necessary to withstand wind and prevent tipping. A quality stabilizer should be easy to use and portable for convenience.
When selecting a stabilizing device, consider factors like material strength, ease of installation, and portability. Many options feature a spiral design that allows for easy insertion into sandy or loose soil, providing reliable support for your shade structure.
Key Features to Consider
- Material Quality: Look for options made from rust-resistant metal or high-grade plastic that can endure harsh weather conditions.
- Installation Method: Devices with a spiral or corkscrew design allow for straightforward installation without any additional tools.
- Size and Weight: Lightweight options are more portable, while larger sizes offer more stability. Assess your needs based on how often you plan to move your setup.
- Compatibility: Ensure that the chosen device fits well with your shade structure, including pole diameter and design.
Some advanced options may include built-in mechanisms for quick release, enhancing user experience. Look for features that allow for easy removal without requiring excessive force.
In summary, investing in a robust stabilizing device tailored to your specific needs will provide peace of mind during your outdoor activities. Prioritize quality and convenience to ensure a stable and enjoyable experience.
Step-by-Step Guide to Installing a Shade Canopy
For optimal protection from sun exposure, the correct installation of a shade canopy is key. Begin by selecting a suitable location with soft sand or soil to ensure stability and easy anchoring.
Gather necessary tools: a sturdy pole, a heavy-duty anchor, a hand auger, or a specialized drilling tool. These will aid in securely positioning your shade structure.
Installation Process
- Prepare the Site: Clear the area of debris and any potential obstacles. Ensure that the surrounding space allows for the full extension of the shade structure.
- Choose the Right Angle: Position the pole at an angle that maximizes shade coverage during peak sunlight hours. Typically, a tilt towards the sun will provide better coverage.
- Drill the Anchor Hole: Use the auger or drilling tool to create a hole. The depth should be at least one-third of the pole’s length to ensure stability.
- Insert the Pole: Place the pole into the drilled hole. Make sure it is straight and secure.
- Firm the Ground: Backfill the hole with sand or soil. Compact it around the base to reinforce stability.
- Attach the Canopy: Securely fasten the shade fabric to the pole, ensuring it is taut to avoid sagging.
Following these steps will help ensure your shade canopy remains stable and effective throughout your time outdoors, providing the necessary protection from the sun’s rays.
Maintenance Tips for Your Shade Setup
Regular cleaning is essential to prolong the lifespan of your sunshade. Use mild soap and water to remove dirt and salt buildup after each outing. Rinse thoroughly and allow it to dry completely before storing.
Inspect the structural components for damage after each use. Check for rust on metal parts and fraying on fabric. Address any issues promptly to prevent further deterioration.
Storage Recommendations
Store your equipment in a cool, dry location away from direct sunlight. Use a protective cover to shield it from dust and moisture. Avoid placing heavy items on top of it, as this can cause deformation.
- Disassemble the frame if possible to save space.
- Keep anchoring devices in a separate bag to prevent loss.
- Ensure the fabric is completely dry before storage to prevent mold growth.
By following these guidelines, you can maintain your shade system effectively and ensure durability for many outings to come.
Best beach umbrella sdrill bit and auger

5-Piece Auger Drill Bit Set for Planting
Features
| Part Number | SO-620002 |
| Size | 1.6"x9+1.6"x16.5"+4"x12"+3.5"x16"+2"x32" |

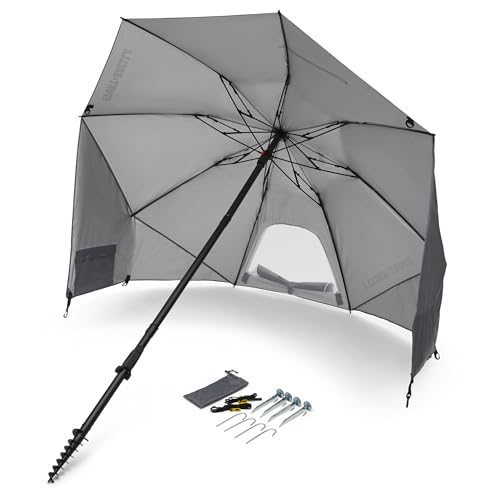
UPF 50+ Sun Protection Umbrella for Outdoors
Features
| Warranty | 1 Year Manufacturer |
| Color | Gray |
| Size | 65" x 49" x 50" |

12-Pack Heavy-Duty Beach Umbrella Anchors
Features
| Part Number | RRY-Briwooody-1585 |
| Model | RRY-Briwooody-1585 |
| Color | white |

6" x 31" Heavy-Duty Auger Drill Bit
Features
| Part Number | JC-150mm-drillbit |
| Model | JC-150mm-drillbit |
| Warranty | 0.5 |
| Size | 6" × 31" |
Video:
FAQ:
What features should I look for in a beach umbrella drill bit?
When choosing a drill bit for installing a beach umbrella, consider the following features: material quality, size, and design. A high-quality steel bit is durable and can withstand tough soil conditions. Look for a bit that is the right size for the umbrella pole, typically around 1-2 inches in diameter. Additionally, a bit with a pointed tip can help penetrate the ground more easily. Ergonomic designs or those with a handle can also provide better grip and ease of use.
How does an auger differ from a standard drill bit for beach umbrellas?
An auger is specifically designed to create deep, narrow holes in the ground, making it ideal for securing beach umbrellas. Unlike standard drill bits, which may be flat or straight, augers have a spiral shape that allows them to remove soil as they drill. This feature helps in creating a more stable foundation for the umbrella. Additionally, augers often have larger diameters than standard drill bits, accommodating thicker umbrella poles.
Can you recommend some brands of beach umbrella drill bits or augers?
Several brands are known for producing reliable beach umbrella drill bits and augers. For drill bits, you might consider brands like DEWALT or Bosch, which are well-regarded for their durability and performance. For augers, companies such as Fiskars and XtremepowerUS offer models specifically designed for beach use, ensuring stability and ease of installation. Always check reviews and specifications to find the best fit for your needs.
What are some tips for using a drill bit or auger effectively at the beach?
To use a drill bit or auger effectively at the beach, first, choose a location that is free from debris and rocks. Wet sand is easier to work with than dry sand, so consider digging during cooler parts of the day when the sand is more compact. Make sure to keep the drill steady and apply even pressure. If using an auger, rotating it in a clockwise direction helps in removing soil efficiently. Lastly, ensure that the umbrella is securely fastened in the hole to prevent it from tipping over in the wind.